> ## Documentation Index
> Fetch the complete documentation index at: https://docai.inclusioncloud.com/llms.txt
> Use this file to discover all available pages before exploring further.
# Set Up SAP Build Process Automation in Your BTP Subaccount
> Configure SAP Build Process Automation: add entitlements, create service instances, assign role collections, install the agent, and enable Generative AI.
This guide walks you through the end-to-end setup of SAP Build Process Automation in an SAP Business Technology Platform (SAP BTP) environment. It is intended for **SAP BTP administrators** who need to configure entitlements, provision service instances, assign user roles, and prepare the environment for process automation projects. You will complete the following:
1. Add SAP Build Process Automation entitlements to your subaccount
2. Create a service instance and application subscription
3. Verify entitlements, instances, and subscriptions
4. Assign role collections to a business user
5. Install the automation agent
6. Activate Generative AI capabilities
**Prerequisites:**
* Administrator access to an SAP BTP global account and subaccount
* A Cloud Foundry environment with a **Dev** space already created
* A business user account to assign role collections to
***
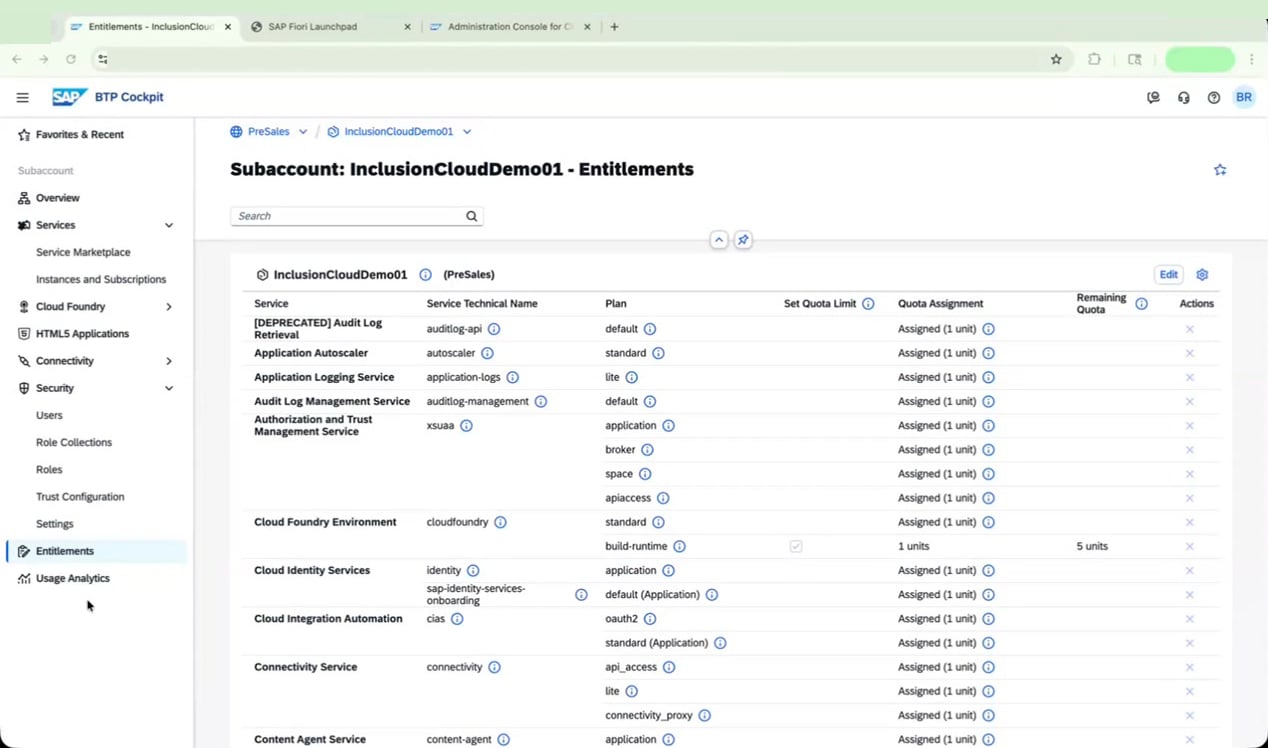
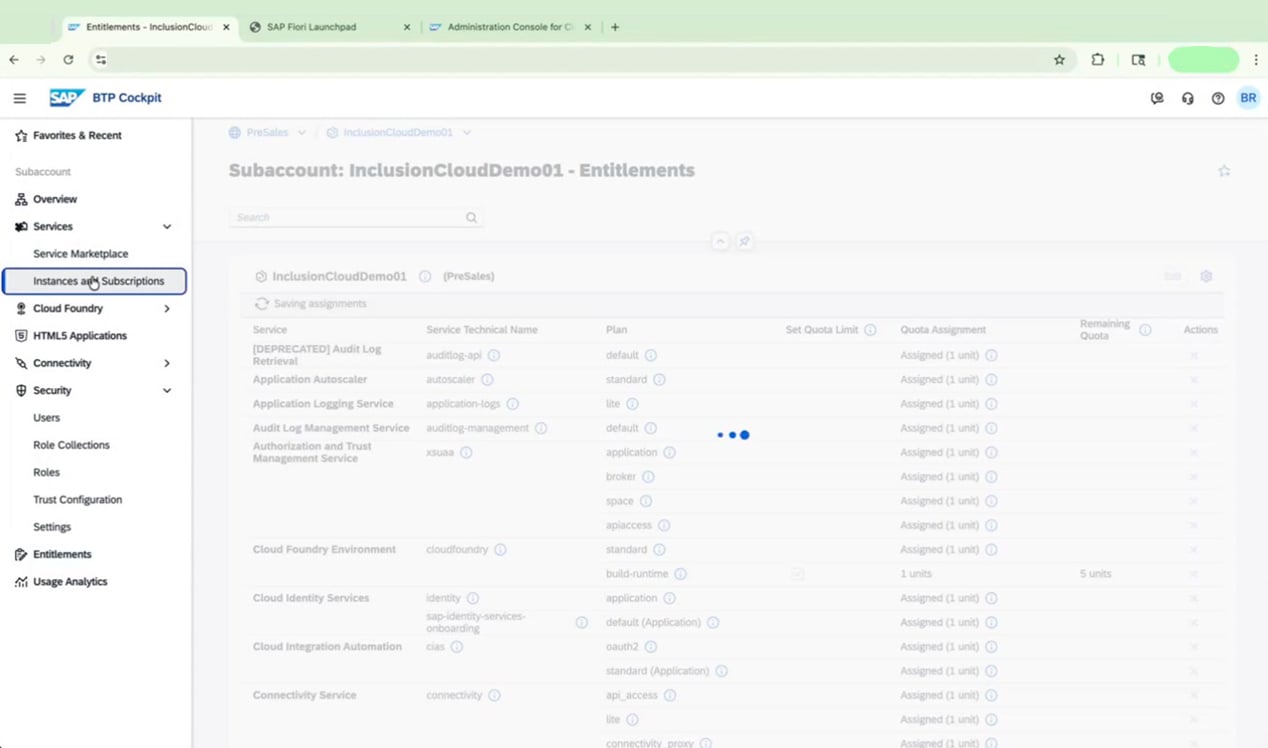
## Procedure 1: Add Entitlements for SAP Build Process Automation
Before you can use SAP Build Process Automation, add the required service plans as entitlements to your subaccount.
Open the SAP BTP Cockpit and select your subaccount (for example, **InclusionCloudDemo01**). In the left sidebar, click **Entitlements**.
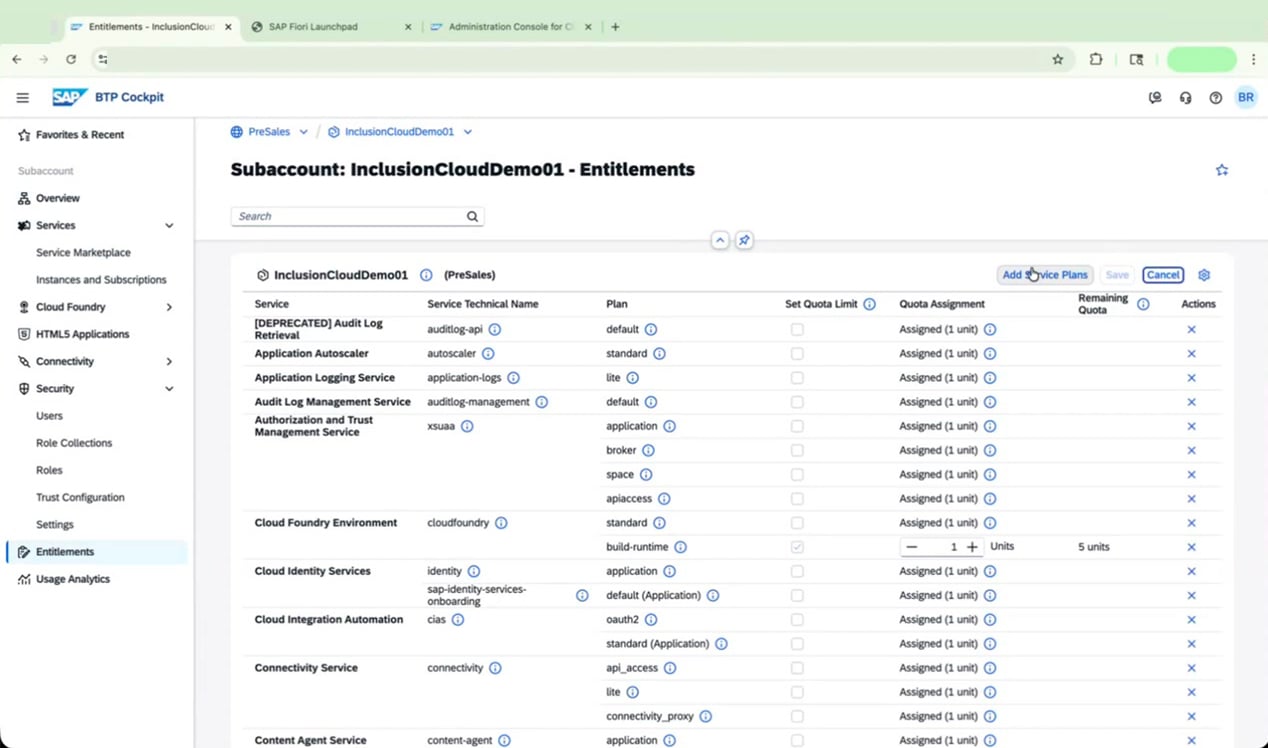
 Click **Edit**, then click **Add Service Plans**.
 In the **Add Service Plans** dialog, type **process auto** in the search bar and select **SAP Build Process Automation** from the results.
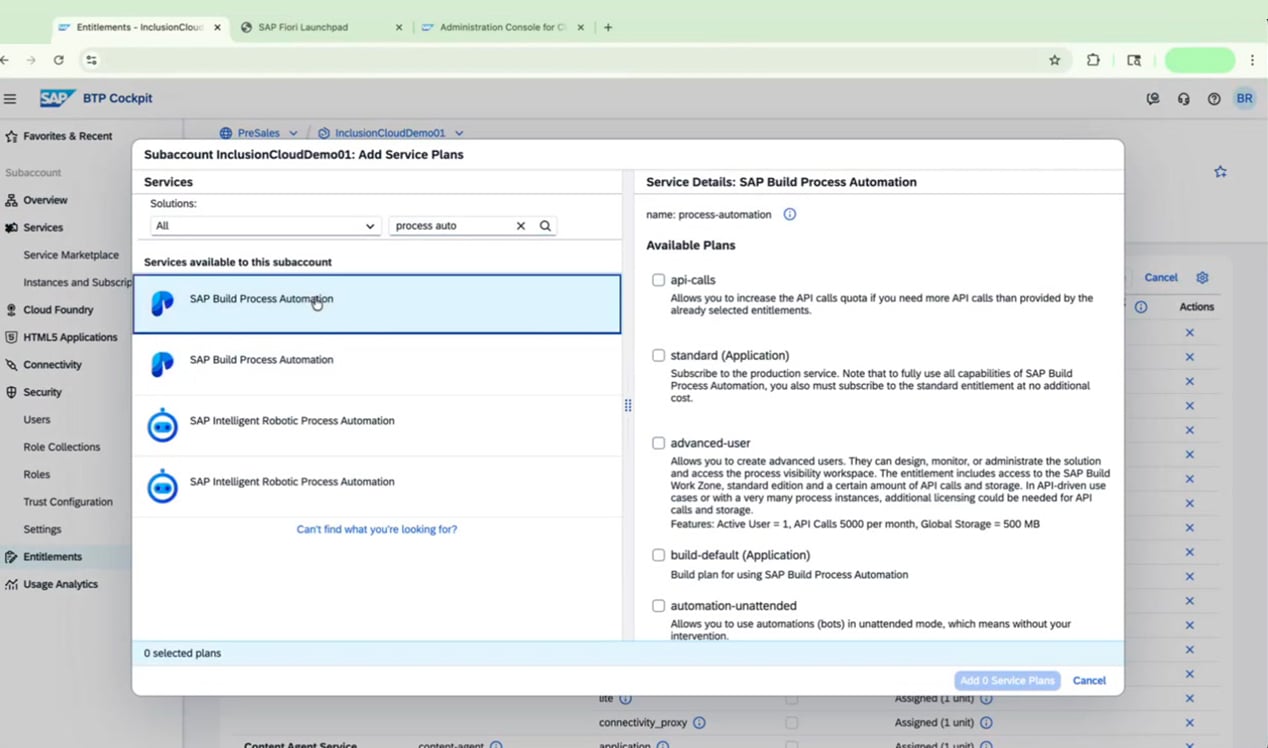 Select all five of the following plans:
| Plan | Purpose |
| ----------------------------- | ------------------------------------------- |
| `standard` | Main service plan |
| `build-default (Application)` | Build plan for the application subscription |
| `automation-attended` | Run bots in attended mode |
| `automation-unattended` | Run bots in unattended mode |
| `advanced-user` | Access to process visibility workspace |
Select all five of the following plans:
| Plan | Purpose |
| ----------------------------- | ------------------------------------------- |
| `standard` | Main service plan |
| `build-default (Application)` | Build plan for the application subscription |
| `automation-attended` | Run bots in attended mode |
| `automation-unattended` | Run bots in unattended mode |
| `advanced-user` | Access to process visibility workspace |
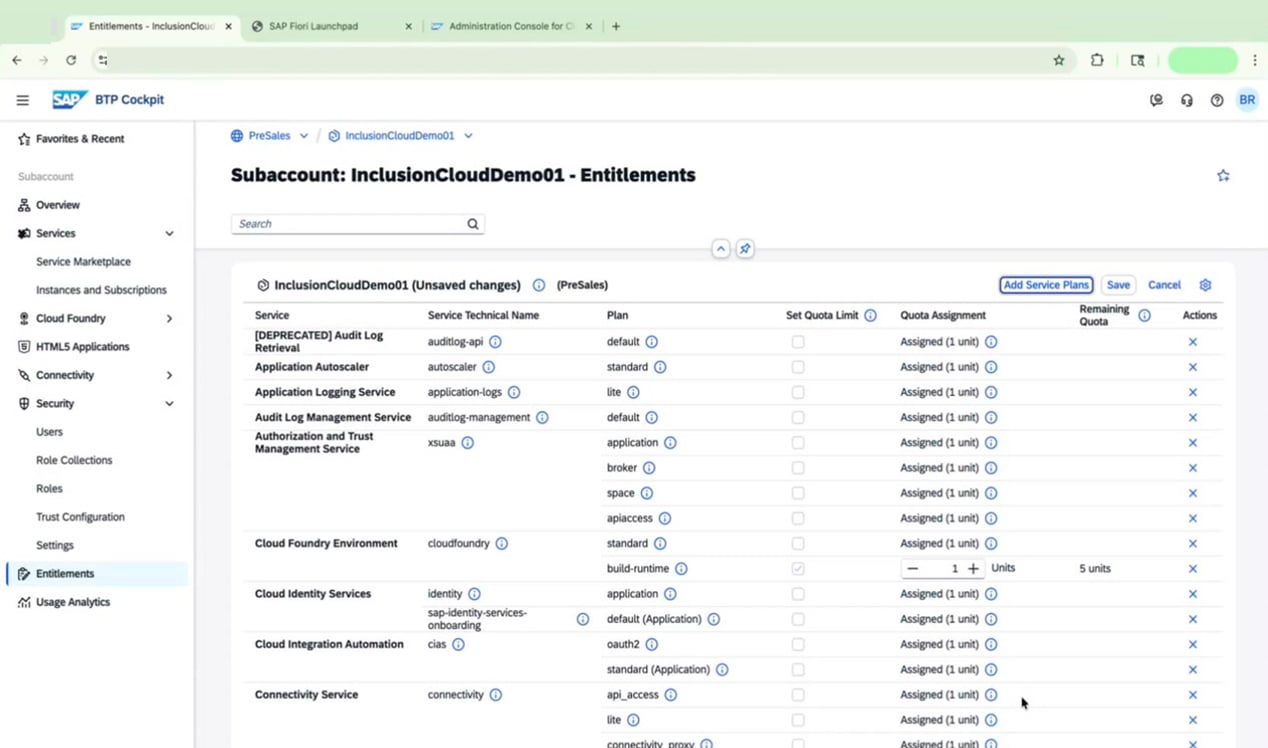
 Click **Add 5 Service Plans**, then click **Save** on the Entitlements page to apply the changes.
 You can return to the **Add Service Plans** dialog at any time to add additional plans — such as `storage`, `standard-user`, `api-calls`, or `addon` (for UiPath connectivity) — depending on your requirements.
***
## Procedure 2: Create the Service Instance and Subscription
With entitlements in place, create both a service instance and an application subscription for SAP Build Process Automation.
In the left sidebar, click **Instances and Subscriptions**.
You can return to the **Add Service Plans** dialog at any time to add additional plans — such as `storage`, `standard-user`, `api-calls`, or `addon` (for UiPath connectivity) — depending on your requirements.
***
## Procedure 2: Create the Service Instance and Subscription
With entitlements in place, create both a service instance and an application subscription for SAP Build Process Automation.
In the left sidebar, click **Instances and Subscriptions**.
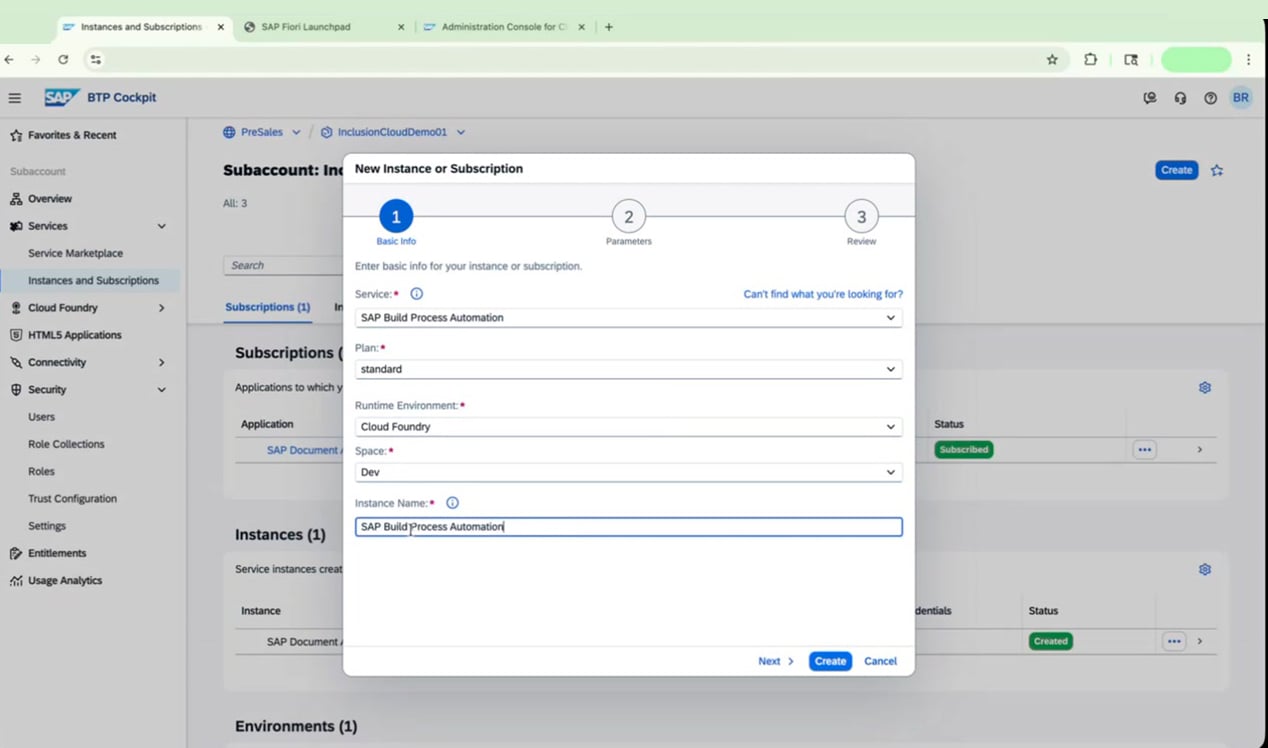
 Click **Create**. In the **New Instance or Subscription** dialog, configure the fields as follows:
* **Service:** SAP Build Process Automation
* **Plan:** standard
* **Runtime Environment:** Cloud Foundry
* **Space:** Dev
* **Instance Name:** SAP Build Process Automation
Click **Create**.
Click **Create**. In the **New Instance or Subscription** dialog, configure the fields as follows:
* **Service:** SAP Build Process Automation
* **Plan:** standard
* **Runtime Environment:** Cloud Foundry
* **Space:** Dev
* **Instance Name:** SAP Build Process Automation
Click **Create**.
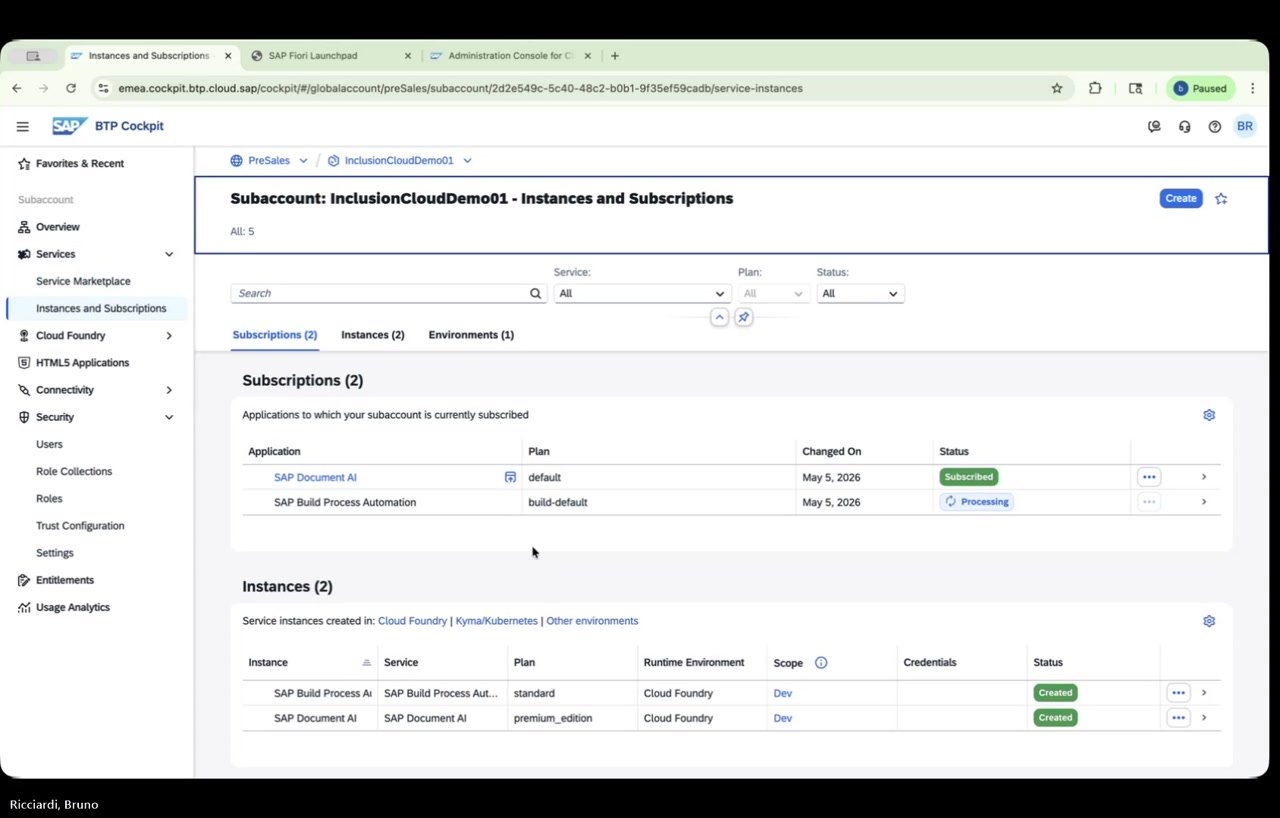
 The new instance appears in the **Instances** section with a status of **Creation in Progress**. Wait for the status to change to **Created** before continuing.
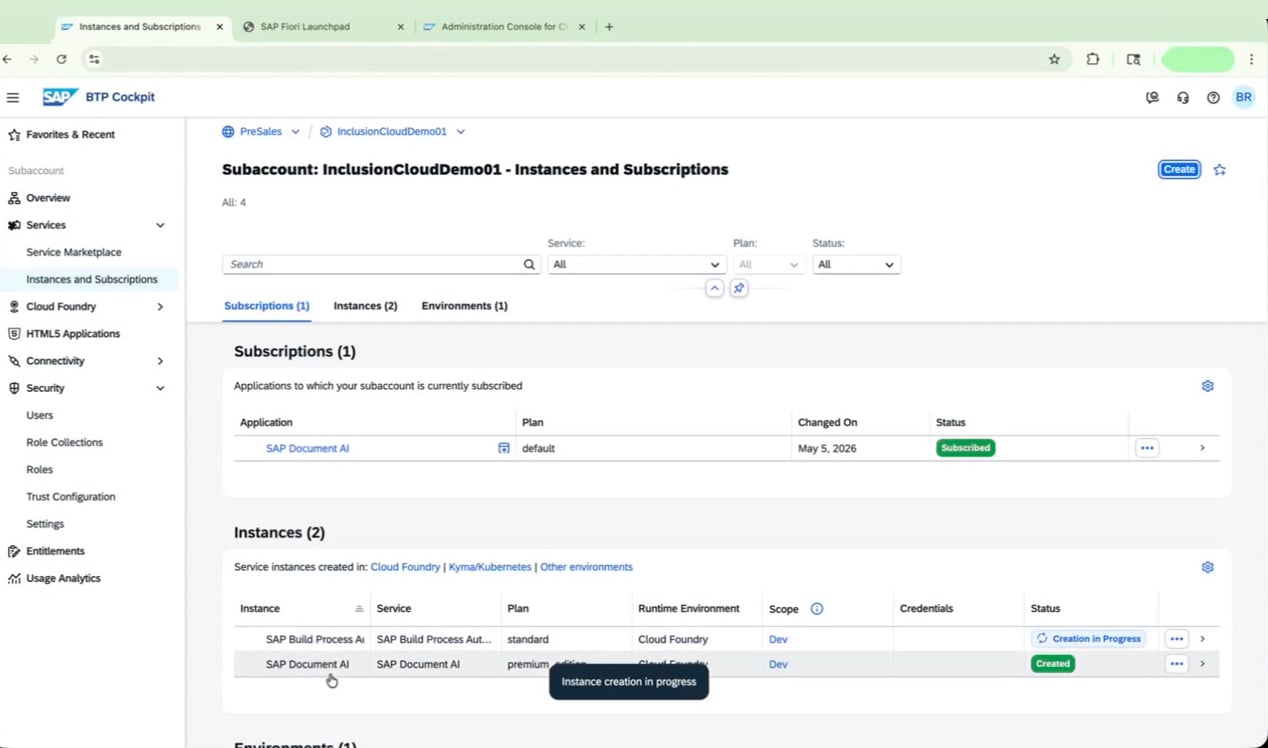 While the instance is being created, click **Create** again to set up the application subscription. In the dialog, select **SAP Build Process Automation** as the service and **build-default** as the plan, then click **Create**.
 The subscription appears in the **Subscriptions** section with a status of **Processing**. The deployment may take several minutes.
 Do not proceed to the next procedure until the subscription status shows **Subscribed**. If the status does not appear to update, navigate away from the **Instances and Subscriptions** page and return to refresh it.
In typical scenarios, you may activate SAP Build Apps first and then activate Process Automation. This guide covers standalone Process Automation activation, which is also a valid configuration.
***
## Procedure 3: Verify Your Configuration
Once provisioning is complete, confirm everything is correctly configured before assigning roles.
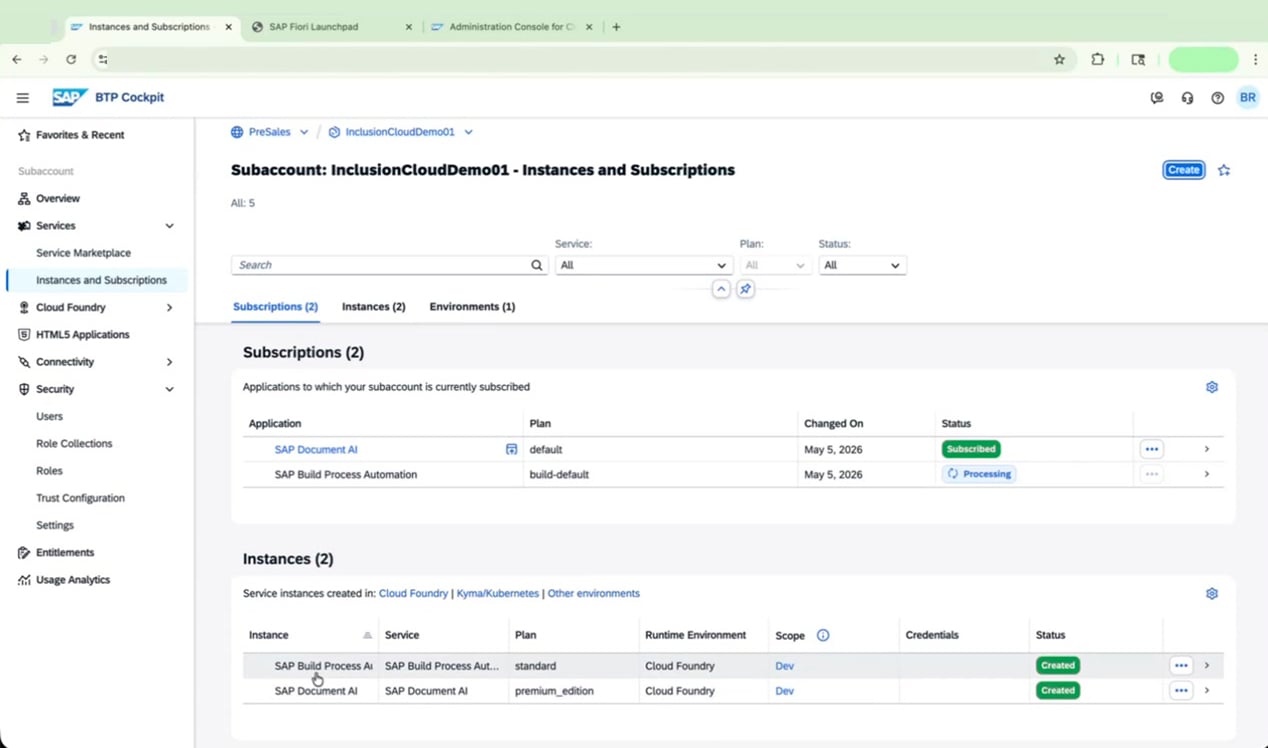
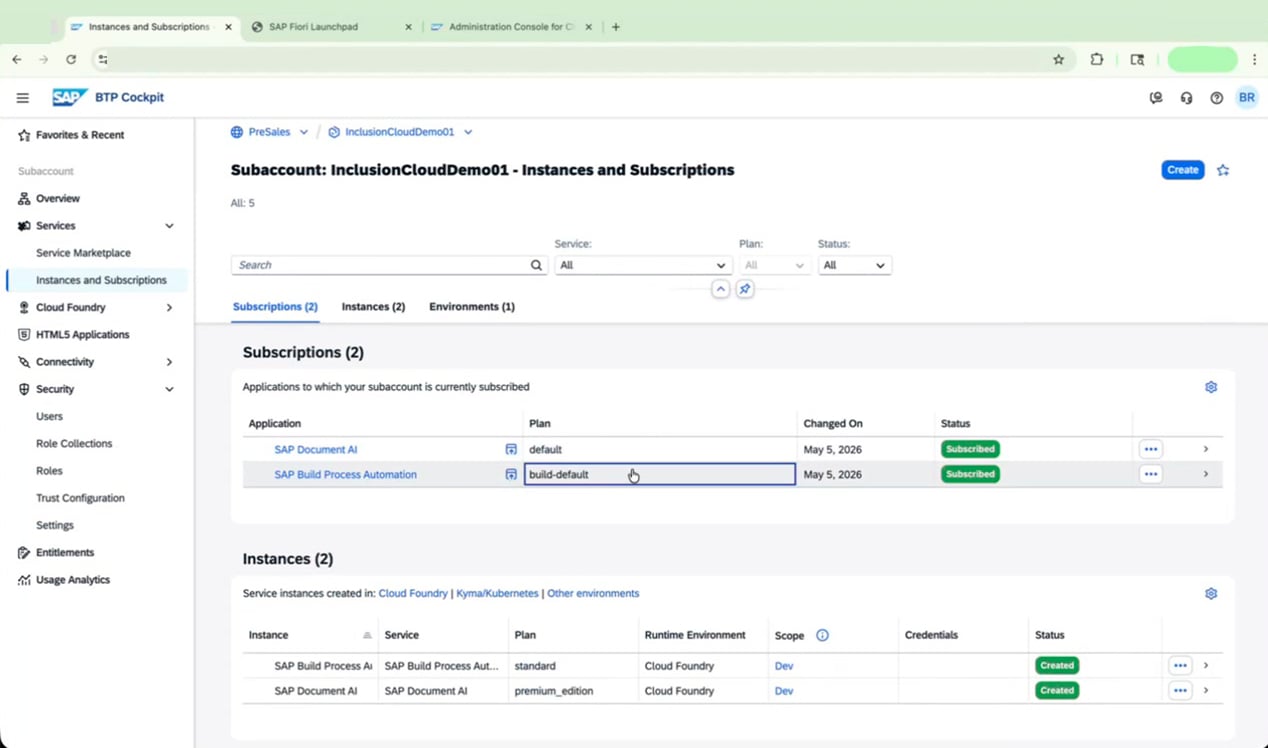
Go to **Instances and Subscriptions** and verify that the **Subscriptions** section shows:
| Application | Plan | Status |
| ---------------------------- | ------------- | ---------- |
| SAP Build Process Automation | build-default | Subscribed |
| SAP Document AI | default | Subscribed |
In the **Instances** section, confirm that both instances are present and show **Created** status:
| Instance | Service | Plan | Runtime | Space | Status |
| ---------------------------- | ---------------------------- | ---------------- | ------------- | ----- | ------- |
| SAP Build Process Automation | SAP Build Process Automation | standard | Cloud Foundry | Dev | Created |
| SAP Document AI | SAP Document AI | premium\_edition | Cloud Foundry | Dev | Created |
Do not proceed to the next procedure until the subscription status shows **Subscribed**. If the status does not appear to update, navigate away from the **Instances and Subscriptions** page and return to refresh it.
In typical scenarios, you may activate SAP Build Apps first and then activate Process Automation. This guide covers standalone Process Automation activation, which is also a valid configuration.
***
## Procedure 3: Verify Your Configuration
Once provisioning is complete, confirm everything is correctly configured before assigning roles.
Go to **Instances and Subscriptions** and verify that the **Subscriptions** section shows:
| Application | Plan | Status |
| ---------------------------- | ------------- | ---------- |
| SAP Build Process Automation | build-default | Subscribed |
| SAP Document AI | default | Subscribed |
In the **Instances** section, confirm that both instances are present and show **Created** status:
| Instance | Service | Plan | Runtime | Space | Status |
| ---------------------------- | ---------------------------- | ---------------- | ------------- | ----- | ------- |
| SAP Build Process Automation | SAP Build Process Automation | standard | Cloud Foundry | Dev | Created |
| SAP Document AI | SAP Document AI | premium\_edition | Cloud Foundry | Dev | Created |
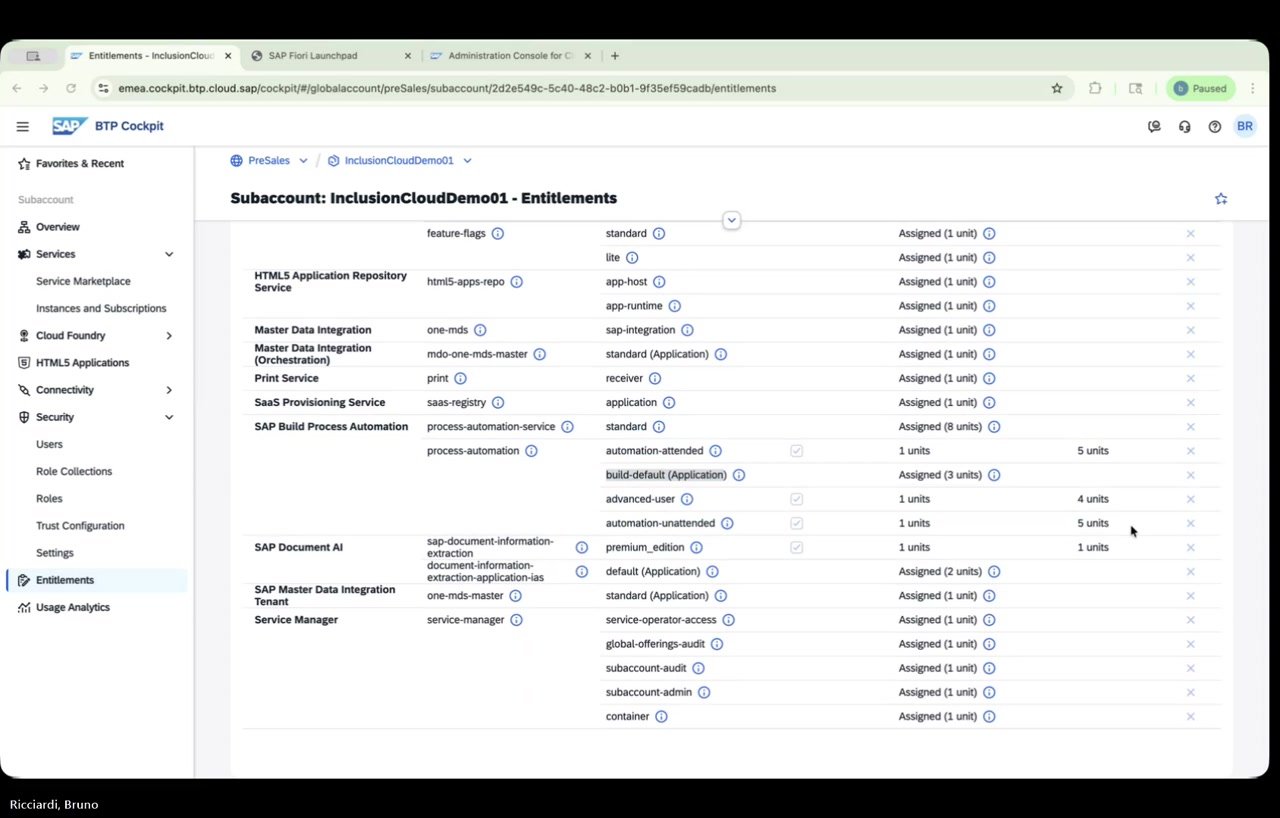
 Navigate to **Entitlements** and confirm the SAP Build Process Automation plans are listed with their assigned quotas:
| Plan | Assigned |
| --------------------------- | -------- |
| automation-attended | 1 unit |
| build-default (Application) | 3 units |
| advanced-user | 1 unit |
| automation-unattended | 1 unit |
Navigate to **Entitlements** and confirm the SAP Build Process Automation plans are listed with their assigned quotas:
| Plan | Assigned |
| --------------------------- | -------- |
| automation-attended | 1 unit |
| build-default (Application) | 3 units |
| advanced-user | 1 unit |
| automation-unattended | 1 unit |
 You are now ready to assign roles to your business users.
***
## Procedure 4: Assign Role Collections to a Business User
Users need specific role collections assigned before they can access SAP Build Process Automation.
In the SAP BTP Cockpit, confirm that the SAP Build Process Automation subscription shows the status **Subscribed**.
You are now ready to assign roles to your business users.
***
## Procedure 4: Assign Role Collections to a Business User
Users need specific role collections assigned before they can access SAP Build Process Automation.
In the SAP BTP Cockpit, confirm that the SAP Build Process Automation subscription shows the status **Subscribed**.
 Go to **Security > Users** in the left navigation pane. Identify the business user you want to grant access to.
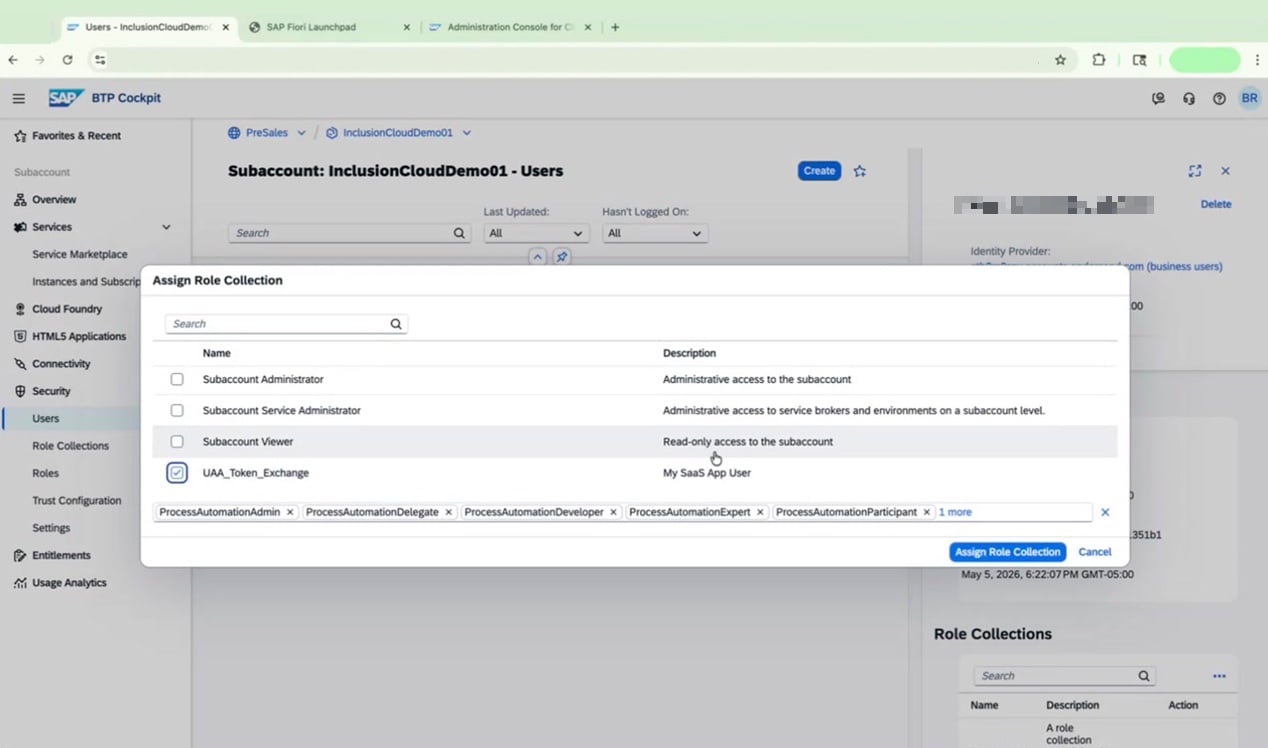
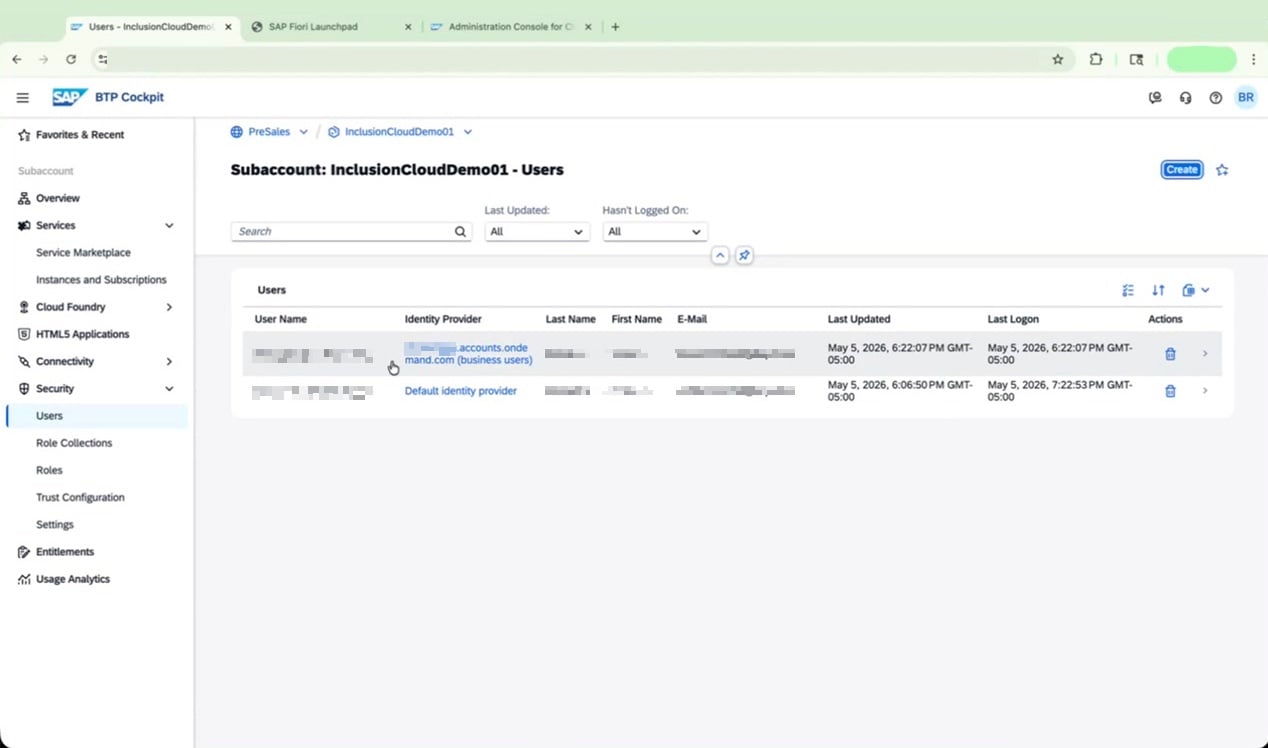 Select the user, then click to assign a role collection. In the **Assign Role Collection** dialog, select all of the following role collections:
* `ProcessAutomationAdmin`
* `ProcessAutomationDelegate`
* `ProcessAutomationDeveloper`
* `ProcessAutomationExpert`
* `ProcessAutomationParticipant`
* `UAA_Token_Exchange`
Click **Assign Role Collection** to apply.
Select the user, then click to assign a role collection. In the **Assign Role Collection** dialog, select all of the following role collections:
* `ProcessAutomationAdmin`
* `ProcessAutomationDelegate`
* `ProcessAutomationDeveloper`
* `ProcessAutomationExpert`
* `ProcessAutomationParticipant`
* `UAA_Token_Exchange`
Click **Assign Role Collection** to apply.
 Assign only the role collections that match each user's responsibilities. For example, a developer needs `ProcessAutomationDeveloper`, while an end user who only triggers processes needs `ProcessAutomationParticipant`.
***
## Procedure 5: Access the App and Install the Automation Agent
With roles assigned, open the SAP Build Process Automation application and set up the automation agent.
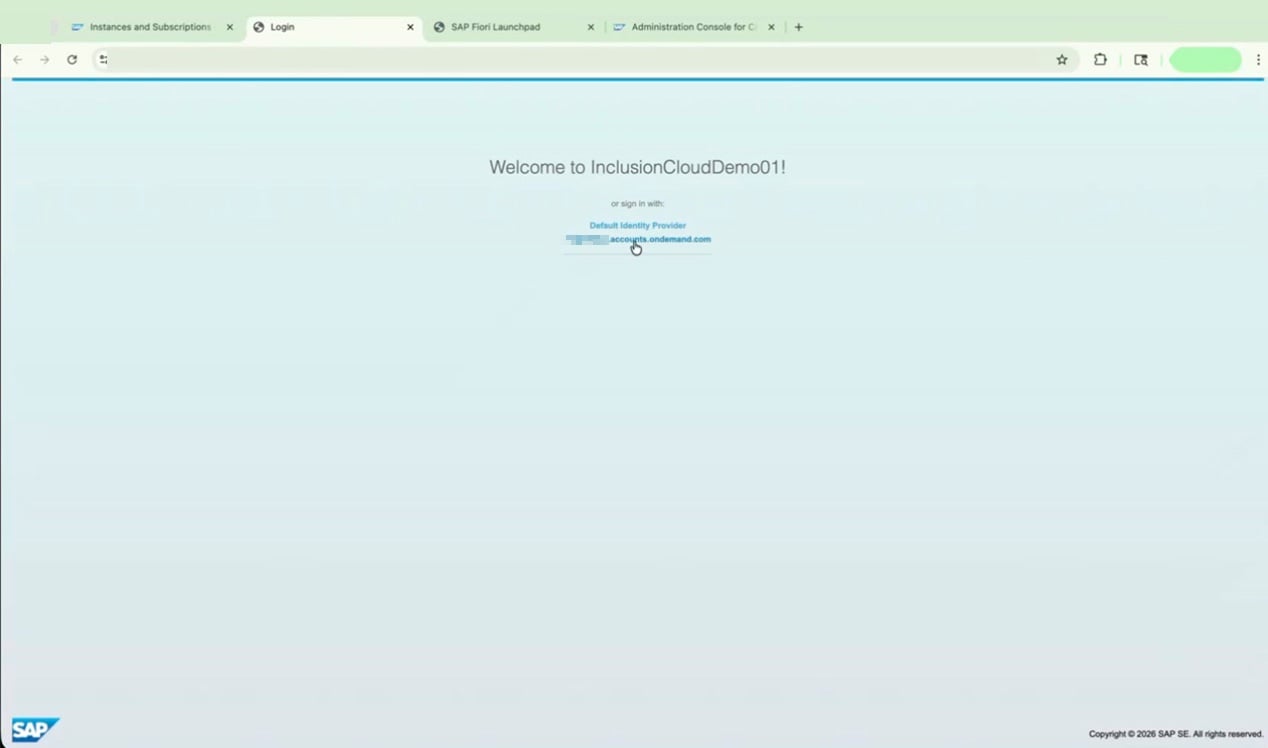
Go to **Instances and Subscriptions** and click on the **SAP Build Process Automation** subscription to open the application.
When prompted, select your identity provider and sign in with your credentials.
Assign only the role collections that match each user's responsibilities. For example, a developer needs `ProcessAutomationDeveloper`, while an end user who only triggers processes needs `ProcessAutomationParticipant`.
***
## Procedure 5: Access the App and Install the Automation Agent
With roles assigned, open the SAP Build Process Automation application and set up the automation agent.
Go to **Instances and Subscriptions** and click on the **SAP Build Process Automation** subscription to open the application.
When prompted, select your identity provider and sign in with your credentials.
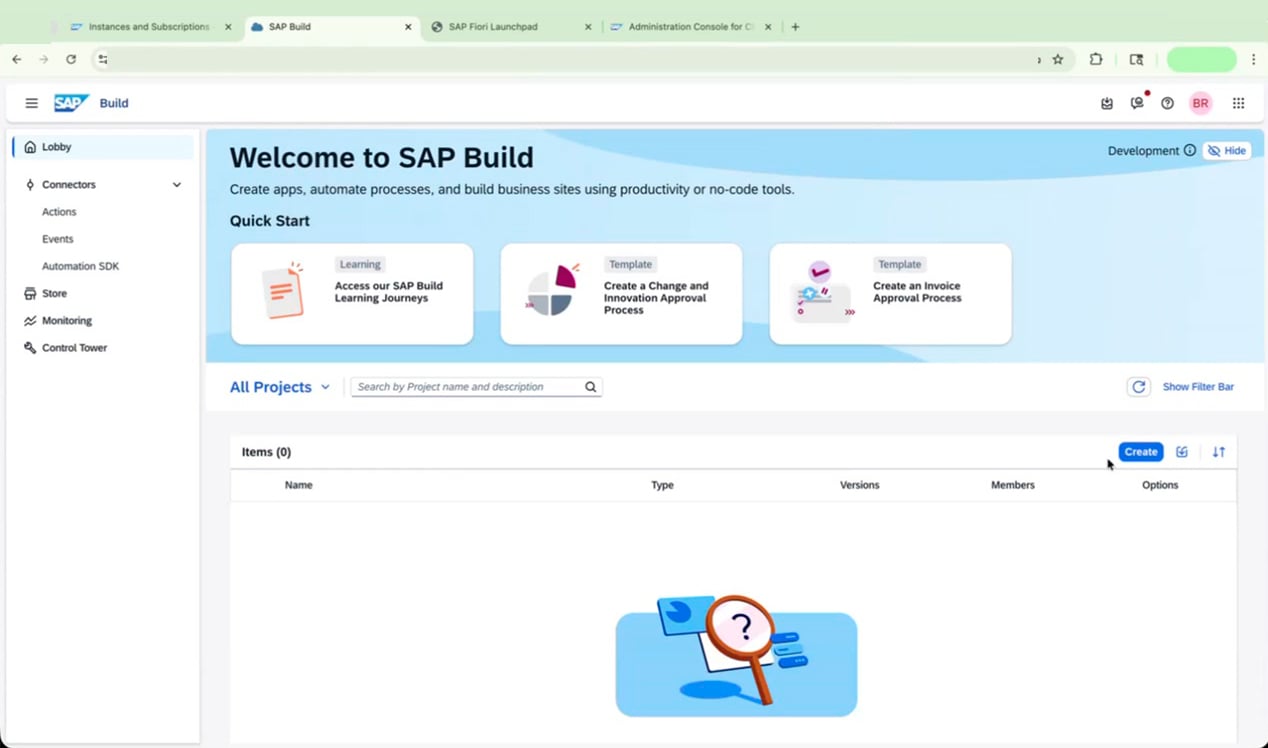
 Wait for the SAP Build lobby to load. Once it appears, you can click **Create** to start a new project. Available project types include:
* **Application**
* **Automated Process**
* **Joule Agent and Skill** (if subscribed)
* **Business Site** (if subscribed)
Wait for the SAP Build lobby to load. Once it appears, you can click **Create** to start a new project. Available project types include:
* **Application**
* **Automated Process**
* **Joule Agent and Skill** (if subscribed)
* **Business Site** (if subscribed)
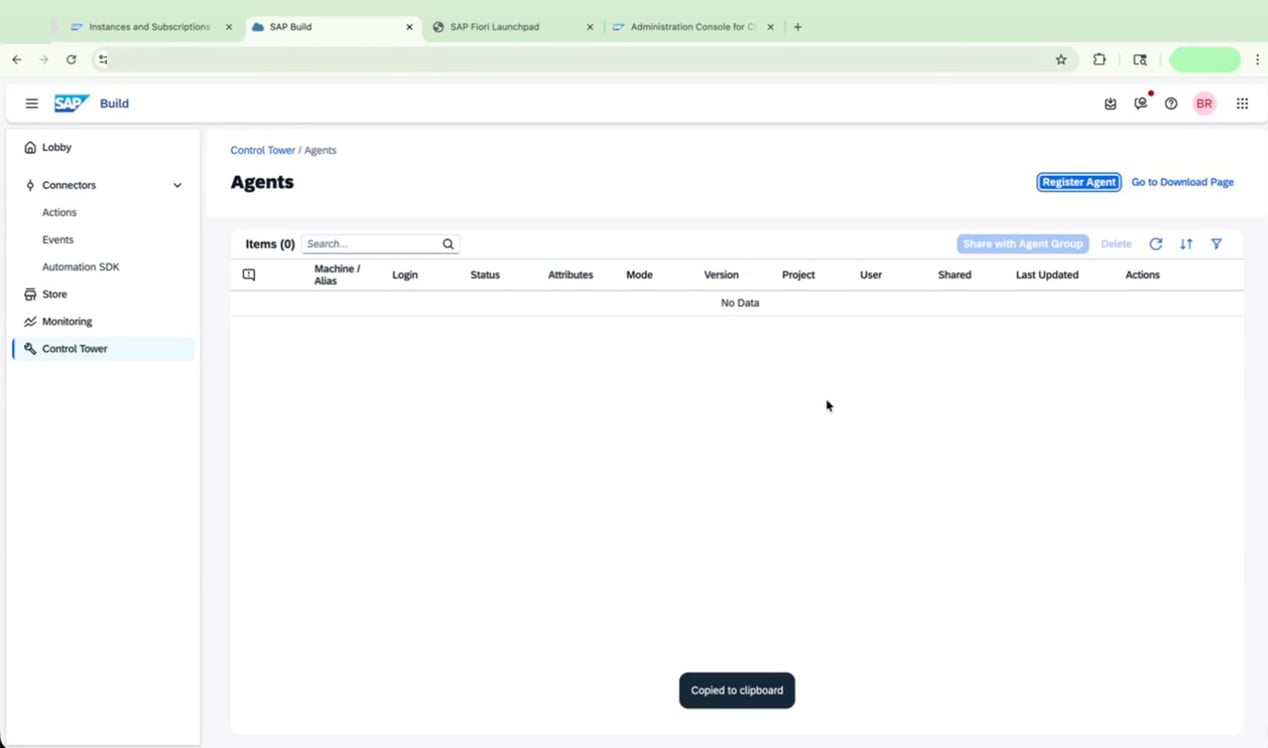
 To install the automation agent, navigate to **Control Tower** in the left navigation pane, then select **Agents**.
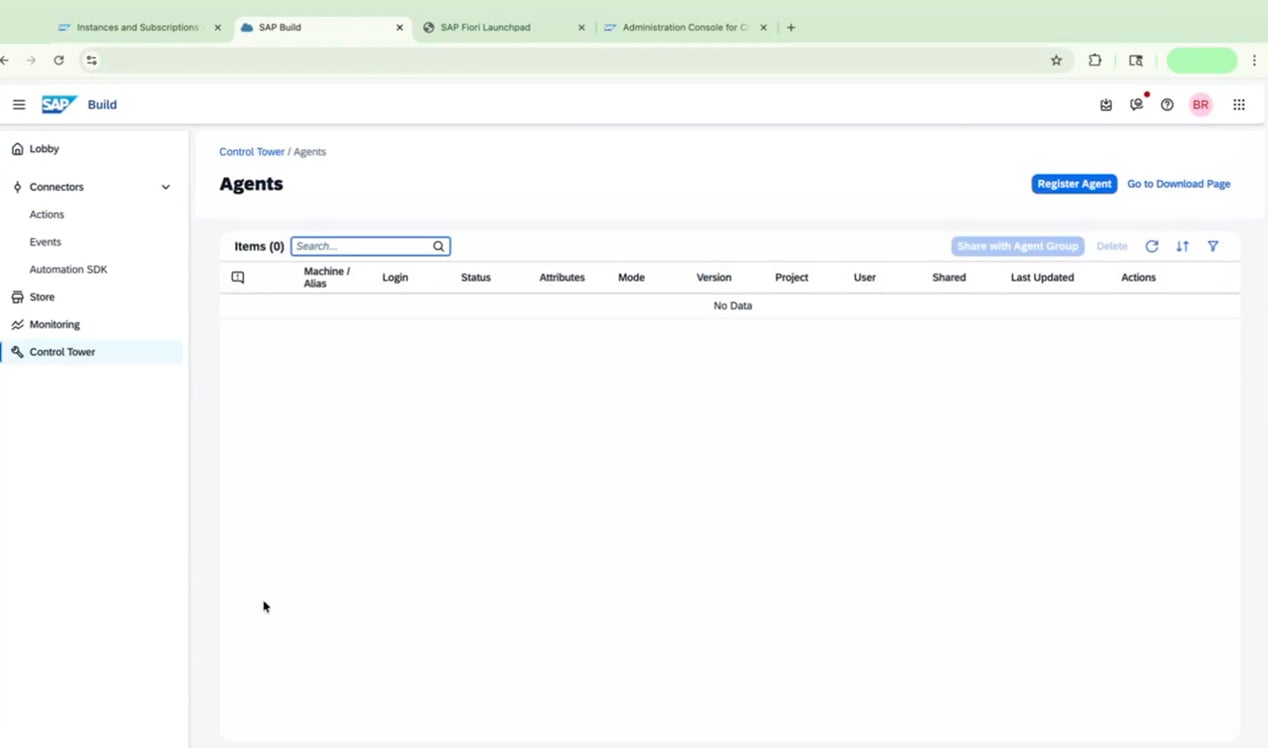 Click **Go to Download Page** and follow the three-step process:
1. **Install the agent** — Download and run the installer for your operating system.
2. **Allow the extension** — Enable the required browser extension and restart your browser.
3. **Register** — Register the agent to your SAP Build Process Automation tenant.
Click **Go to Download Page** and follow the three-step process:
1. **Install the agent** — Download and run the installer for your operating system.
2. **Allow the extension** — Enable the required browser extension and restart your browser.
3. **Register** — Register the agent to your SAP Build Process Automation tenant.
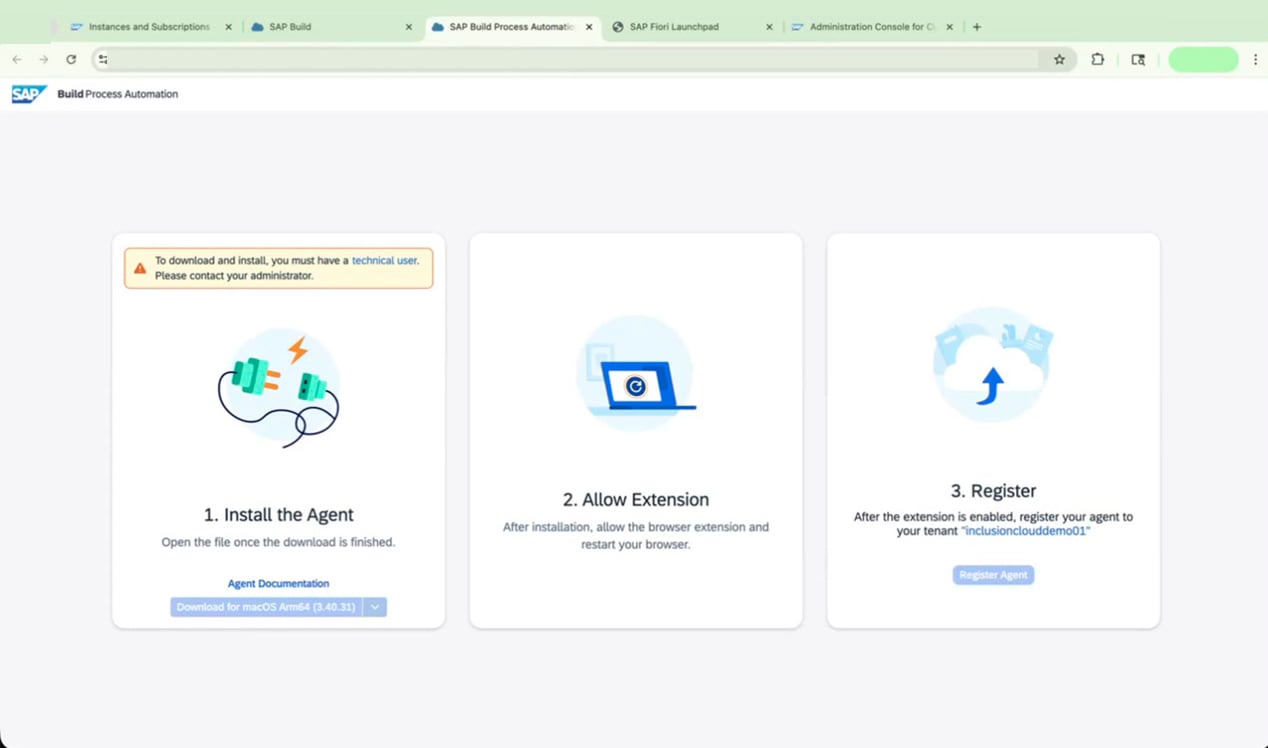 A technical user account is required to complete agent registration. Contact your administrator if you do not have one.
After registration, return to **Control Tower > Agents** and confirm that your agent appears in the list.
A technical user account is required to complete agent registration. Contact your administrator if you do not have one.
After registration, return to **Control Tower > Agents** and confirm that your agent appears in the list.
 ***
## Procedure 6: Activate Generative AI Capabilities
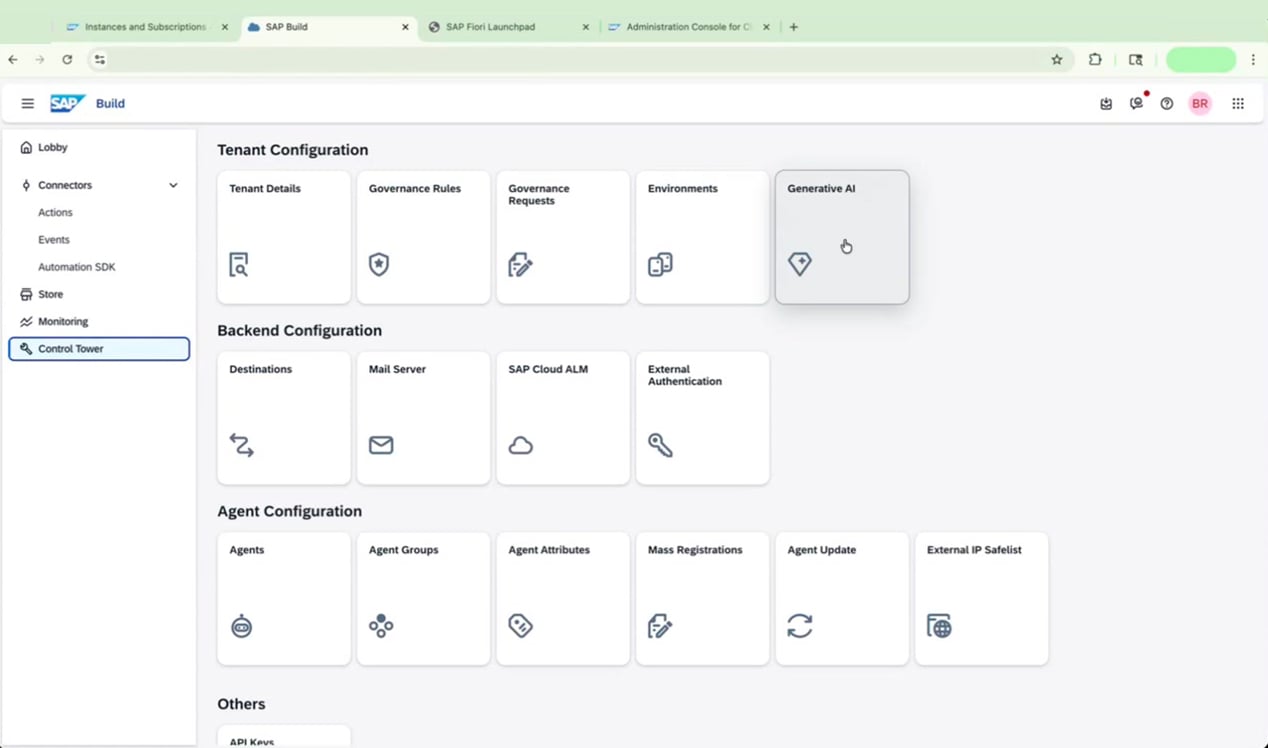
SAP Build Process Automation includes optional Generative AI features you can enable from the Control Tower.
In the SAP Build Control Tower, locate the **Tenant Configuration** section and click the **Generative AI** tile.
***
## Procedure 6: Activate Generative AI Capabilities
SAP Build Process Automation includes optional Generative AI features you can enable from the Control Tower.
In the SAP Build Control Tower, locate the **Tenant Configuration** section and click the **Generative AI** tile.
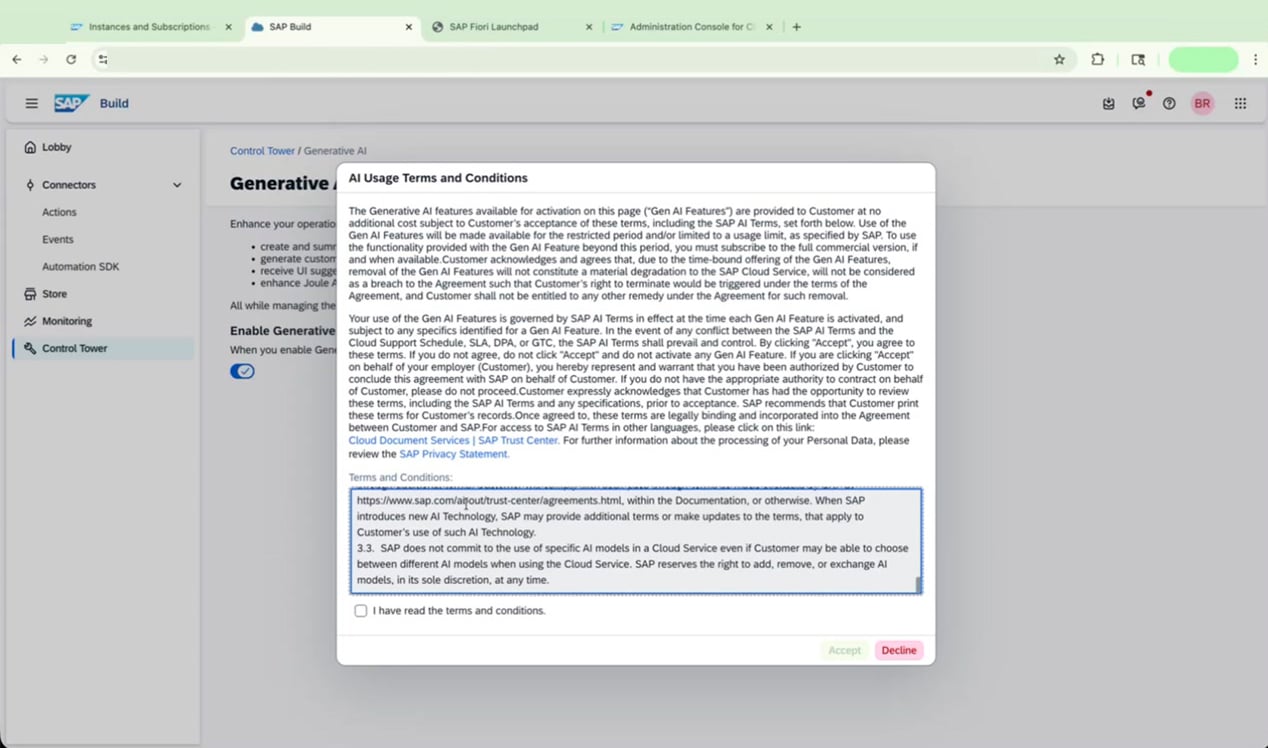
 In the **AI Usage Terms and Conditions** dialog, review the terms, check the **I have read the terms and conditions** box, then click **Accept**.
 Confirm that the **Enable Generative AI** toggle is switched on. The page displays the activating user and the activation date and time.
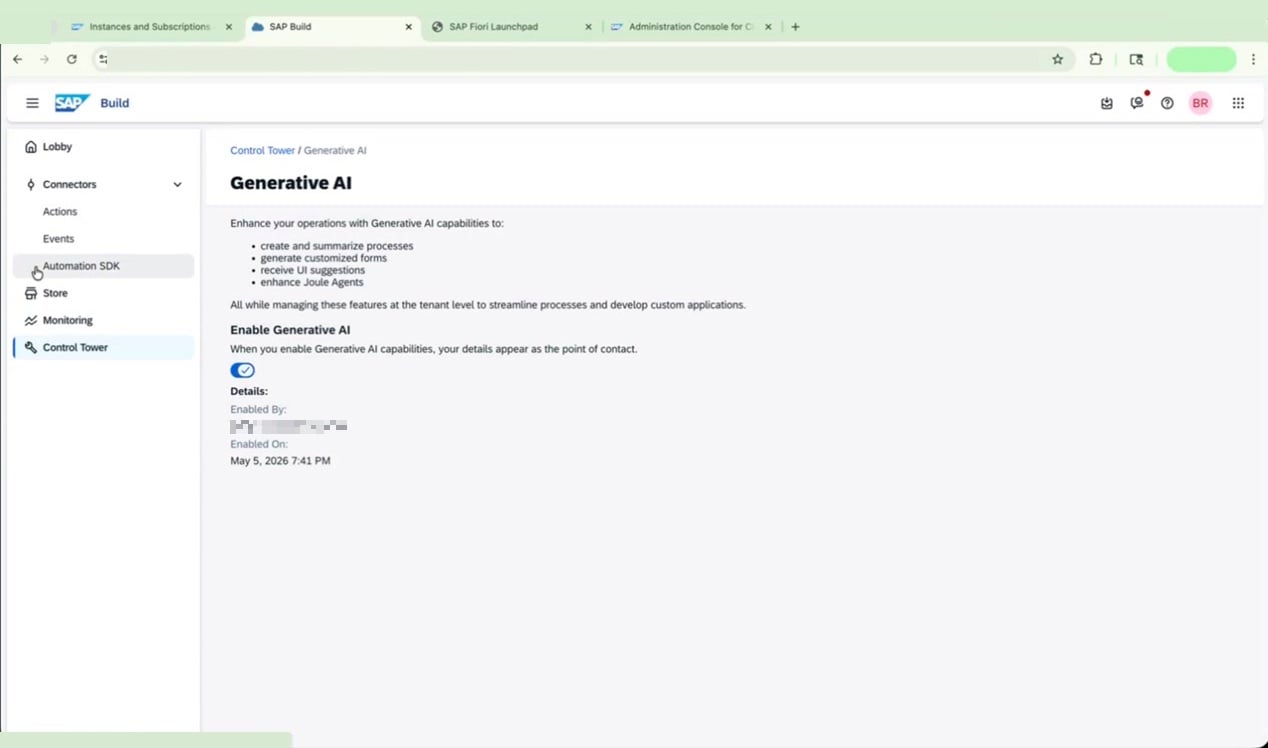 Once enabled, Generative AI capabilities are available across your tenant, including:
* Creating and summarizing processes
* Generating customized forms
* Receiving UI suggestions
* Enhancing Joule Agents
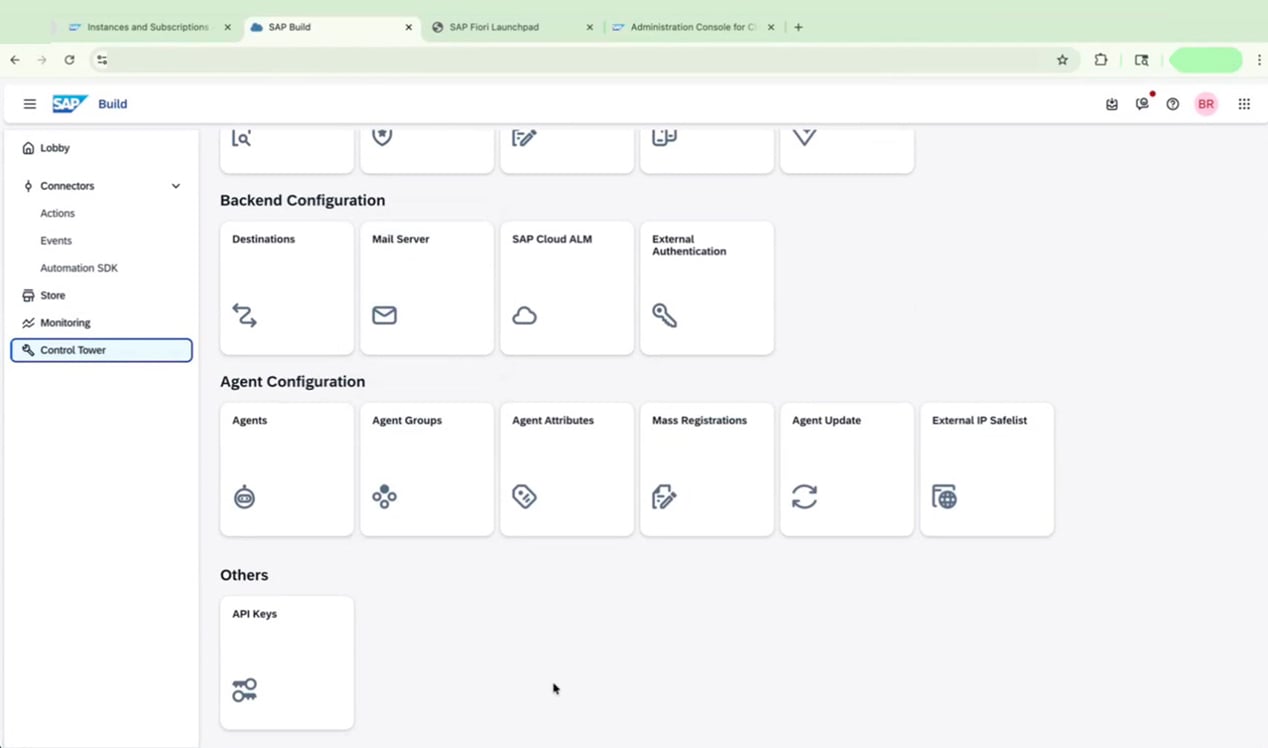
Explore the additional configuration options available in the Control Tower, such as **Destinations**, **Mail Server**, **SAP Cloud ALM**, **External Authentication**, **Agent Groups**, and **API Keys** — these allow you to further customize and extend your automation environment.
Once enabled, Generative AI capabilities are available across your tenant, including:
* Creating and summarizing processes
* Generating customized forms
* Receiving UI suggestions
* Enhancing Joule Agents
Explore the additional configuration options available in the Control Tower, such as **Destinations**, **Mail Server**, **SAP Cloud ALM**, **External Authentication**, **Agent Groups**, and **API Keys** — these allow you to further customize and extend your automation environment.
 ***
## FAQ
The status typically moves from **Processing** to **Subscribed** within a few minutes, but may take longer depending on system load. Navigate away from the **Instances and Subscriptions** page and return to refresh the status if it appears stuck.
No. Assign only the role collections that match each user's responsibilities. For example, a developer needs `ProcessAutomationDeveloper`, while an end user who only triggers processes needs `ProcessAutomationParticipant`. Granting unnecessary roles can expose functionality that is not relevant to that user's work.
The `standard` plan is used to create a **service instance**, which enables API-level access via Cloud Foundry. The `build-default` plan is used to create the **application subscription**, which provides access to the SAP Build Process Automation web interface. You need both for a fully functional setup.
Yes. A technical user account is required to register the agent to your tenant. If you do not have one, contact your SAP BTP administrator before beginning the agent installation steps.
Yes. Navigate to **Entitlements > Edit > Add Service Plans** at any time to add additional plans such as `storage`, `standard-user`, `api-calls`, or `addon` (for UiPath connectivity). Adding plans later does not disrupt your existing configuration.
***
## FAQ
The status typically moves from **Processing** to **Subscribed** within a few minutes, but may take longer depending on system load. Navigate away from the **Instances and Subscriptions** page and return to refresh the status if it appears stuck.
No. Assign only the role collections that match each user's responsibilities. For example, a developer needs `ProcessAutomationDeveloper`, while an end user who only triggers processes needs `ProcessAutomationParticipant`. Granting unnecessary roles can expose functionality that is not relevant to that user's work.
The `standard` plan is used to create a **service instance**, which enables API-level access via Cloud Foundry. The `build-default` plan is used to create the **application subscription**, which provides access to the SAP Build Process Automation web interface. You need both for a fully functional setup.
Yes. A technical user account is required to register the agent to your tenant. If you do not have one, contact your SAP BTP administrator before beginning the agent installation steps.
Yes. Navigate to **Entitlements > Edit > Add Service Plans** at any time to add additional plans such as `storage`, `standard-user`, `api-calls`, or `addon` (for UiPath connectivity). Adding plans later does not disrupt your existing configuration.