> ## Documentation Index
> Fetch the complete documentation index at: https://docai.inclusioncloud.com/llms.txt
> Use this file to discover all available pages before exploring further.
# Configuring SAP Document AI in SAP BTP from Scratch
> Step-by-step guide to provision SAP Document AI in a new SAP BTP subaccount: subaccount creation, entitlements, user access configuration, and final setup.
This guide walks you through the complete process of setting up SAP Document AI in a brand-new SAP Business Technology Platform (SAP BTP) subaccount — from initial subaccount creation all the way through final configuration inside the Document AI system. Each step is documented in sequence, with supporting screenshots to help you follow along accurately.
This guide is intended for **SAP BTP administrators, solution architects, and technical consultants** who need to provision and configure SAP Document AI in a clean subaccount environment. Before you begin, ensure you have:
* Access to the **SAP BTP Cockpit** with global account administrator privileges
* Access to an **SAP Cloud Identity Services (IAS) tenant**
This guide covers configuration in a completely new SAP BTP subaccount. If you are working in an existing subaccount that already has some entitlements or instances configured, some steps may already be complete.
## What You'll Learn
* How to create a new SAP BTP subaccount and configure identity provider trust settings
* How to assign the service entitlements, including SAP Document AI service plans and Cloud Foundry environment
* How to enable Cloud Foundry and create a service instance and application subscription for SAP Document AI
* How to configure admin access through SAP Cloud Identity Services (IAS) and assign Document AI role collections to users
* How to configure document retention, Instant Learning, and Data Feedback Collection settings within the SAP Document AI interface
***
## Chapter 1: Set Up Your SAP BTP Subaccount
This chapter walks you through setting up a brand-new SAP BTP subaccount for Document AI — from creation and trust configuration all the way to enabling Cloud Foundry and assigning the required service entitlements.
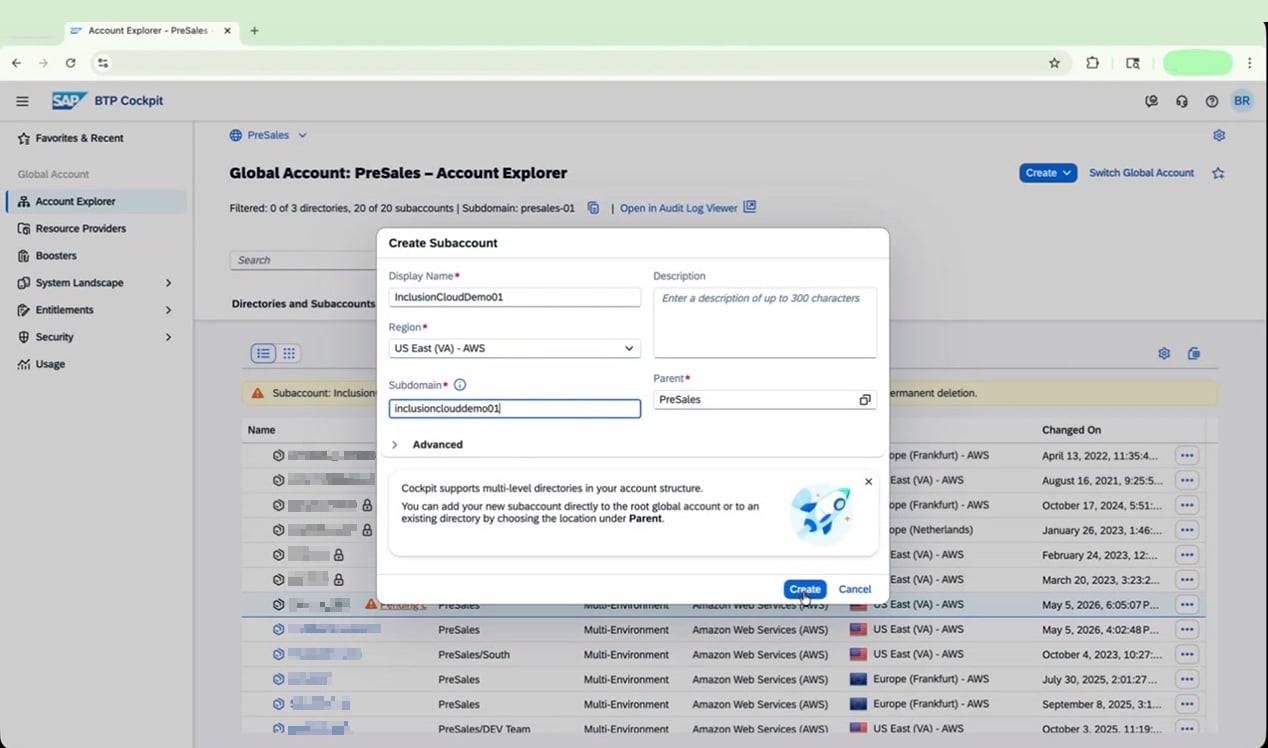
### Create a New Subaccount
In this guide, all subaccounts are created using **Inclusion Cloud Demo** as the example environment.
In the SAP BTP Cockpit, go to **Account Explorer** in the left navigation pane.
Click **Create** to open the "Create Subaccount" dialog, then fill in the following details:
| Field | Value |
| ------------ | ---------------------- |
| Display Name | `InclusionCloudDemo01` |
| Region | `US East (VA) - AWS` |
| Subdomain | `inclusionclouddemo01` |
| Parent | `Your parent location` |
Leave all other fields at their defaults.
Click **Create** to finalize the subaccount.
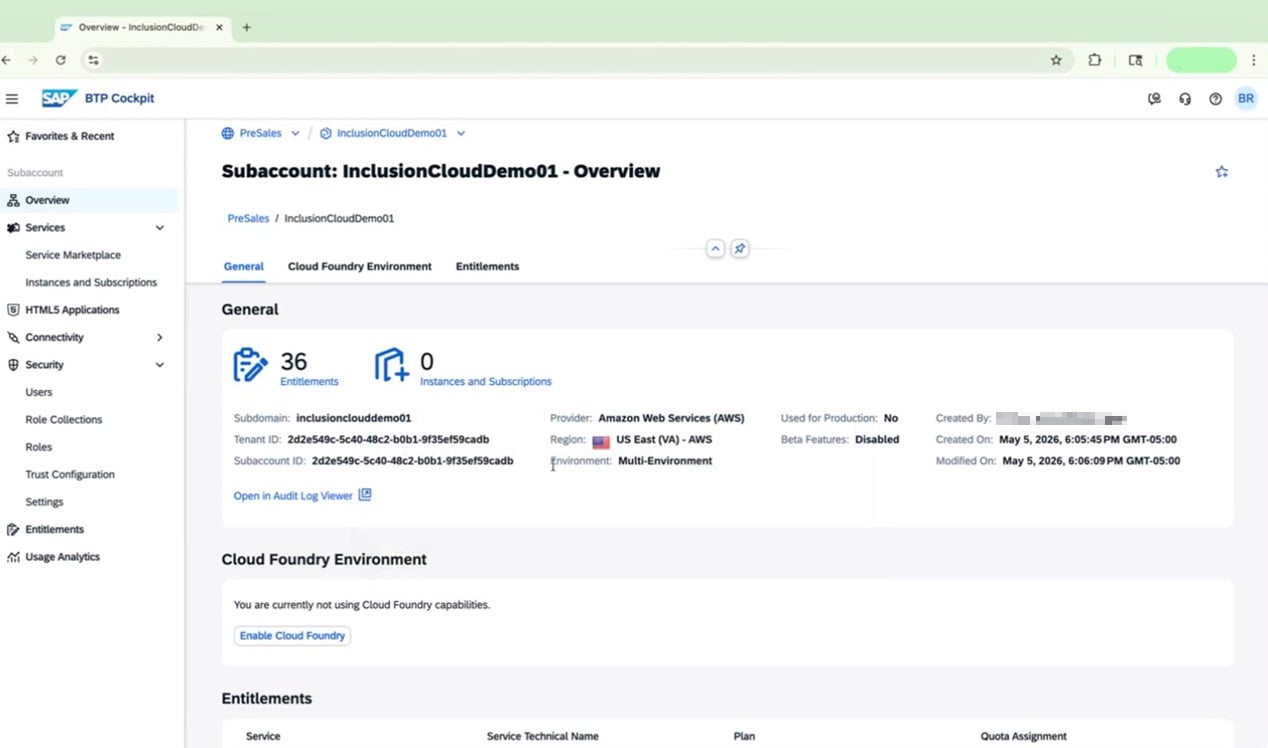
 Once created, click on **InclusionCloudDemo01** in the Account Explorer list to open its overview page and confirm the following details:
* **Subdomain:** inclusionclouddemo01
* **Provider:** Amazon Web Services (AWS)
* **Region:** US East (VA) - AWS
* **Environment:** Multi-Environment
Once created, click on **InclusionCloudDemo01** in the Account Explorer list to open its overview page and confirm the following details:
* **Subdomain:** inclusionclouddemo01
* **Provider:** Amazon Web Services (AWS)
* **Region:** US East (VA) - AWS
* **Environment:** Multi-Environment
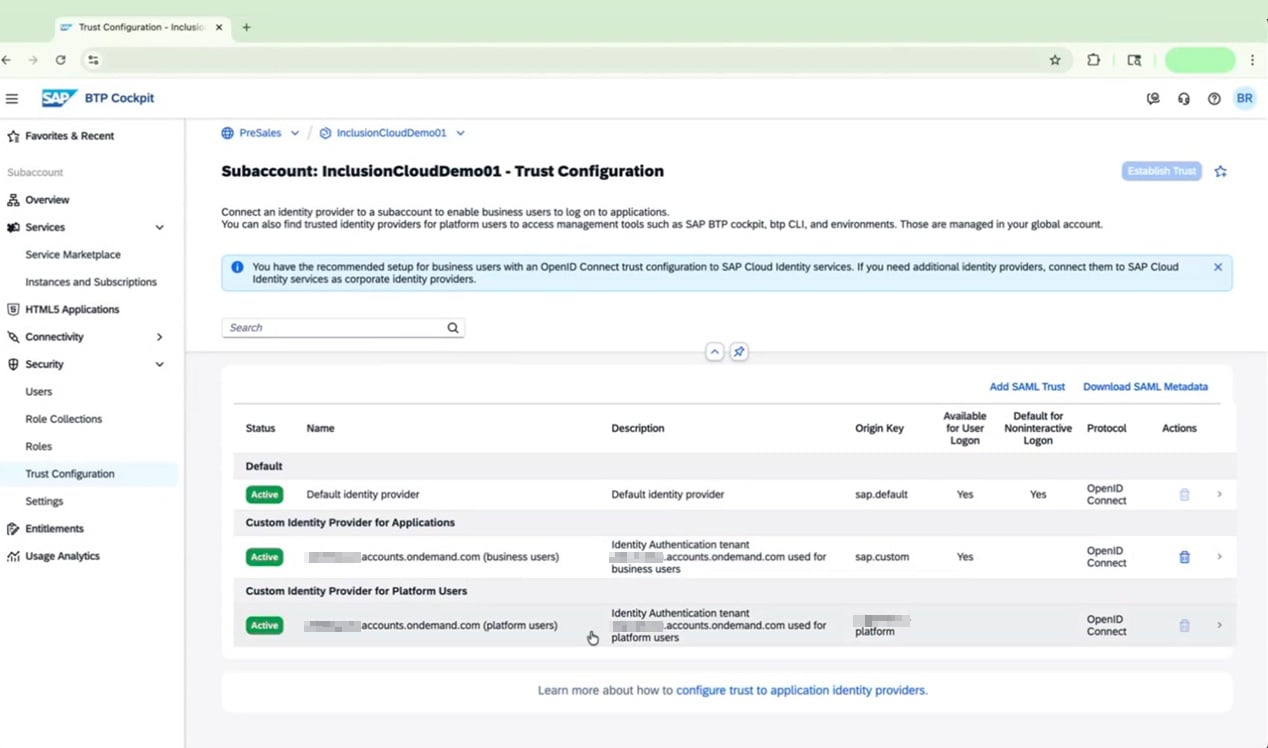
 ### Configure Trust for Identity Authentication
In the left navigation, go to **Security > Trust Configuration**.
Review the current trust settings. If a **Custom Identity Provider for Applications** (business users) is not yet present, click **Establish Trust**.
### Configure Trust for Identity Authentication
In the left navigation, go to **Security > Trust Configuration**.
Review the current trust settings. If a **Custom Identity Provider for Applications** (business users) is not yet present, click **Establish Trust**.
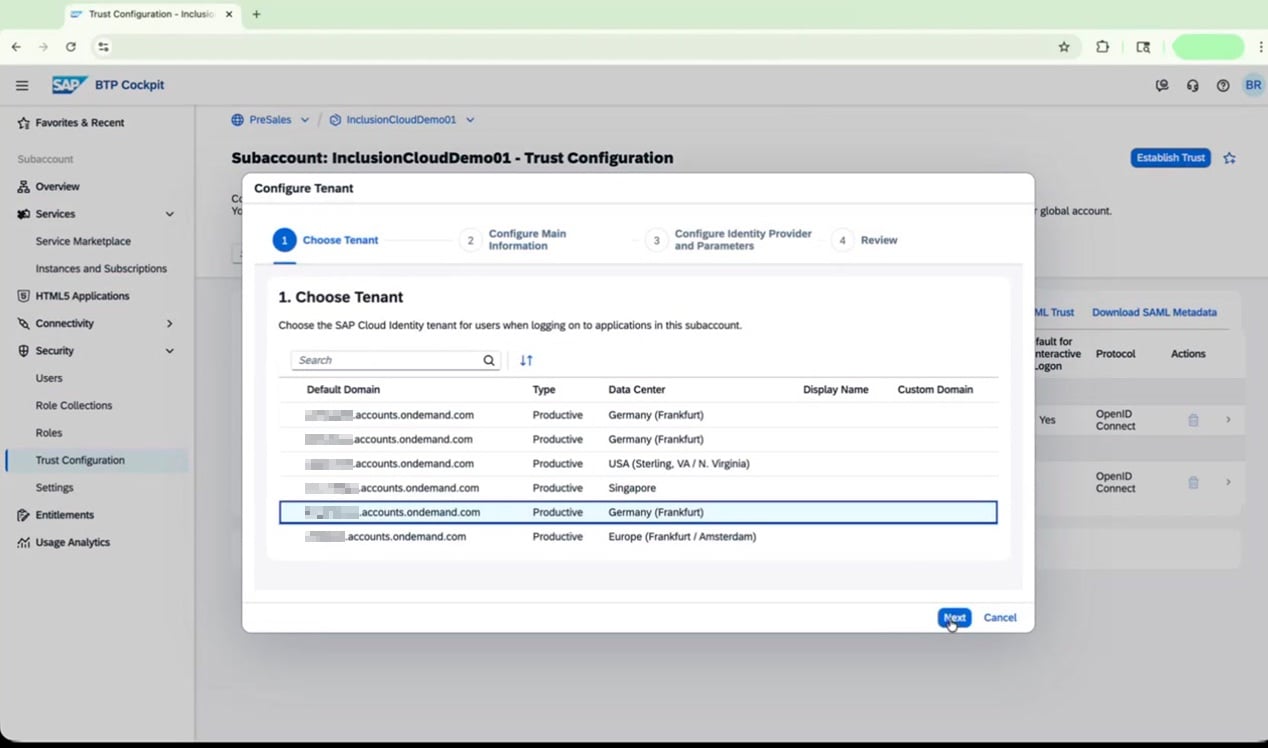
 In the **Configure Tenant** wizard, complete each step:
* **Step 1 – Choose Tenant:** Select the appropriate SAP Cloud Identity tenant from the list (for example, `XYZ.accounts.ondemand.com`), then click **Next**.
* **Steps 2–4 – Main information, parameters, and review:** Confirm the details on each screen, then click **Finish**.
In the **Configure Tenant** wizard, complete each step:
* **Step 1 – Choose Tenant:** Select the appropriate SAP Cloud Identity tenant from the list (for example, `XYZ.accounts.ondemand.com`), then click **Next**.
* **Steps 2–4 – Main information, parameters, and review:** Confirm the details on each screen, then click **Finish**.
 When the wizard completes, verify that all three identity provider entries are listed as **Active** on the Trust Configuration page:
* Default identity provider
* Custom Identity Provider for Applications (business users)
* Custom Identity Provider for Platform Users
### Assign Entitlements for Document AI
In the left navigation, go to **Entitlements**, then click **Edit**.
When the wizard completes, verify that all three identity provider entries are listed as **Active** on the Trust Configuration page:
* Default identity provider
* Custom Identity Provider for Applications (business users)
* Custom Identity Provider for Platform Users
### Assign Entitlements for Document AI
In the left navigation, go to **Entitlements**, then click **Edit**.
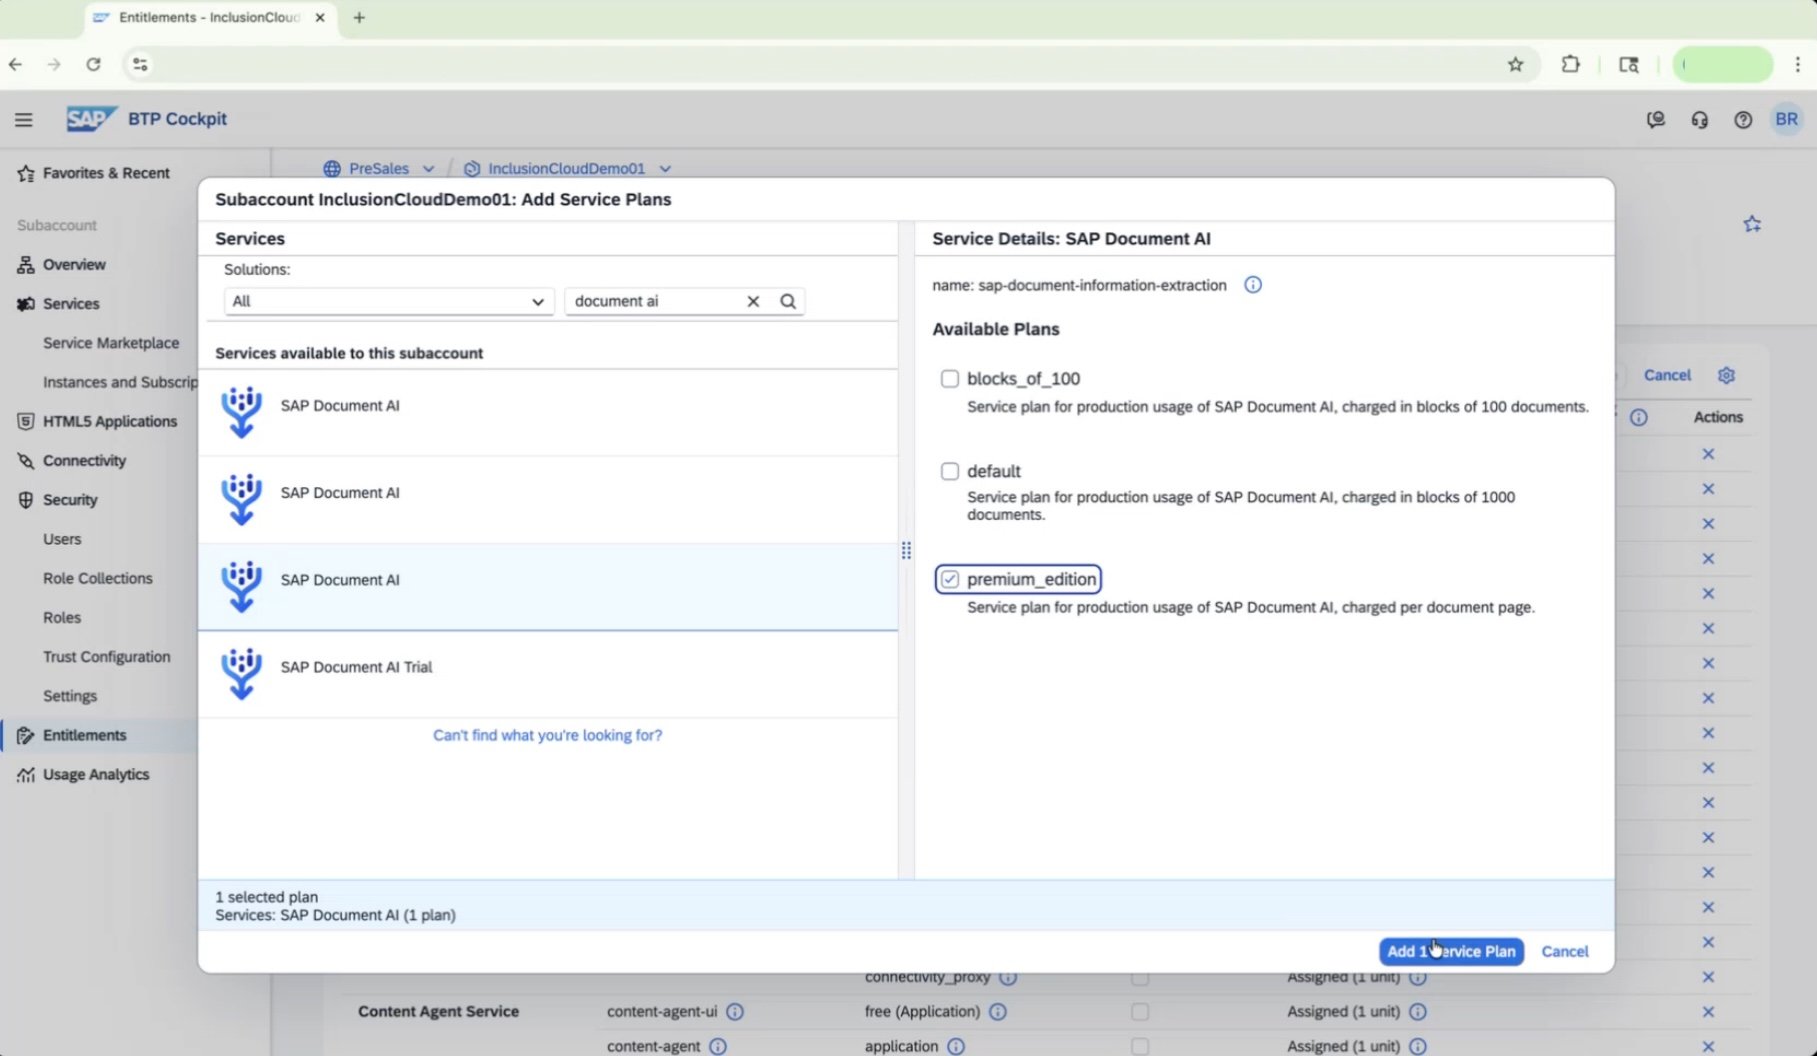
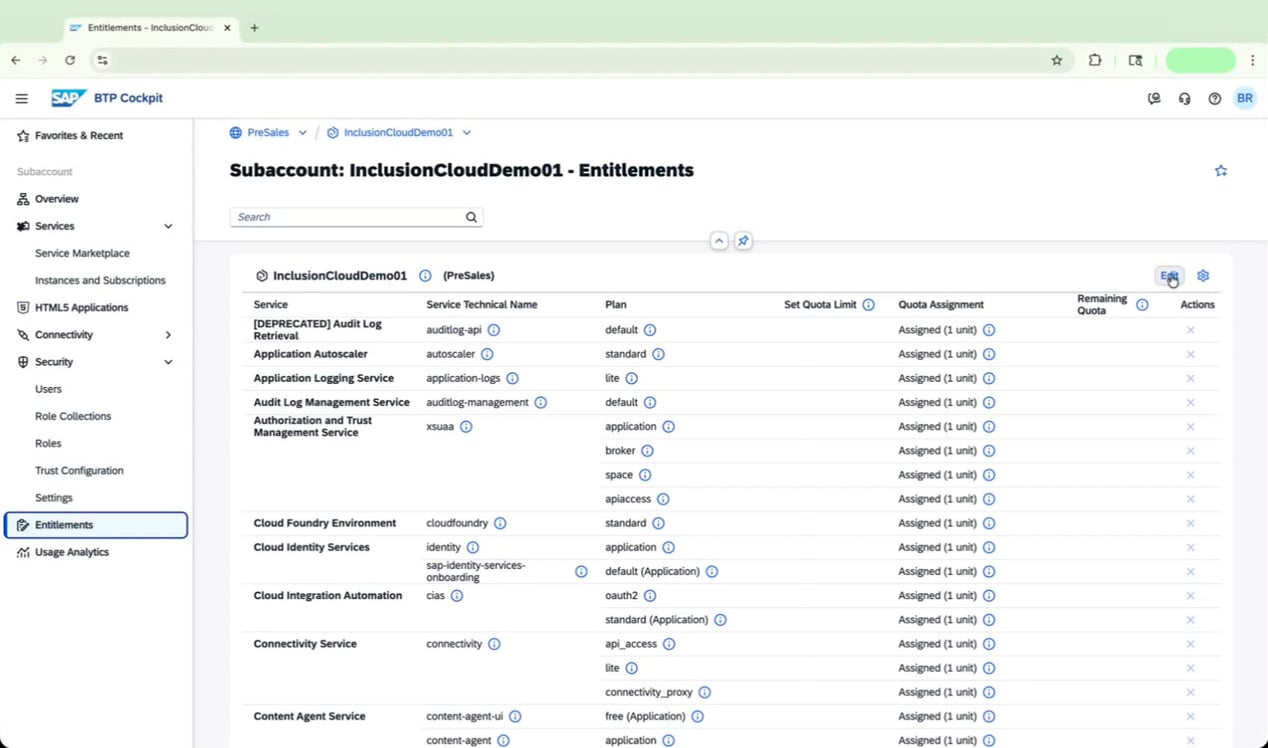 Click **Add Service Plans** to open the service plan selection dialog.
In the **Services** search bar, type `document`. Select **SAP Document AI** from the results and review the available plans on the right: `blocks_of_100`, `default`, and `premium_edition`. Check the box for **`premium_edition`**.
Click **Add Service Plans** to open the service plan selection dialog.
In the **Services** search bar, type `document`. Select **SAP Document AI** from the results and review the available plans on the right: `blocks_of_100`, `default`, and `premium_edition`. Check the box for **`premium_edition`**.
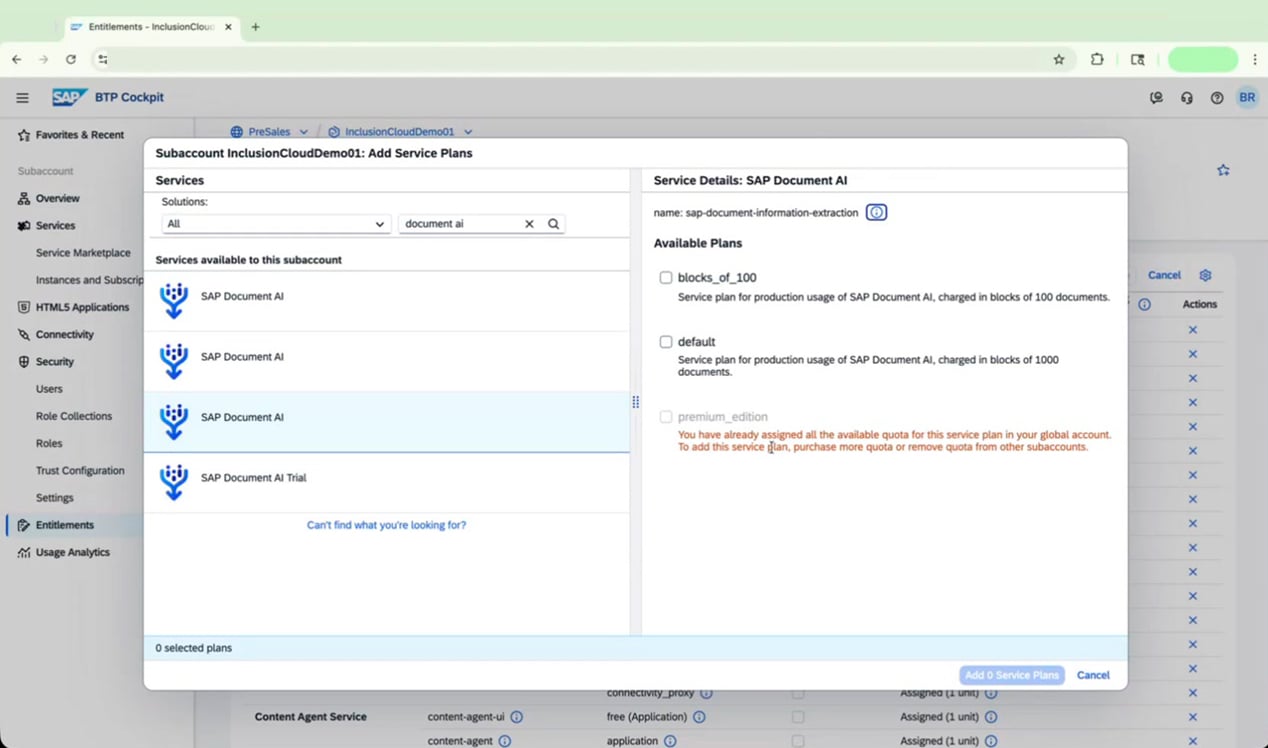
 If you see the message **"You have already assigned all the available quota for this service plan in your global account,"** you must either purchase additional quota or release quota from another subaccount before you can continue.
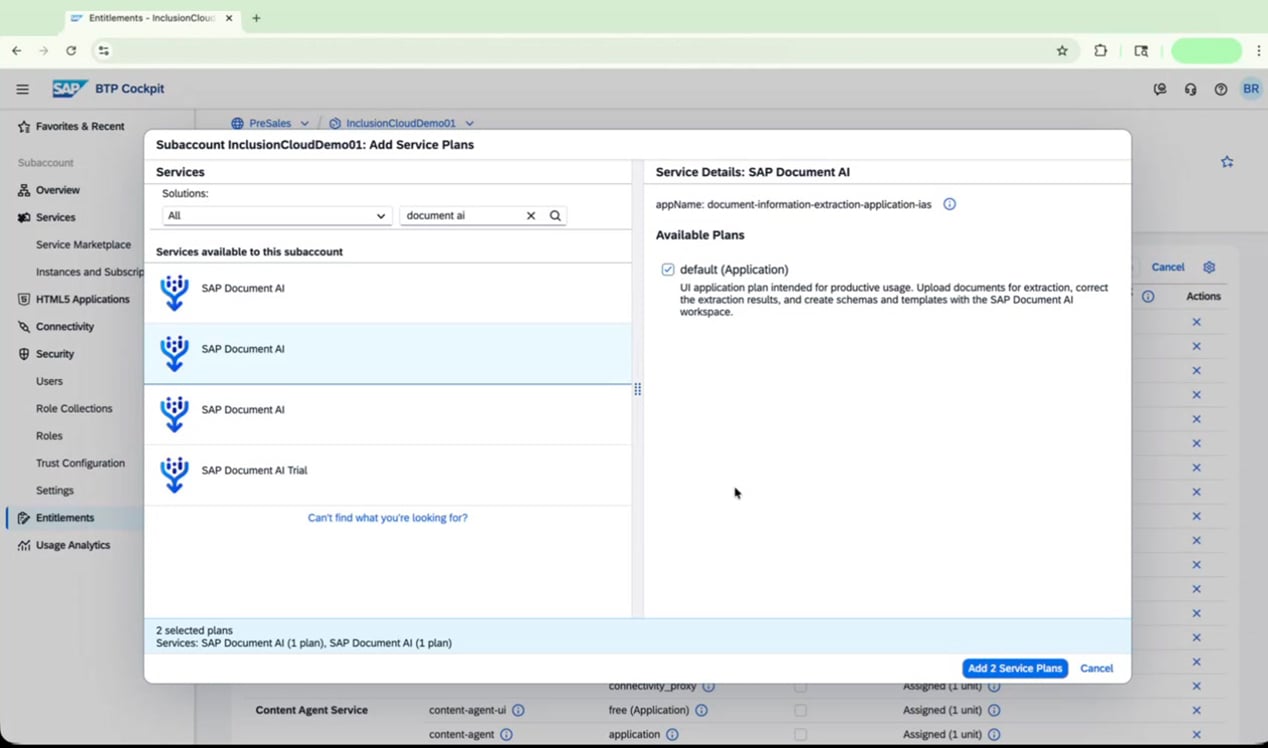
 Once quota is available, select the correct SAP Document AI entry based on your setup:
* **If your customer has IAS configured:** Select the entry whose name ends in **`-ias`** (for example, `document-information-extraction-application-ias`) and choose the **premium\_edition** plan.
* **If your customer does not have IAS configured:** Select the SAP Document AI entry **without** `-ias` at the end.
In both cases, ensure the **default (Application)** plan is checked.
Once quota is available, select the correct SAP Document AI entry based on your setup:
* **If your customer has IAS configured:** Select the entry whose name ends in **`-ias`** (for example, `document-information-extraction-application-ias`) and choose the **premium\_edition** plan.
* **If your customer does not have IAS configured:** Select the SAP Document AI entry **without** `-ias` at the end.
In both cases, ensure the **default (Application)** plan is checked.
 In the same dialog, clear the search bar and type `cloud`. Select **Cloud Foundry Environment**, then choose the **build-runtime** plan on the right.
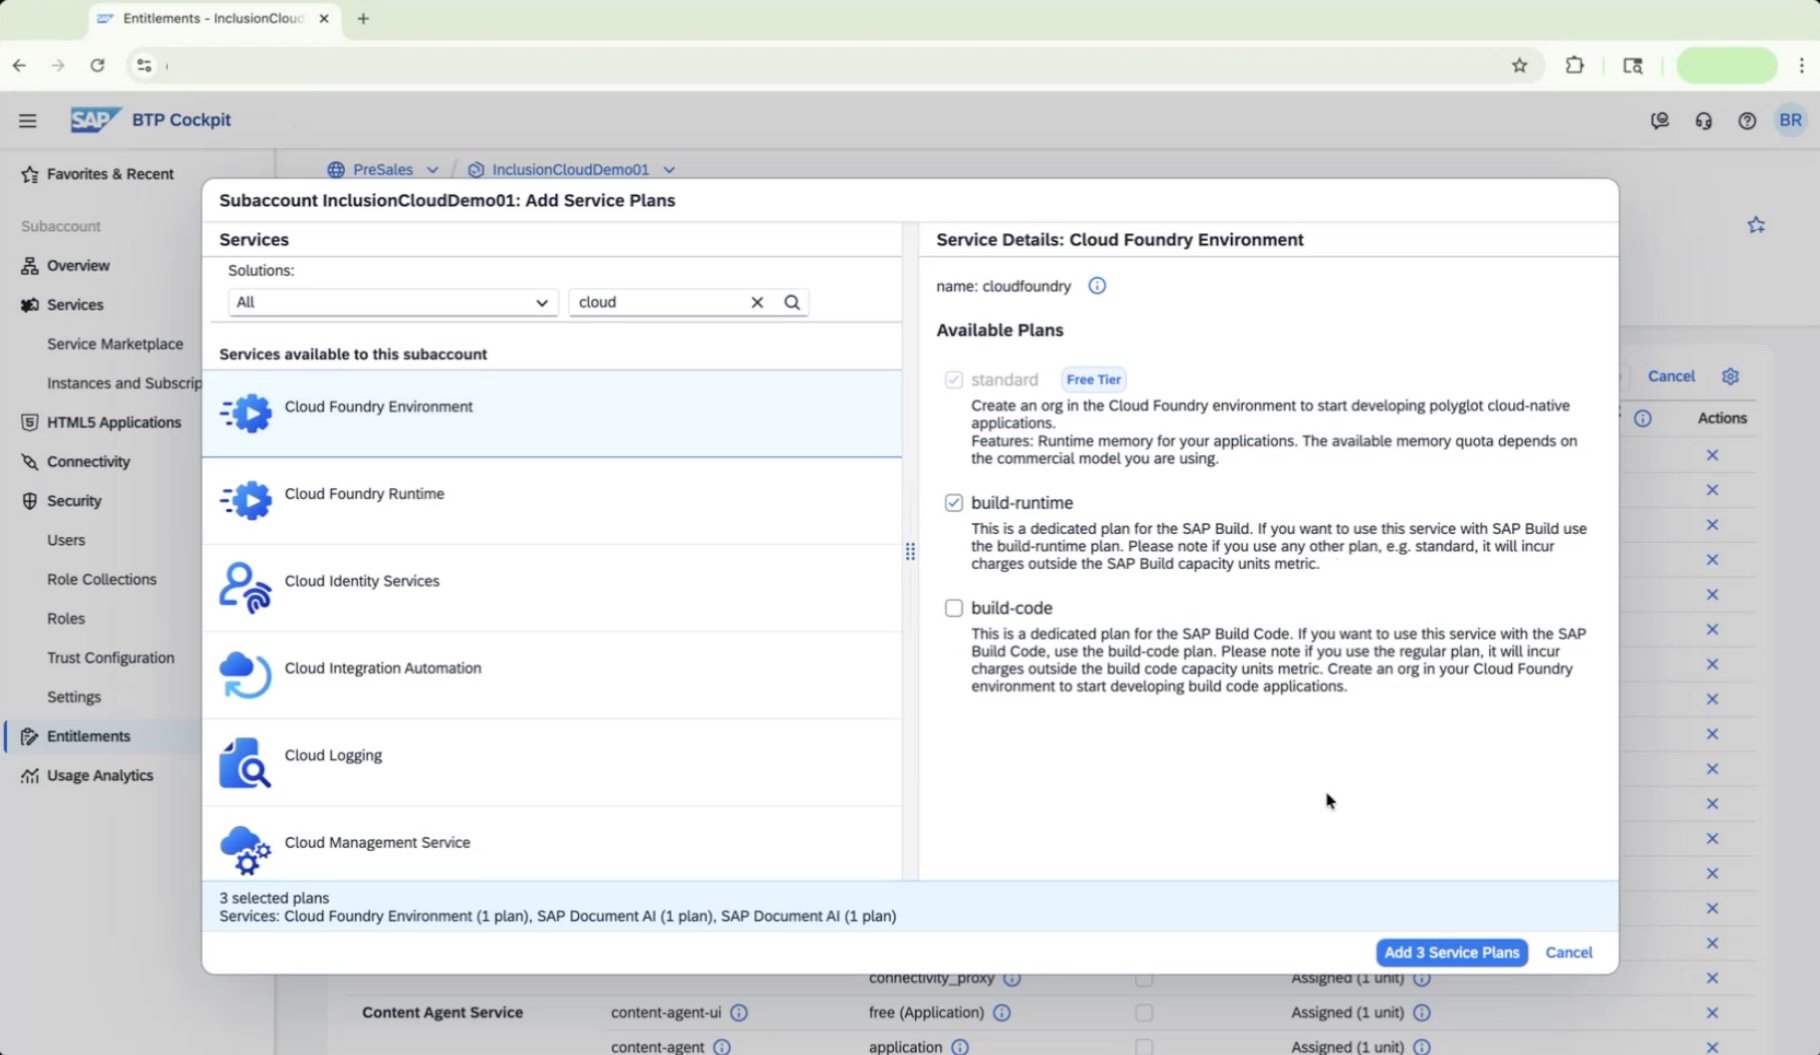 Click **Add 3 Service Plans** to add all selected plans to your subaccount entitlements.
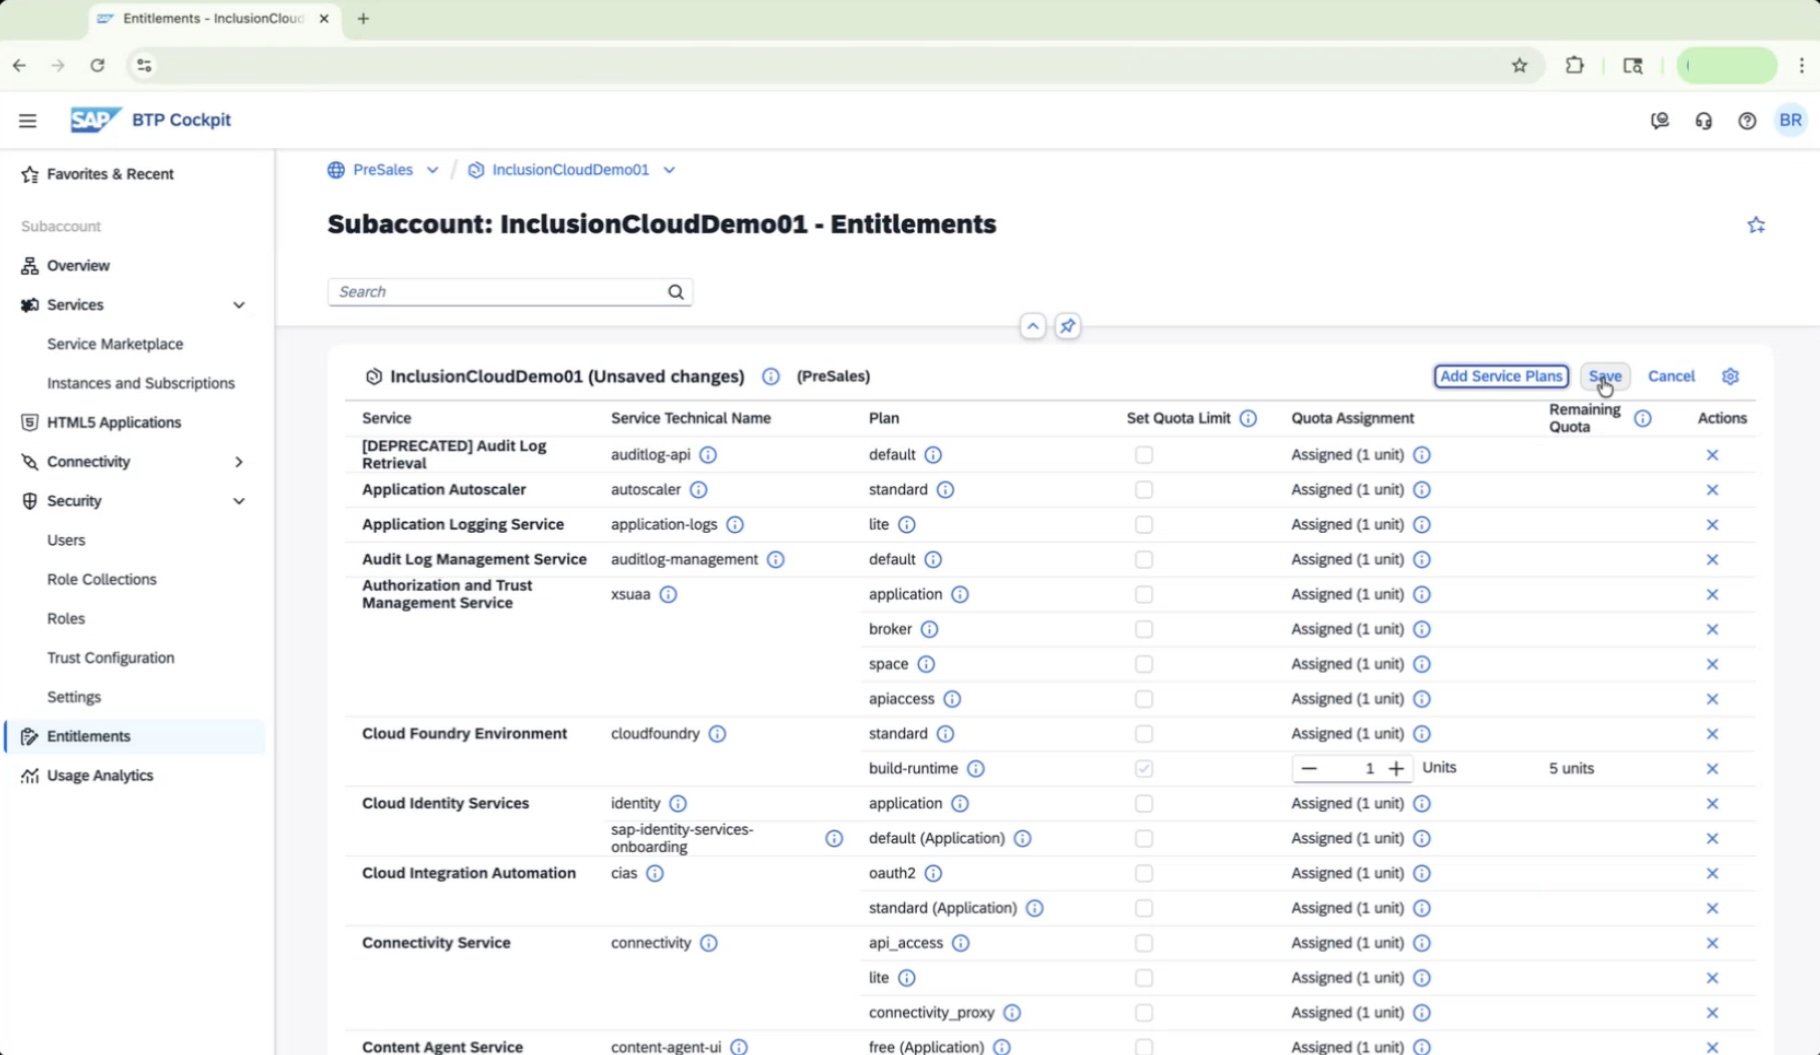
Click **Save** to apply the entitlement changes. The system displays a "Saving assignments" indicator while it processes.
Click **Add 3 Service Plans** to add all selected plans to your subaccount entitlements.
Click **Save** to apply the entitlement changes. The system displays a "Saving assignments" indicator while it processes.
 ### Enable Cloud Foundry
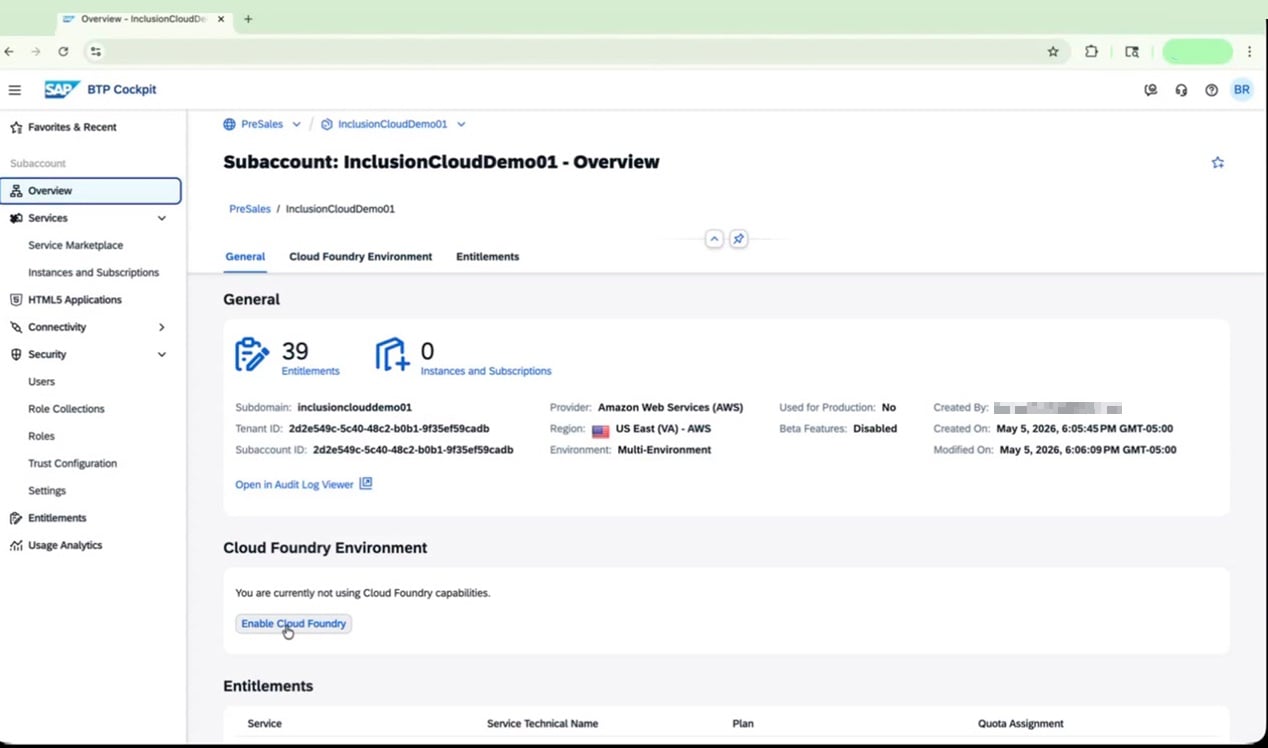
Navigate to the **Overview** tab of your subaccount. Under "Cloud Foundry Environment," click **Enable Cloud Foundry**.
### Enable Cloud Foundry
Navigate to the **Overview** tab of your subaccount. Under "Cloud Foundry Environment," click **Enable Cloud Foundry**.
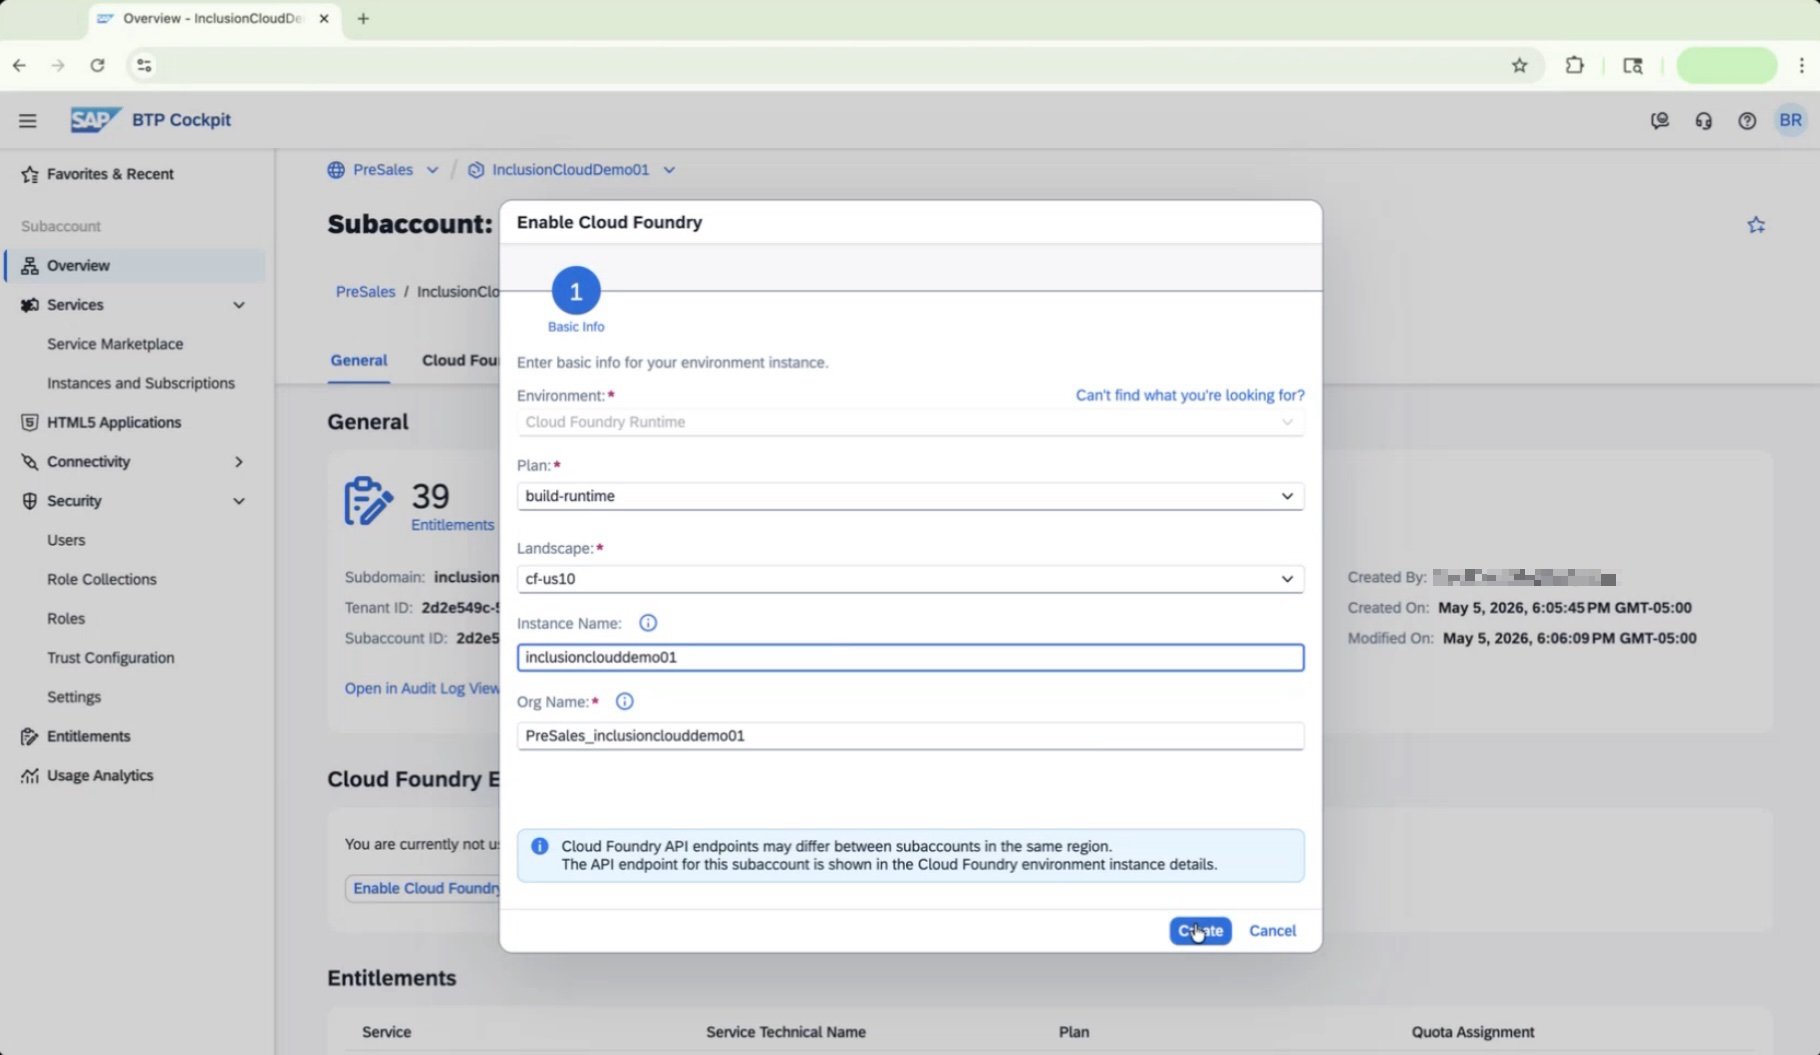
 In the **Enable Cloud Foundry** dialog, fill in the following fields:
| Field | Value |
| ------------- | ------------------------------- |
| Plan | `build-runtime` |
| Landscape | `Your current landscape` |
| Instance Name | `inclusionclouddemo01` |
| Org Name | `PreSales_inclusionclouddemo01` |
Click **Create** to activate Cloud Foundry for the subaccount.
In the **Enable Cloud Foundry** dialog, fill in the following fields:
| Field | Value |
| ------------- | ------------------------------- |
| Plan | `build-runtime` |
| Landscape | `Your current landscape` |
| Instance Name | `inclusionclouddemo01` |
| Org Name | `PreSales_inclusionclouddemo01` |
Click **Create** to activate Cloud Foundry for the subaccount.
 Your subaccount is now set up with the correct trust configuration, service entitlements, and an active Cloud Foundry environment. You're ready to move on to creating service and application instances.
***
## Chapter 2: Create Instances and Configure User Access
In this chapter, you'll create a service instance and an application subscription for SAP Document AI, set up user access through SAP Cloud Identity Services (IAS), assign the required role collections, and troubleshoot any permission errors you may encounter.
### Create the Service Instance and Subscription
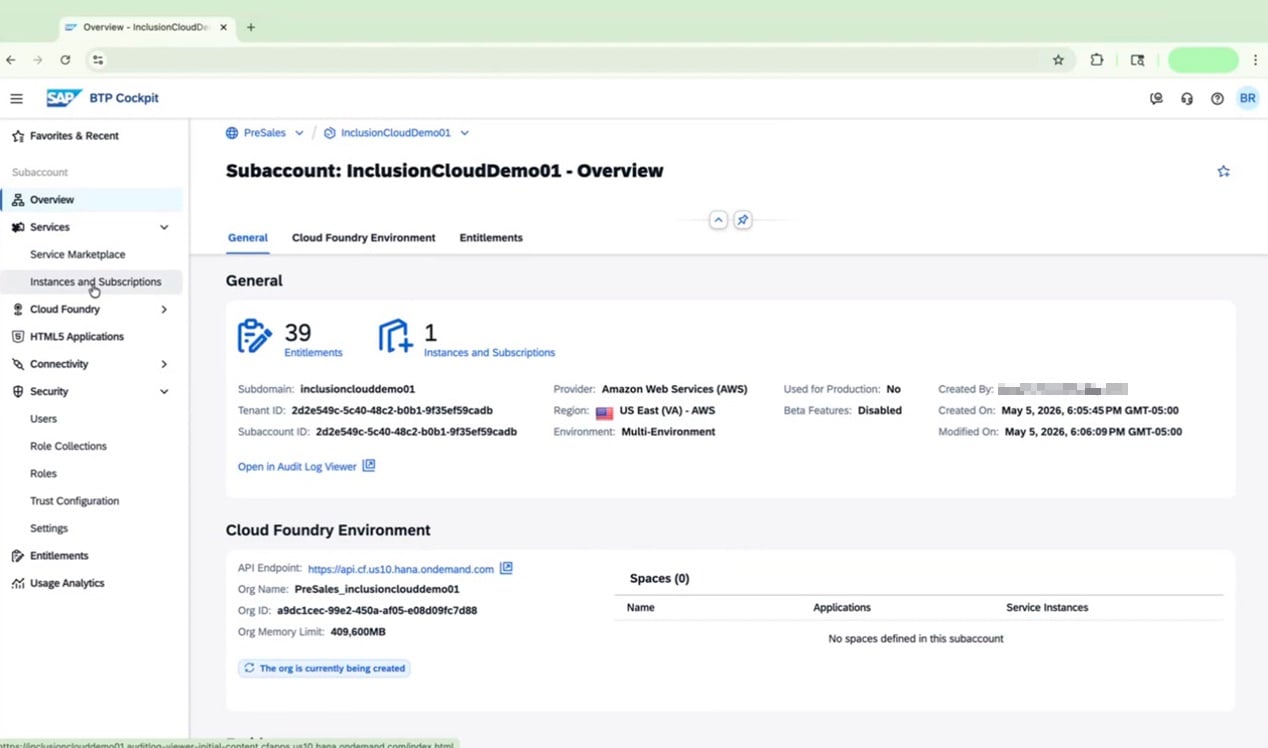
Open SAP BTP Cockpit and navigate to your subaccount (for example, *InclusionCloudDemo01*). You'll land on the subaccount **Overview** page, where you can review details such as entitlements, provider, region, and Cloud Foundry environment status.
Your subaccount is now set up with the correct trust configuration, service entitlements, and an active Cloud Foundry environment. You're ready to move on to creating service and application instances.
***
## Chapter 2: Create Instances and Configure User Access
In this chapter, you'll create a service instance and an application subscription for SAP Document AI, set up user access through SAP Cloud Identity Services (IAS), assign the required role collections, and troubleshoot any permission errors you may encounter.
### Create the Service Instance and Subscription
Open SAP BTP Cockpit and navigate to your subaccount (for example, *InclusionCloudDemo01*). You'll land on the subaccount **Overview** page, where you can review details such as entitlements, provider, region, and Cloud Foundry environment status.
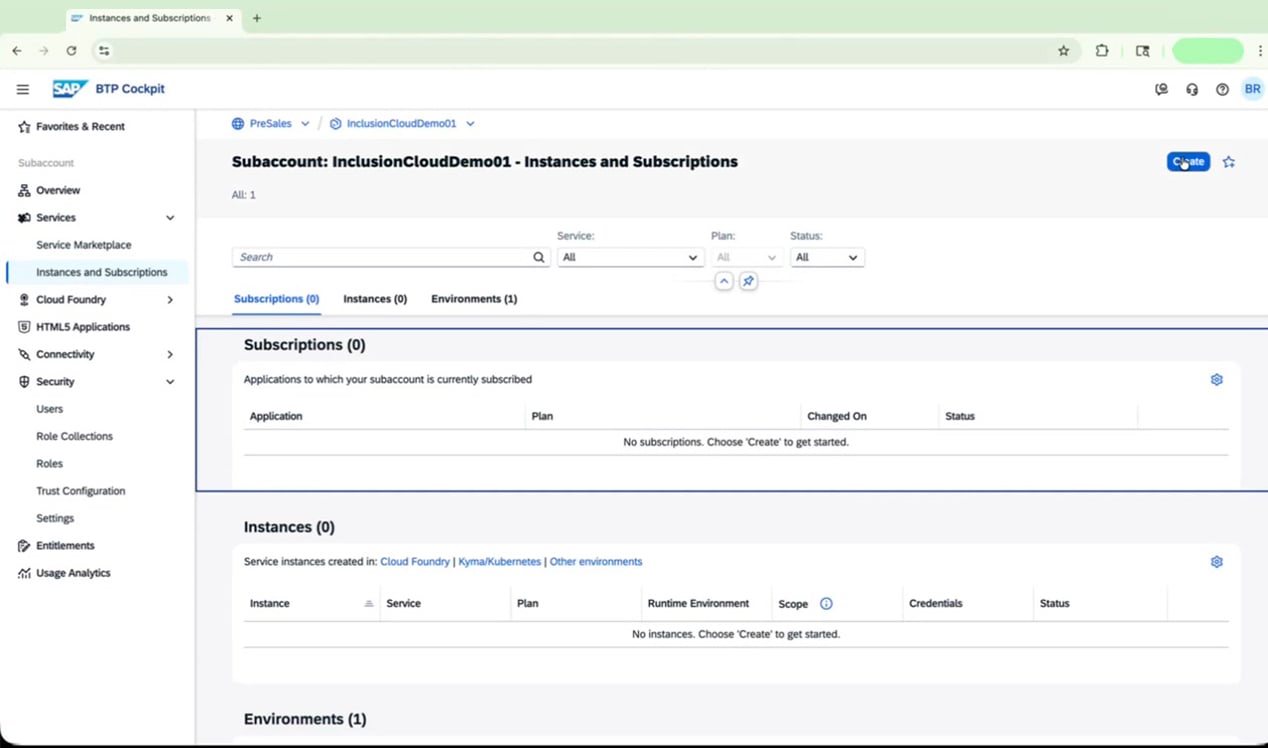
 In the left navigation pane, go to **Services > Instances and Subscriptions**. The page will be empty at this point — that's expected.
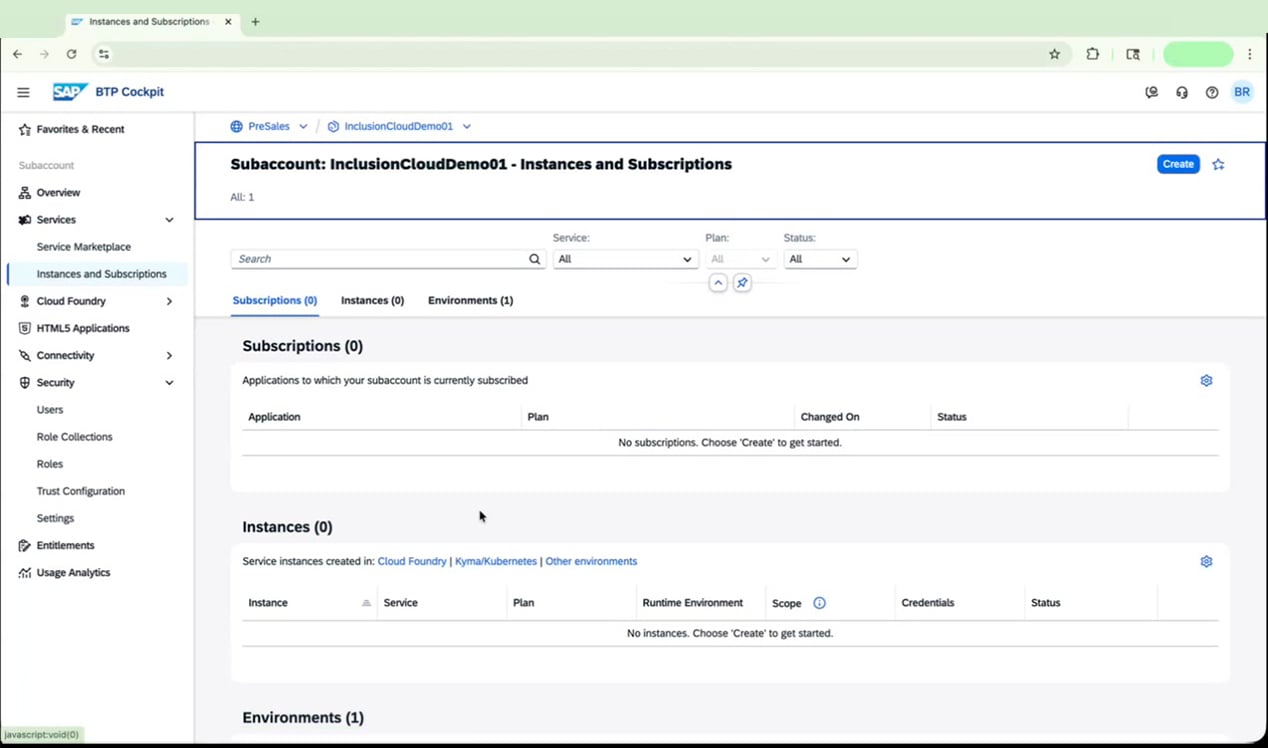 Click **Create** in the top-right corner to open the "New Instance or Subscription" dialog.
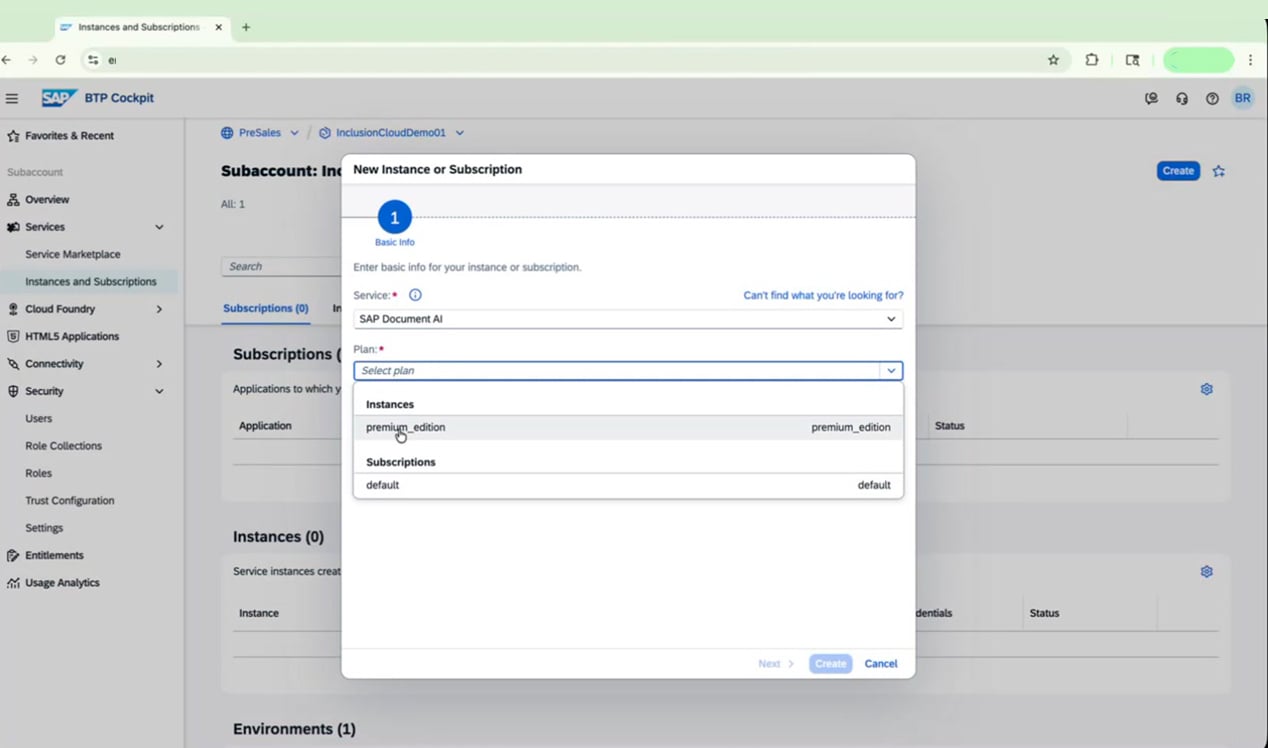
 In the dialog, select **SAP Document AI** as the service. If the system prompts you that no Cloud Foundry spaces exist, you'll need to create one before continuing.
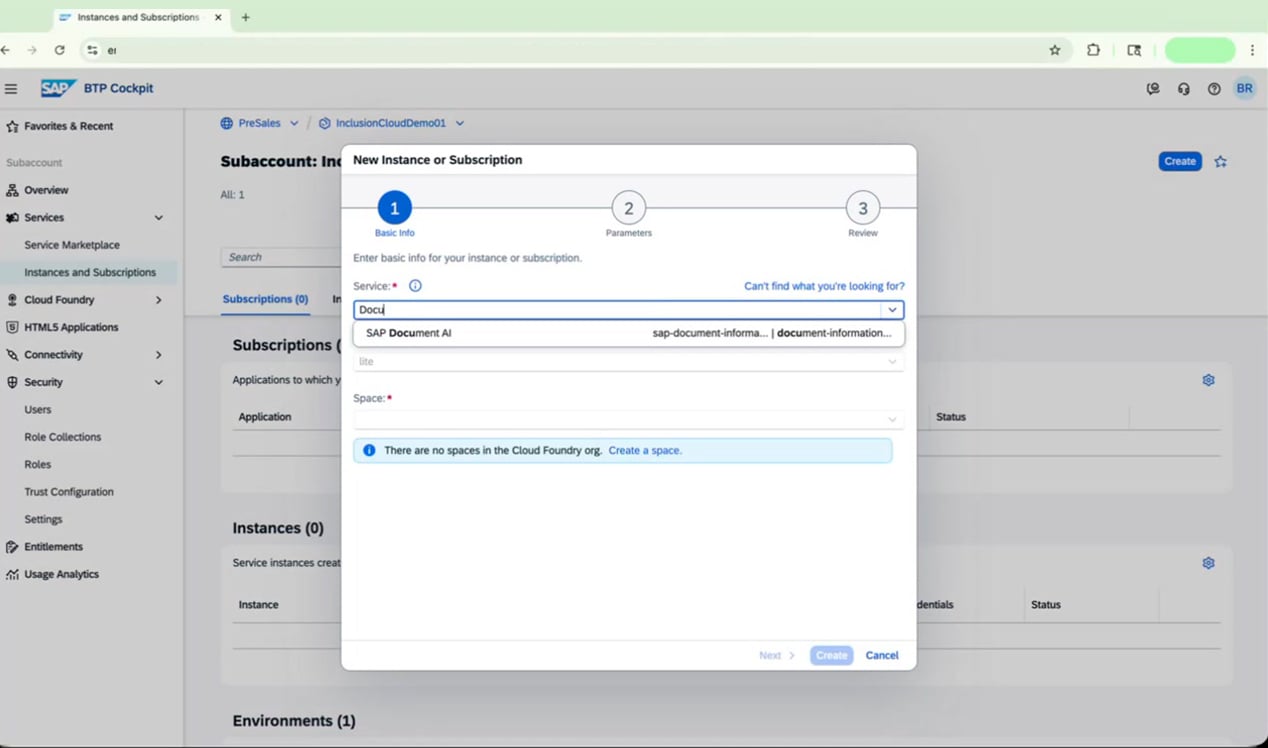 For **Plan**, select **premium\_edition** under the "Instances" section.
 If no Cloud Foundry space exists, click the **Create a space** link in the dialog. Enter a name for your space (for example, *Dev*) and confirm.
This step is only necessary if you do not already have a space available.
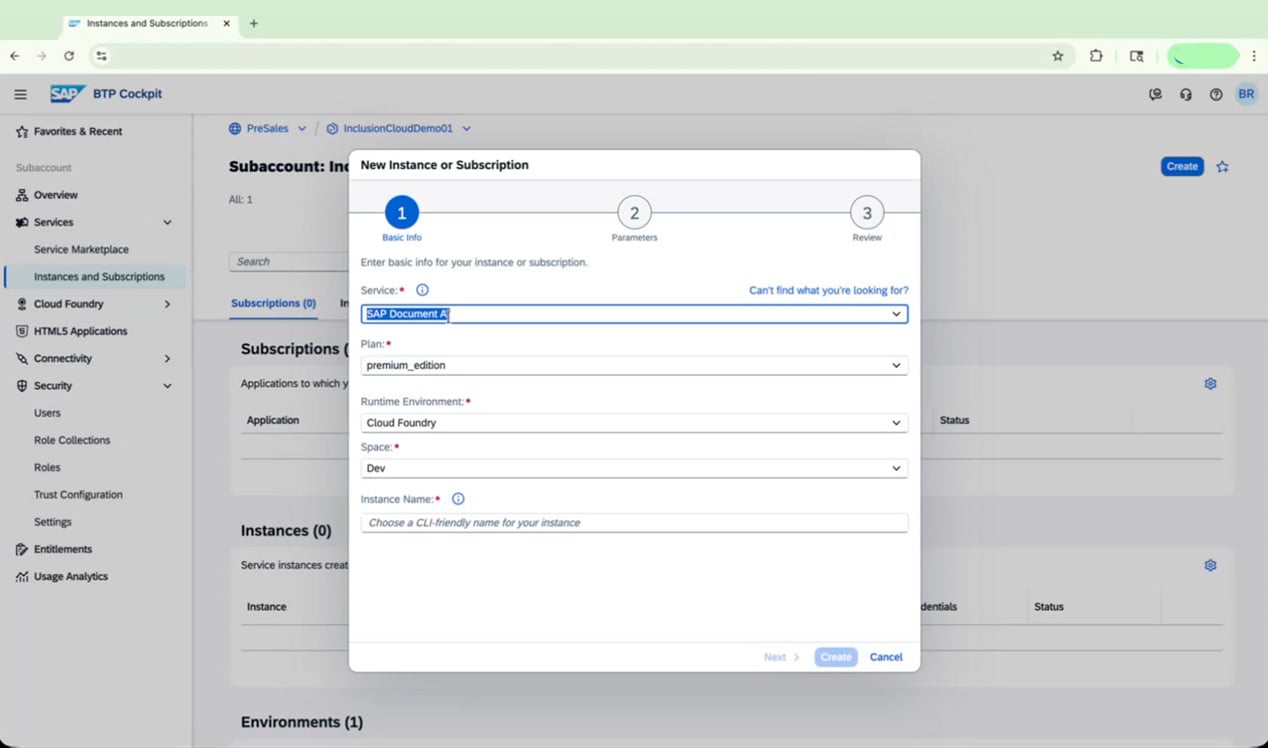
Complete the remaining fields in the dialog:
| Field | Value |
| ------------------- | ----------------------------------------- |
| Service | SAP Document AI |
| Plan | premium\_edition |
| Runtime Environment | Cloud Foundry |
| Space | Dev (or your chosen name) |
| Instance Name | A CLI-friendly name, e.g. *docai-premium* |
Click **Create** to submit.
If no Cloud Foundry space exists, click the **Create a space** link in the dialog. Enter a name for your space (for example, *Dev*) and confirm.
This step is only necessary if you do not already have a space available.
Complete the remaining fields in the dialog:
| Field | Value |
| ------------------- | ----------------------------------------- |
| Service | SAP Document AI |
| Plan | premium\_edition |
| Runtime Environment | Cloud Foundry |
| Space | Dev (or your chosen name) |
| Instance Name | A CLI-friendly name, e.g. *docai-premium* |
Click **Create** to submit.
 Your new instance will appear in the **Instances** list with the status **Creation in Progress**.
 Click **Create** again. In the dialog, select **SAP Document AI** as the service, then choose **default** under the "Subscriptions" section for the plan.
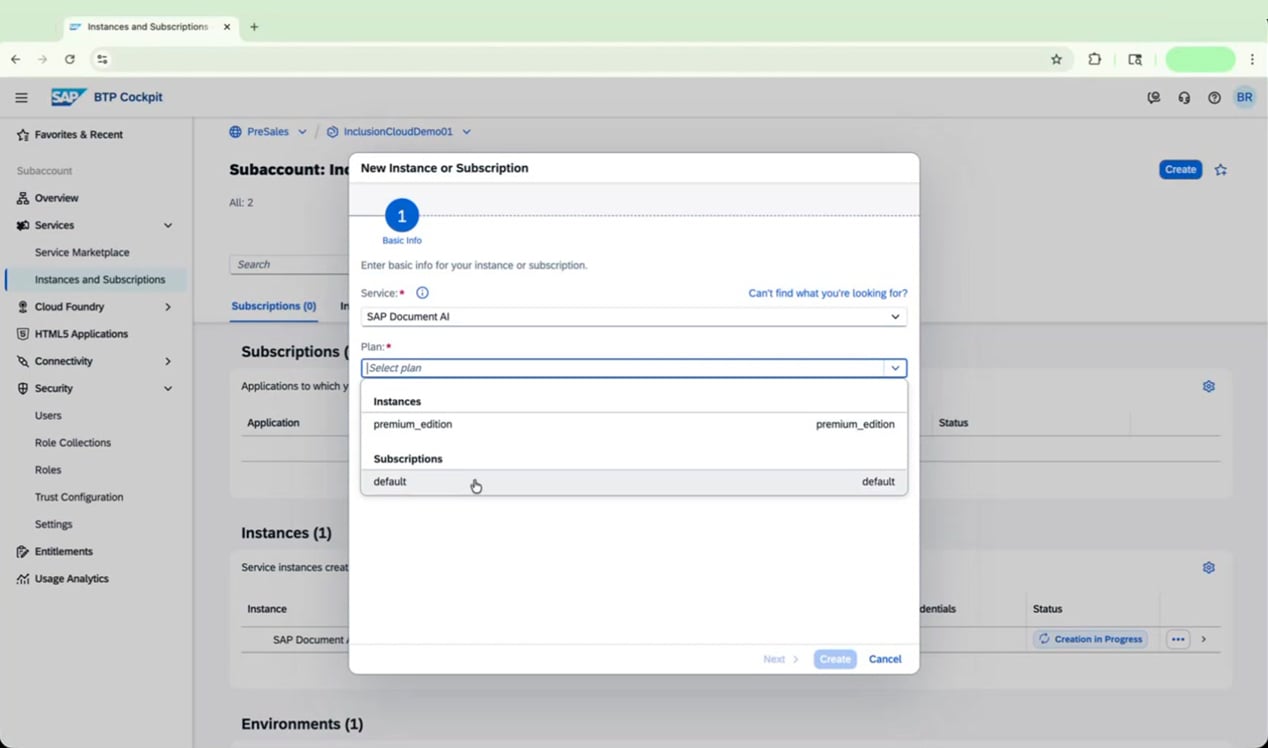 Click **Create** to subscribe.
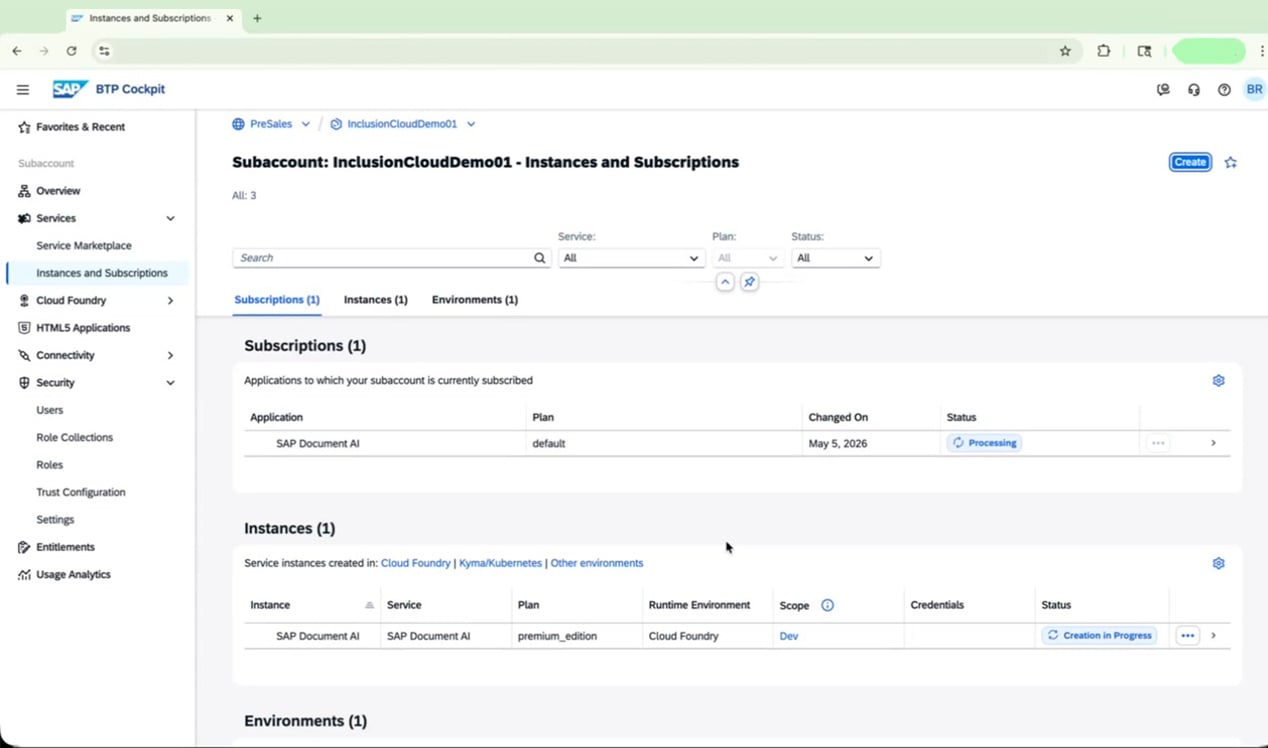
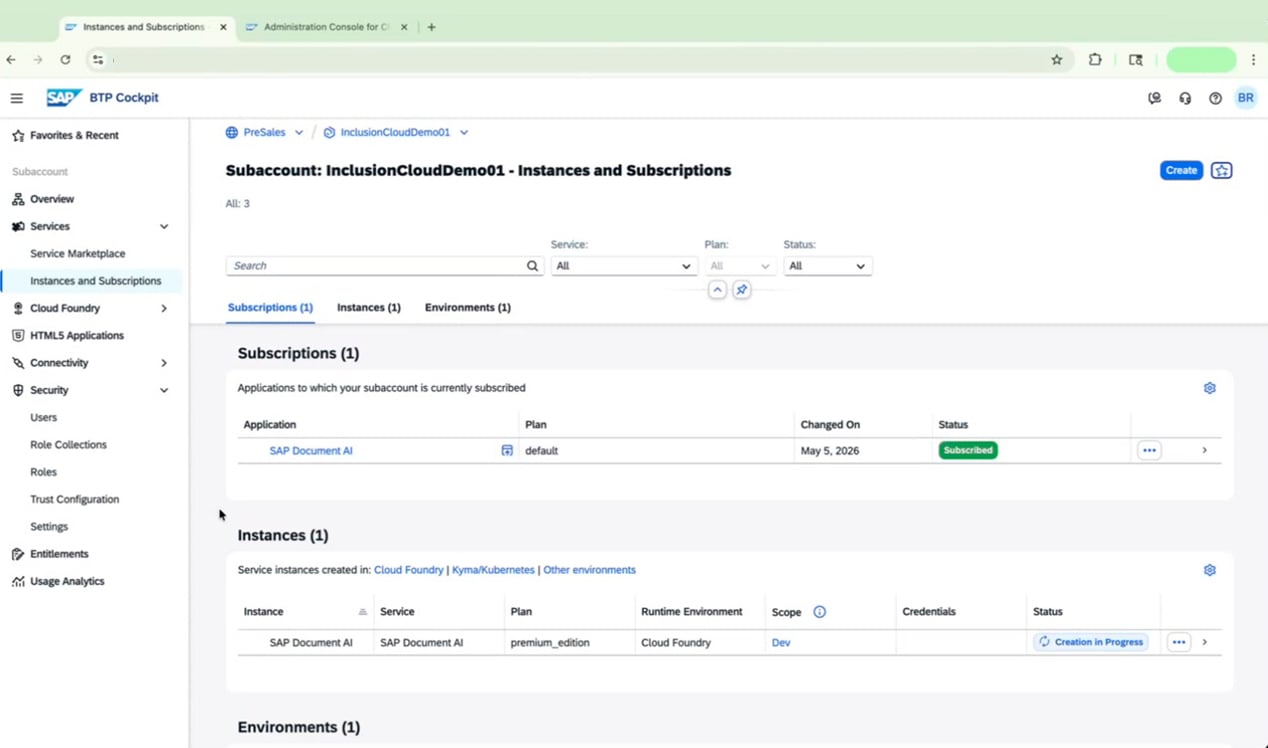
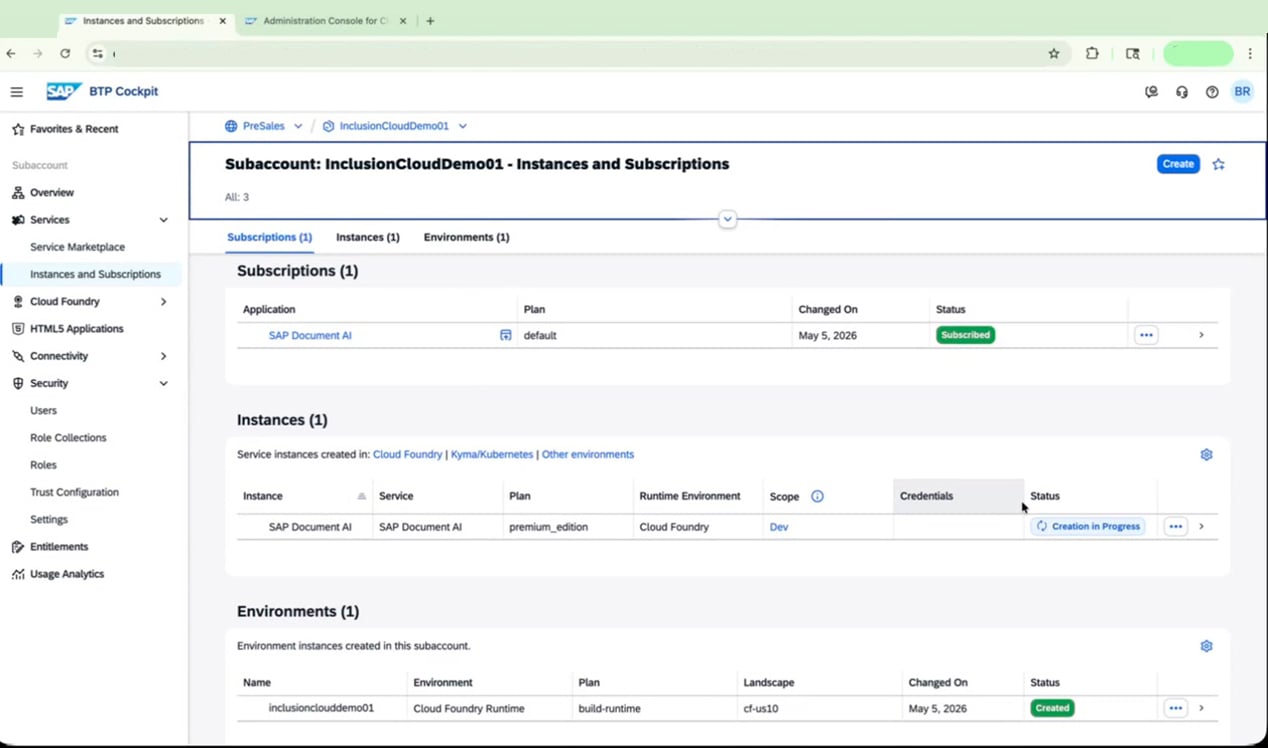
Both entries now appear on the **Instances and Subscriptions** page:
* **Subscriptions:** SAP Document AI | Plan: default | Status: Processing
* **Instances:** SAP Document AI | Plan: premium\_edition | Status: Creation in Progress
Click **Create** to subscribe.
Both entries now appear on the **Instances and Subscriptions** page:
* **Subscriptions:** SAP Document AI | Plan: default | Status: Processing
* **Instances:** SAP Document AI | Plan: premium\_edition | Status: Creation in Progress
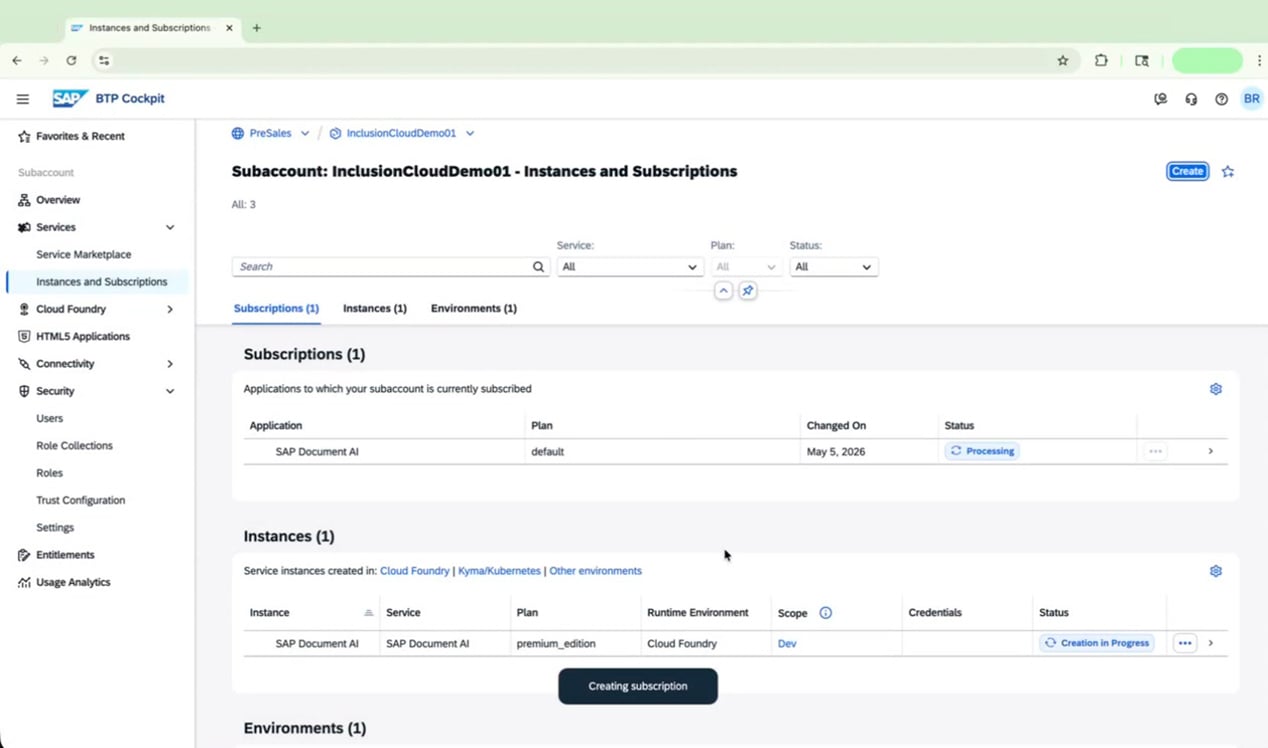 Do not proceed to the next sections until both the service instance and the application subscription have finished processing and show as active. This can take **up to 30 minutes**.
 ### Configure Admin Access in SAP Cloud Identity Services
While you wait for provisioning to complete, you can configure admin access for SAP Document AI through the SAP Cloud Identity Services (IAS) Administration Console.
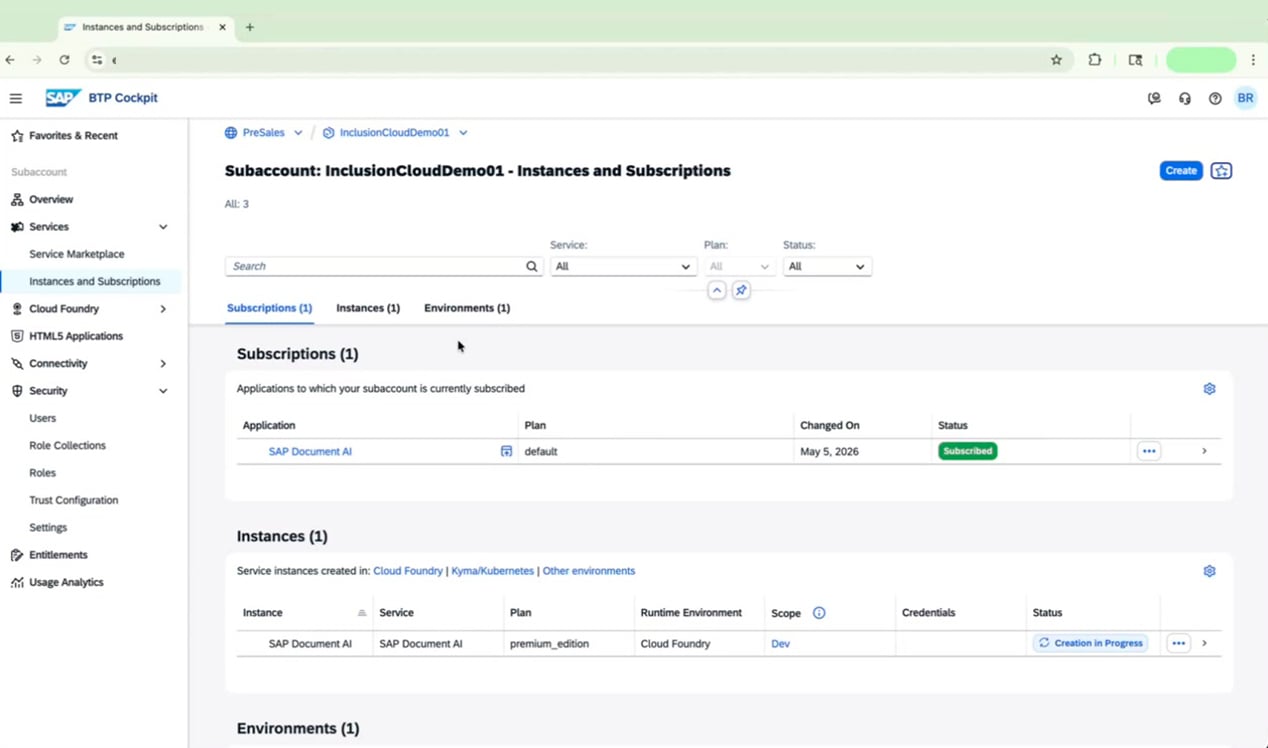
Monitor the **Instances and Subscriptions** page until the SAP Document AI subscription status changes from **Processing** to **Subscribed**. The service instance may still show **Creation in Progress** at this point.
### Configure Admin Access in SAP Cloud Identity Services
While you wait for provisioning to complete, you can configure admin access for SAP Document AI through the SAP Cloud Identity Services (IAS) Administration Console.
Monitor the **Instances and Subscriptions** page until the SAP Document AI subscription status changes from **Processing** to **Subscribed**. The service instance may still show **Creation in Progress** at this point.
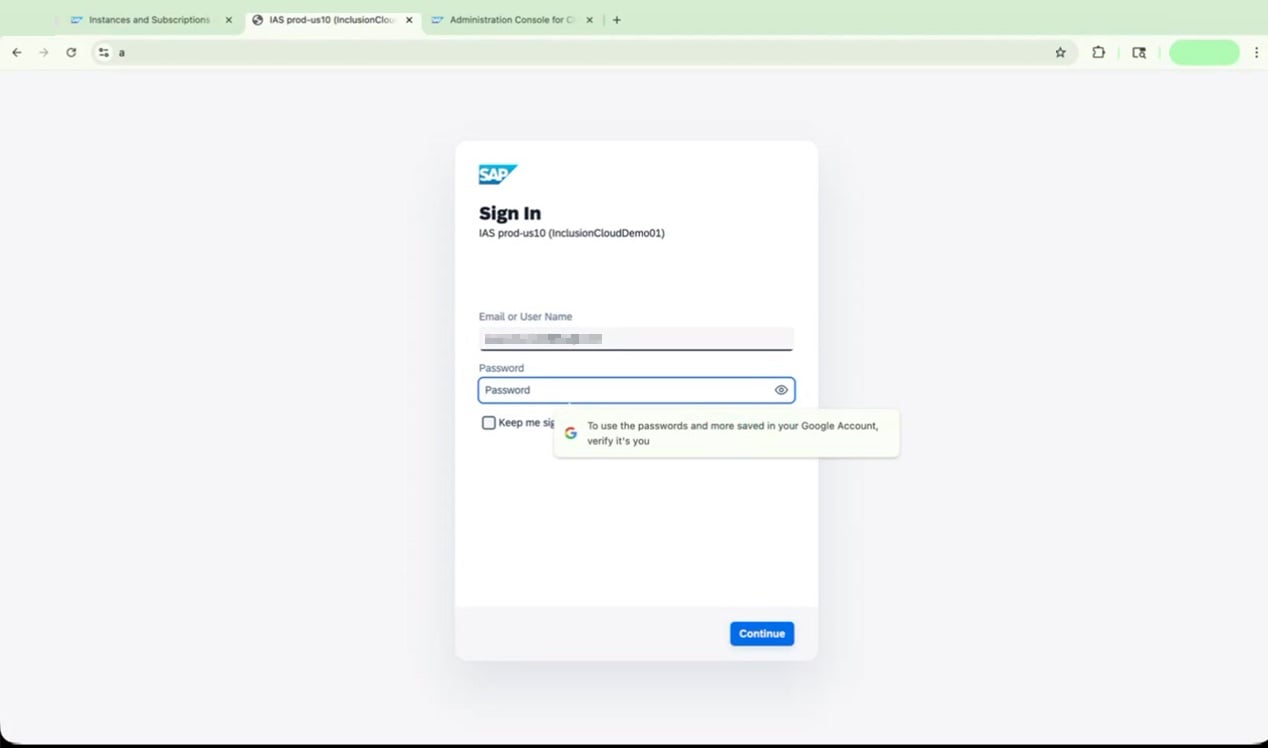
 Open a new browser tab and navigate to your IAS Administration Console URL (for example, `XYZ.accounts.ondemand.com/admin/`). You'll see the **Administration Console Log On** screen.
 Enter your email or user name and password, then click **Log On**.
Once logged in, go to **Users & Authorizations > Groups** in the top menu to view all available groups.
Enter your email or user name and password, then click **Log On**.
Once logged in, go to **Users & Authorizations > Groups** in the top menu to view all available groups.
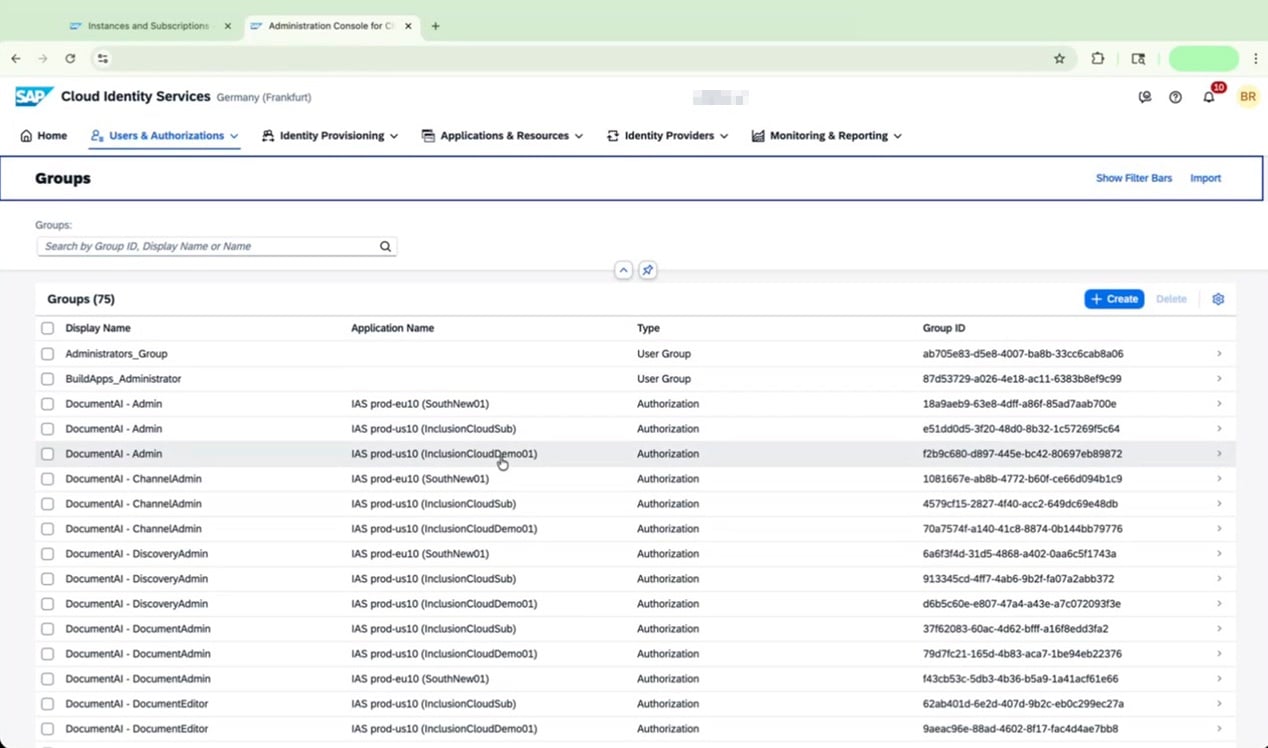 In the groups list, find the group named **DocumentAI - Admin** associated with your application. Click on it to open the group details.
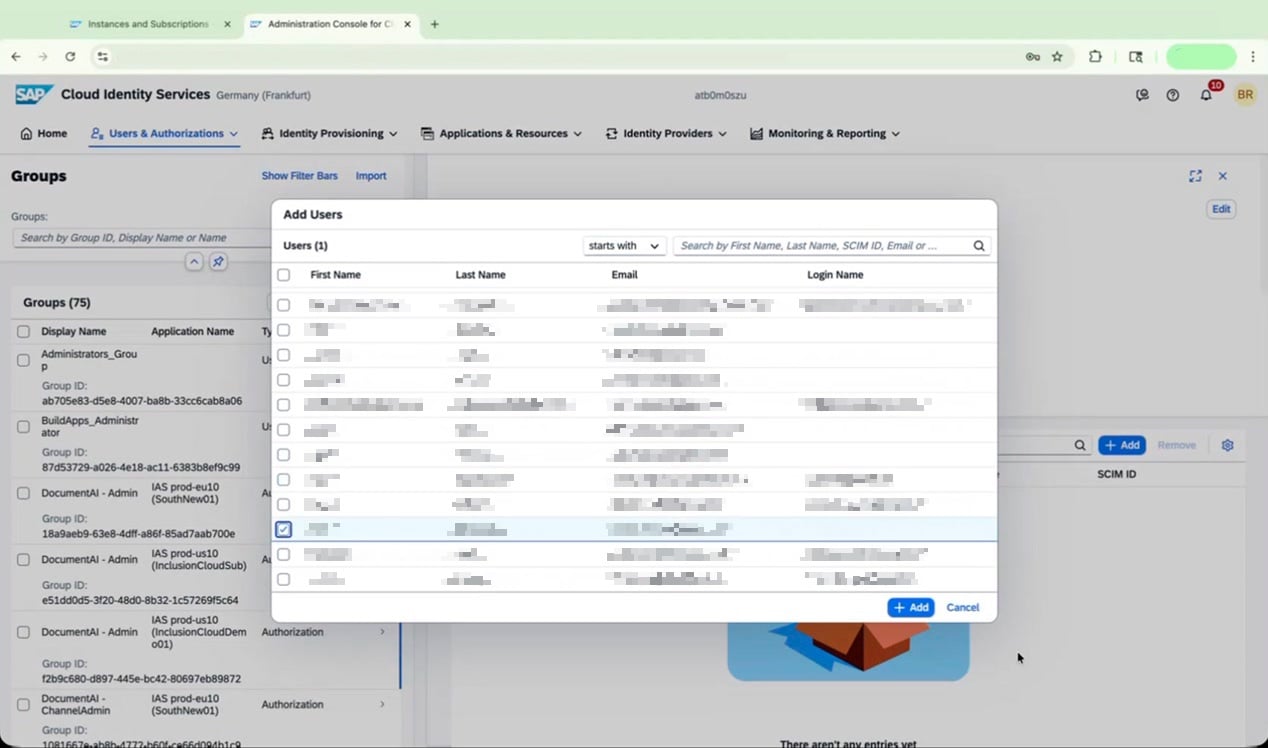
 In the Users section of the group, click **Add**. Search for your user, select them, and click **Add** to grant admin rights to SAP Document AI.
 Return to the SAP BTP Cockpit to check the status of your instance and subscription.
 ### Add Users and Assign Role Collections
With admin access configured in IAS, add your user to the SAP BTP subaccount and assign the Document AI role collections.
In SAP BTP Cockpit, go to **Security > Users** in the left navigation menu.
### Add Users and Assign Role Collections
With admin access configured in IAS, add your user to the SAP BTP subaccount and assign the Document AI role collections.
In SAP BTP Cockpit, go to **Security > Users** in the left navigation menu.
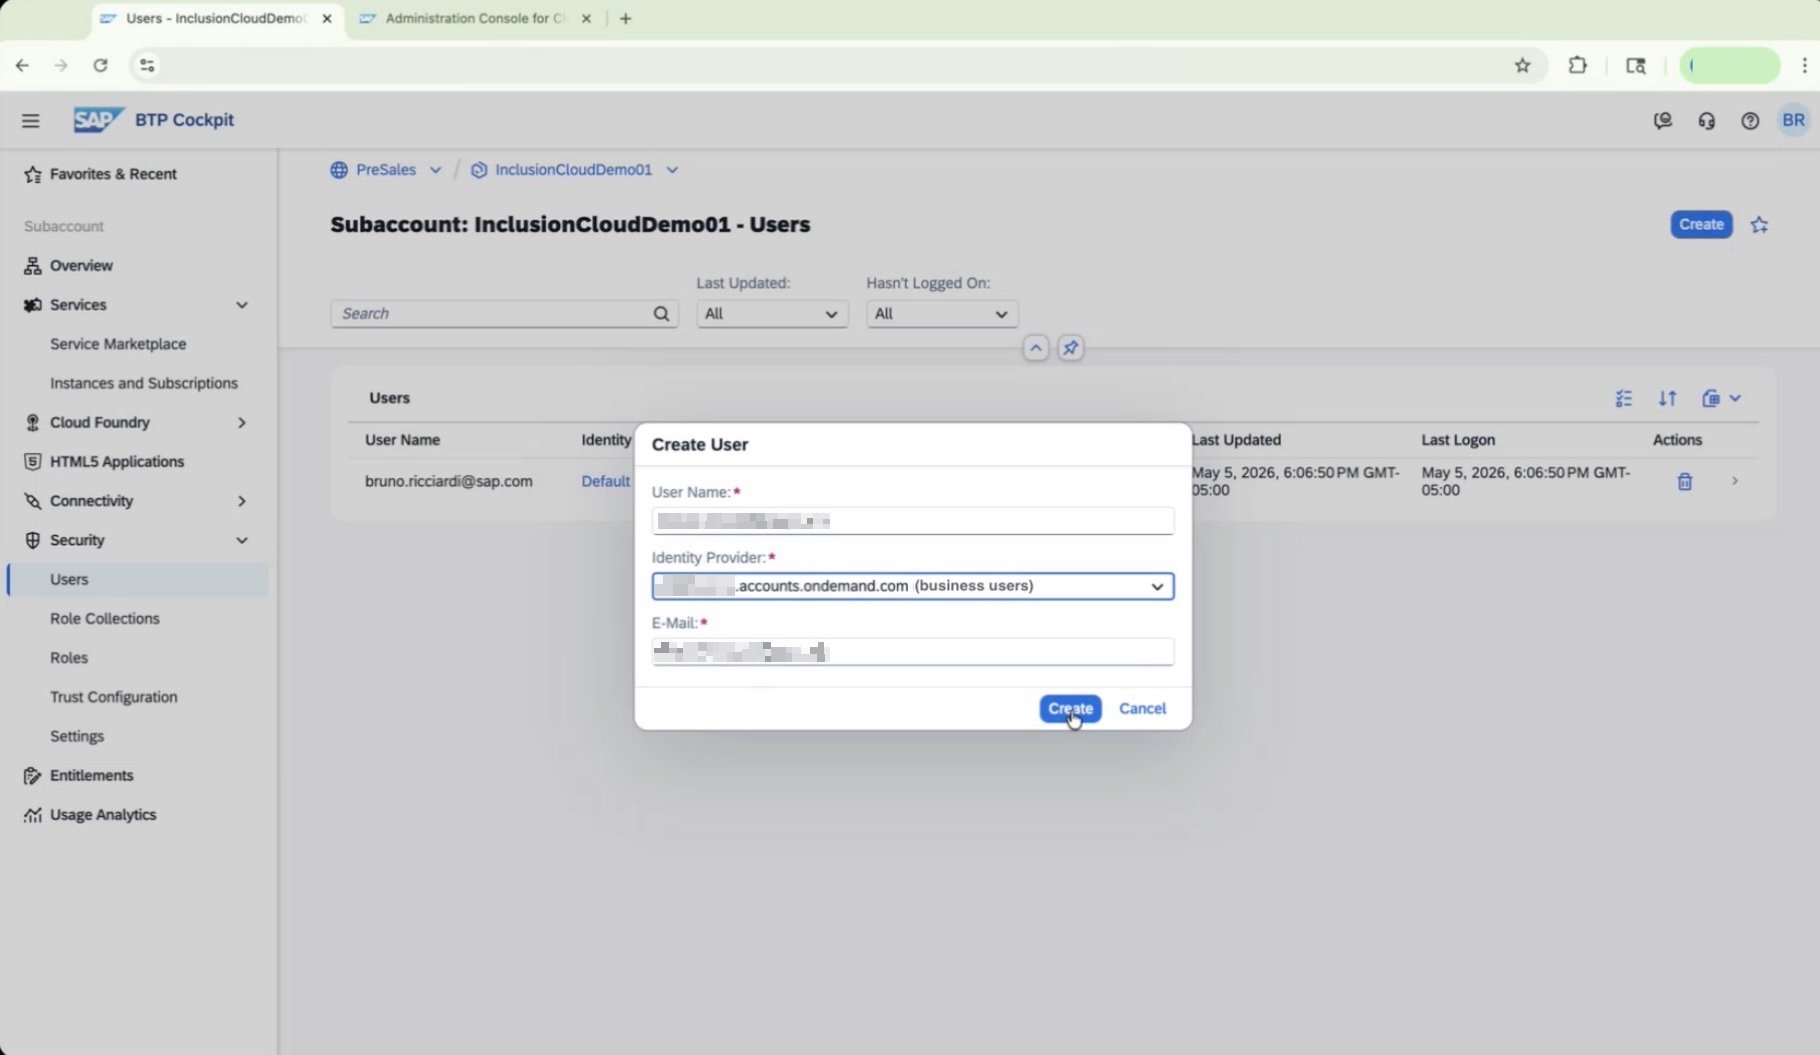
 Click **Create**. In the "Create User" dialog, enter the following and then click **Create**:
| Field | Value |
| ----------------- | --------------------------------------- |
| User Name | Your user's email address |
| Identity Provider | Your IAS tenant URL **(business user)** |
| E-Mail | Your user's email address |
Ensure you are creating this as a **Business User** rather than a platform user. Only business users will have access to the live SAP Document AI application.
Click **Create**. In the "Create User" dialog, enter the following and then click **Create**:
| Field | Value |
| ----------------- | --------------------------------------- |
| User Name | Your user's email address |
| Identity Provider | Your IAS tenant URL **(business user)** |
| E-Mail | Your user's email address |
Ensure you are creating this as a **Business User** rather than a platform user. Only business users will have access to the live SAP Document AI application.
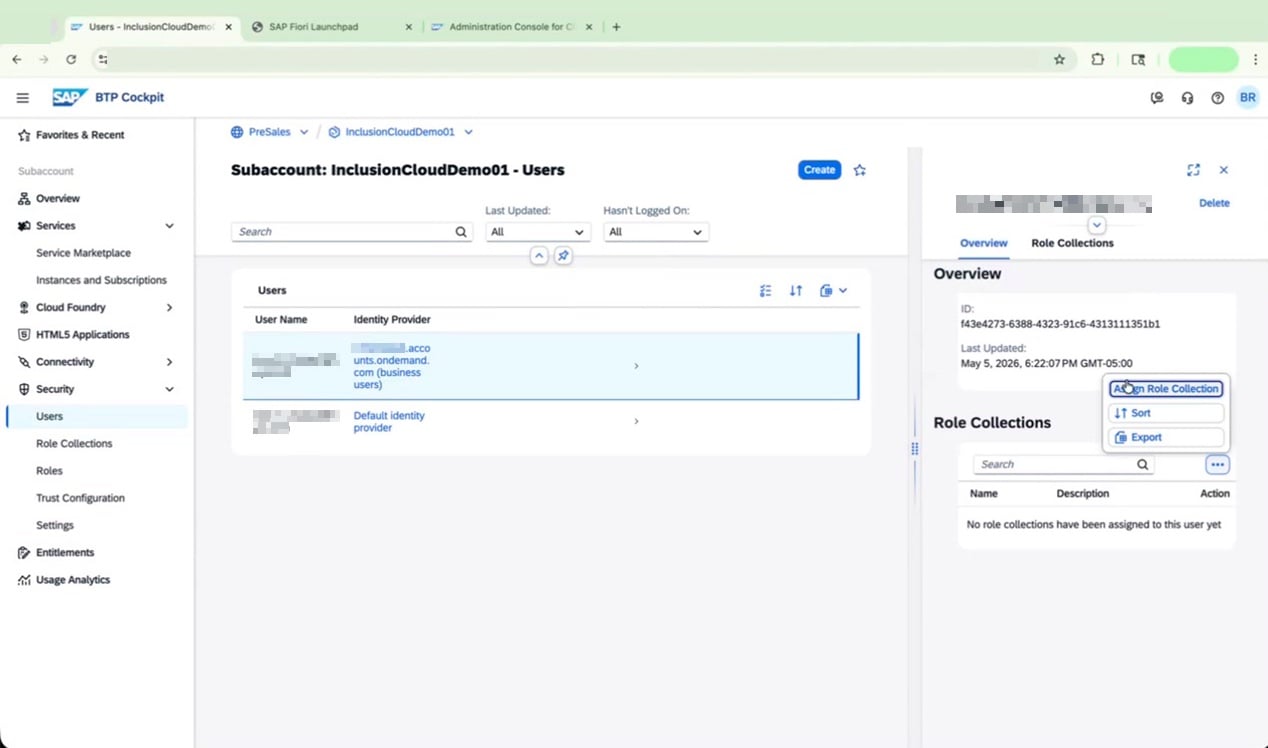
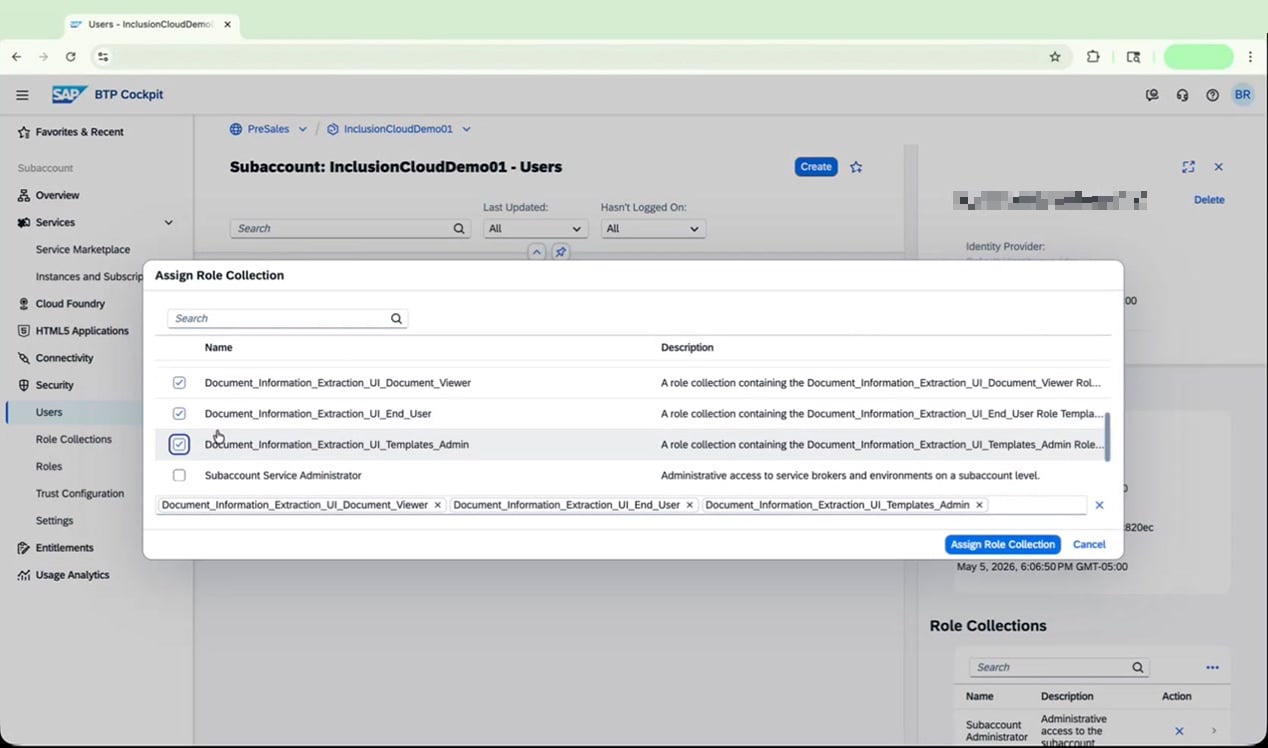
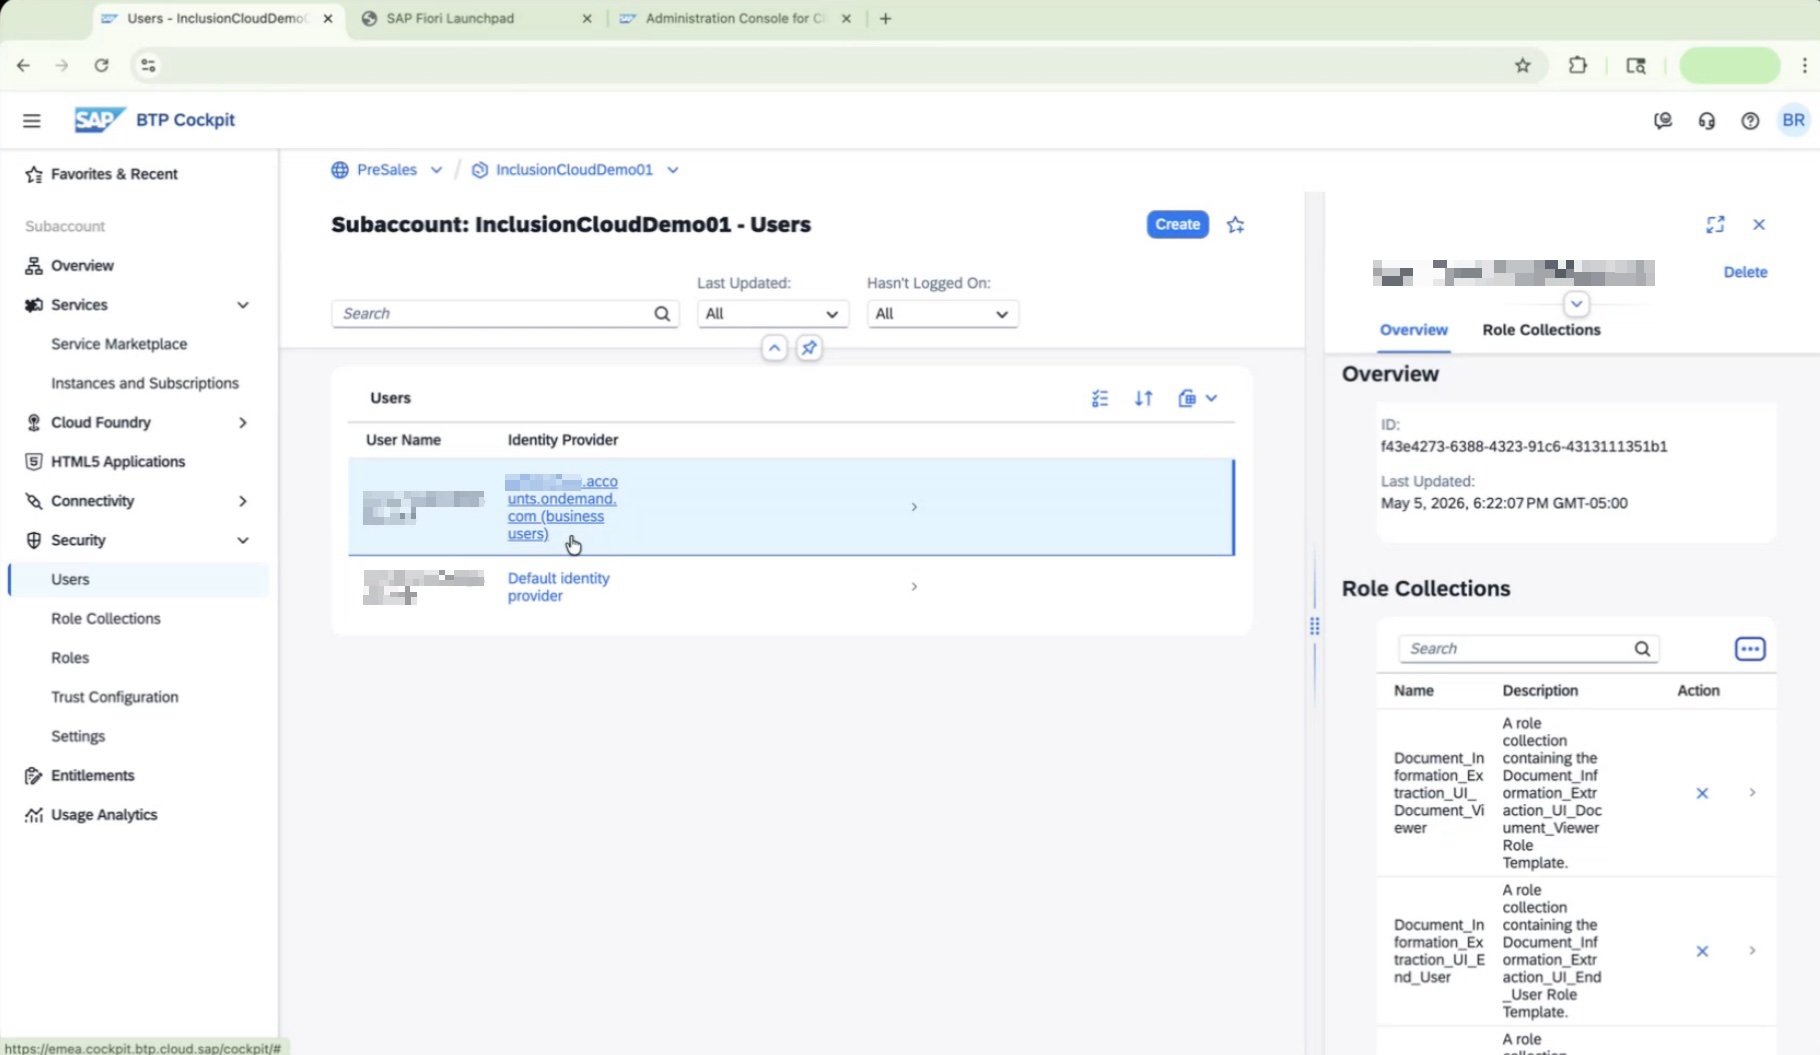
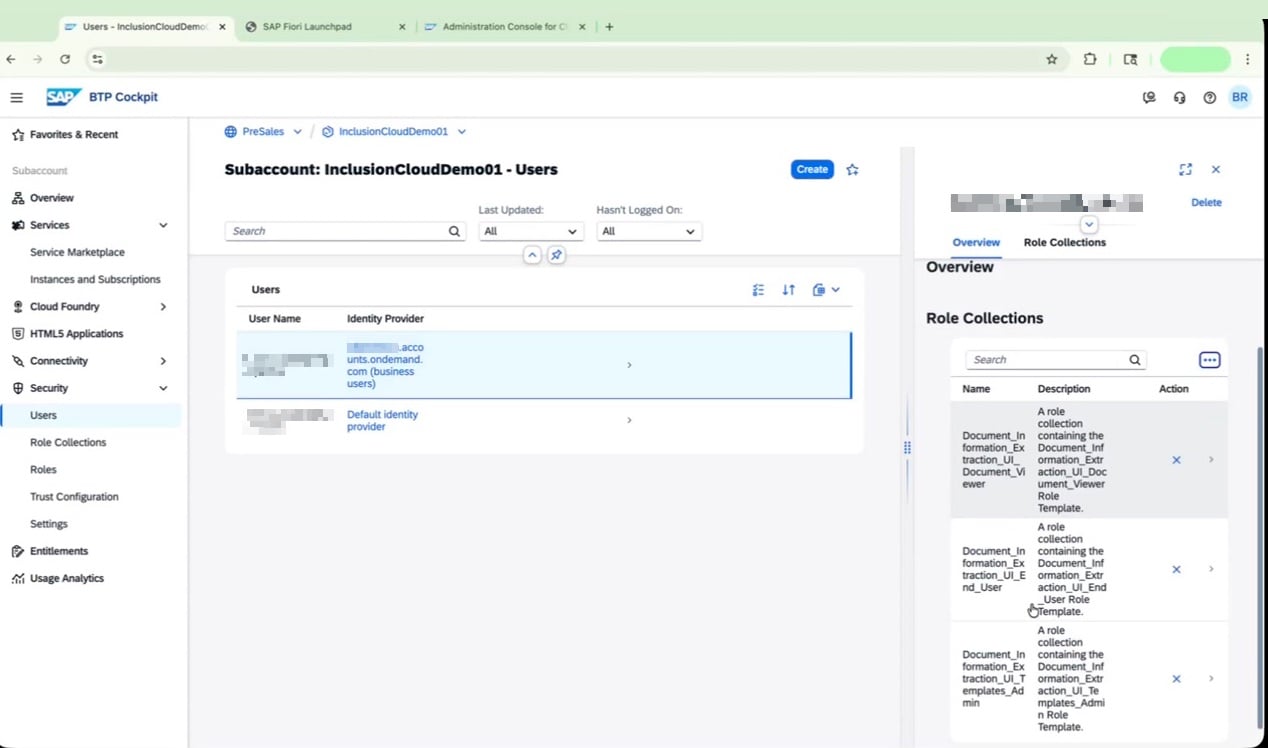
 Locate the newly created user in the list and click on them to open their details panel on the right side of the screen. Locate **Role Collections**, then click **Assign Role Collection** under the **three dots menu**.
 Select the following three role collections:
* `Document_Information_Extraction_UI_Document_Viewer`
* `Document_Information_Extraction_UI_End_User`
* `Document_Information_Extraction_UI_Templates_Admin`
Click **Assign Role Collection** to apply.
Select the following three role collections:
* `Document_Information_Extraction_UI_Document_Viewer`
* `Document_Information_Extraction_UI_End_User`
* `Document_Information_Extraction_UI_Templates_Admin`
Click **Assign Role Collection** to apply.
 If you have multiple users (for example, one using IAS and one using the default identity provider), repeat the role assignment for each user.
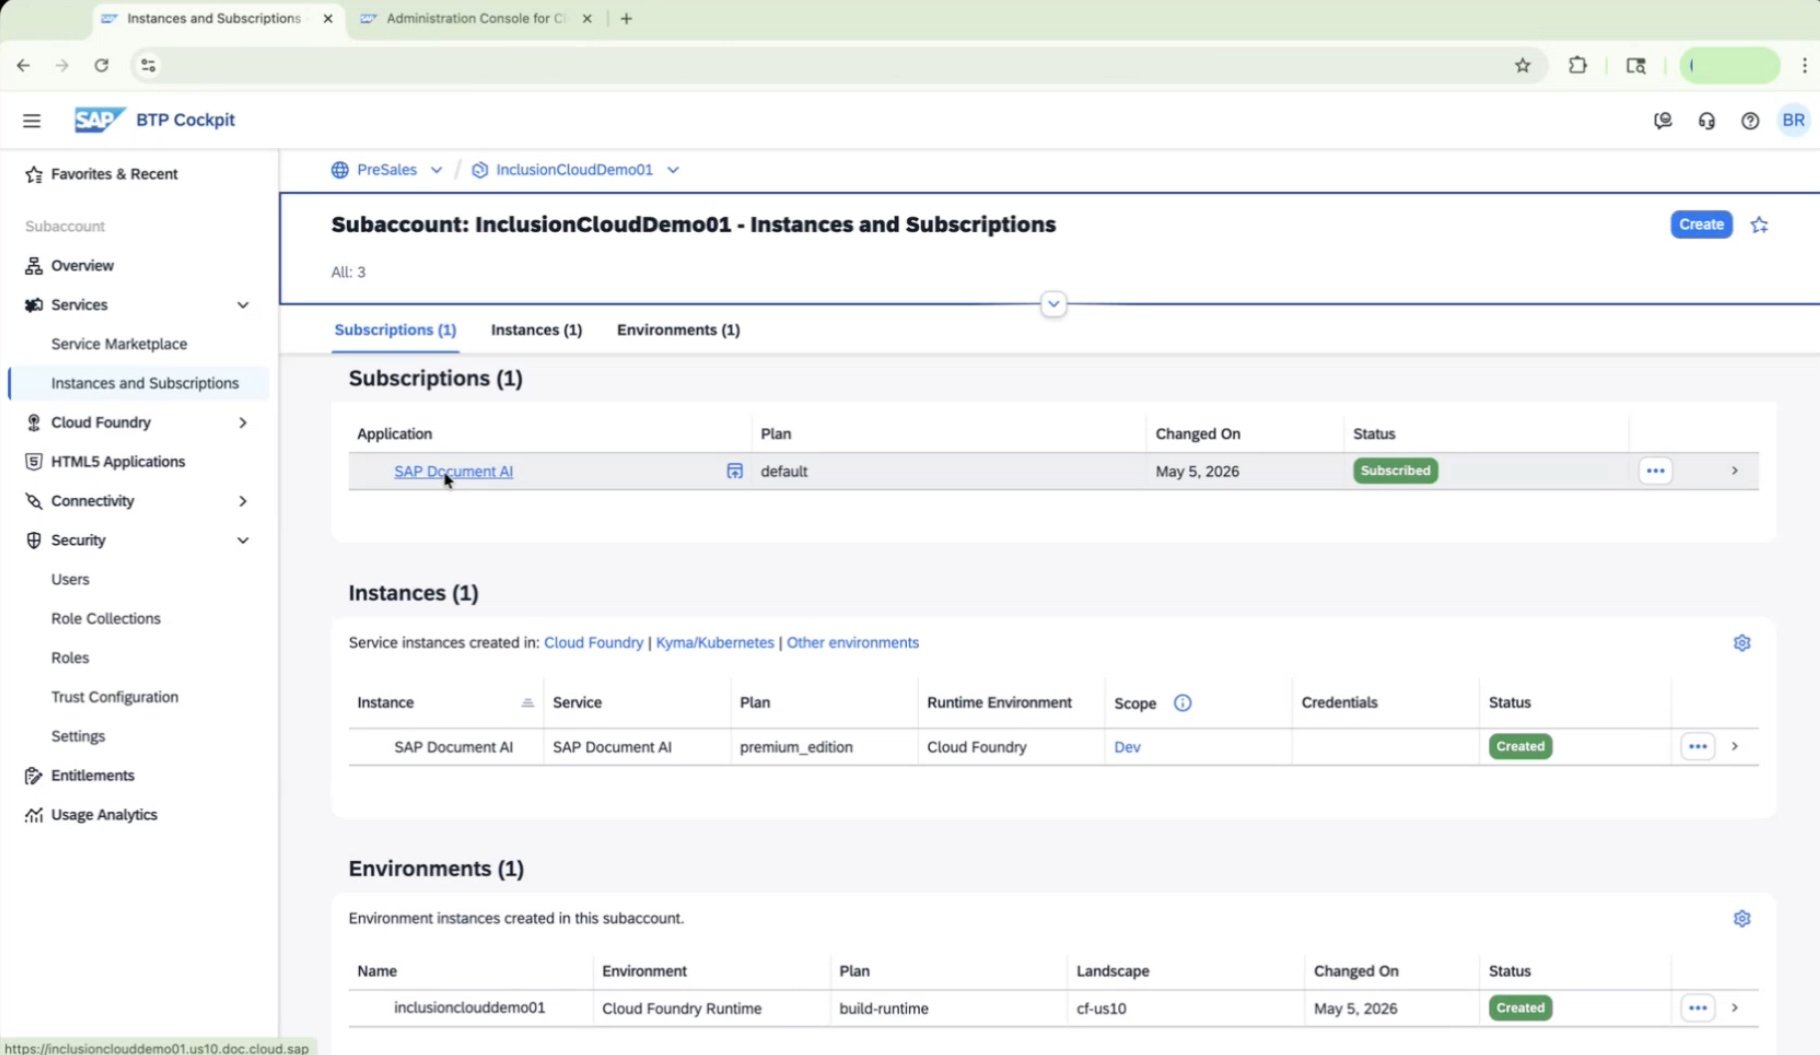
 Go to **Services > Instances and Subscriptions** and verify the current status:
* **Subscriptions:** SAP Document AI | Plan: default | Status: **Subscribed**
* **Instances:** SAP Document AI | Plan: premium\_edition | Runtime: Cloud Foundry | Scope: Dev | Status: **Creation in Progress**
Go to **Services > Instances and Subscriptions** and verify the current status:
* **Subscriptions:** SAP Document AI | Plan: default | Status: **Subscribed**
* **Instances:** SAP Document AI | Plan: premium\_edition | Runtime: Cloud Foundry | Scope: Dev | Status: **Creation in Progress**
 Do not attempt to open the SAP Document AI application until the service instance status shows **Created**. Accessing it too early will result in errors.
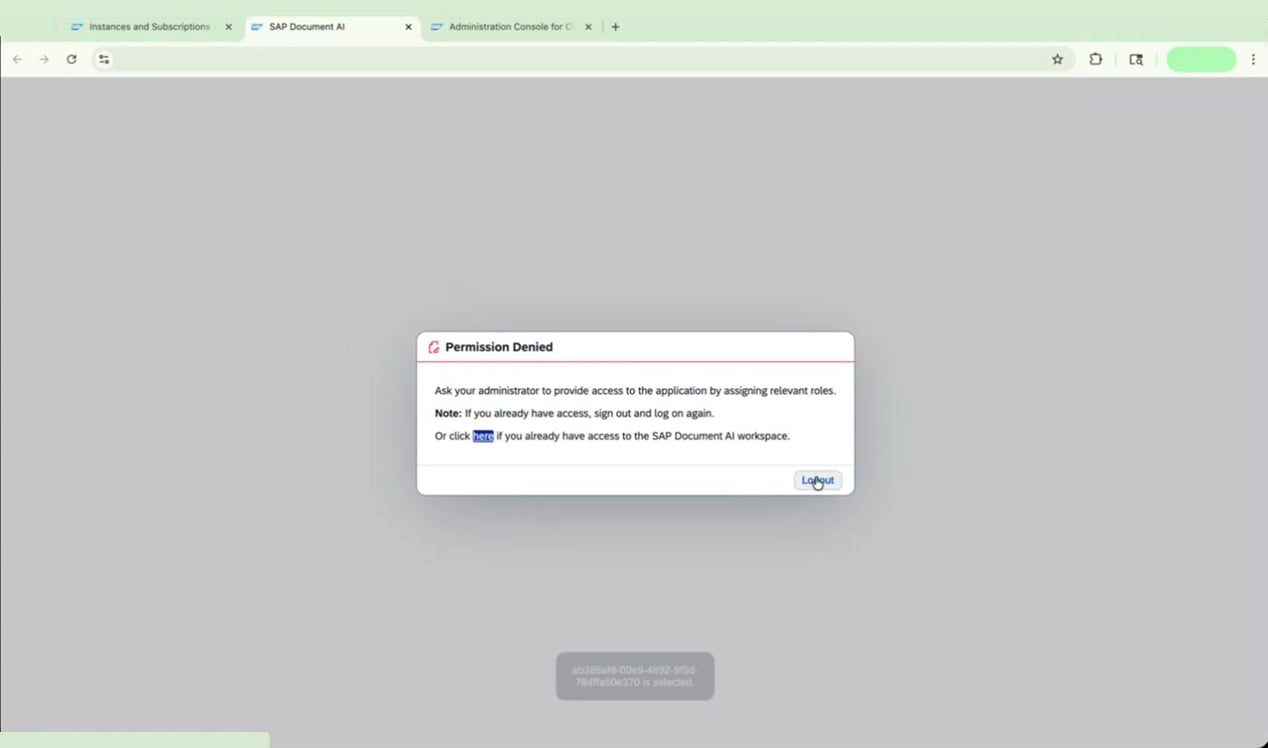
### Troubleshoot "Permission Denied" Errors
Even after assigning role collections, you may encounter a "Permission Denied" error when first opening the SAP Document AI workspace. Follow these steps to resolve it.
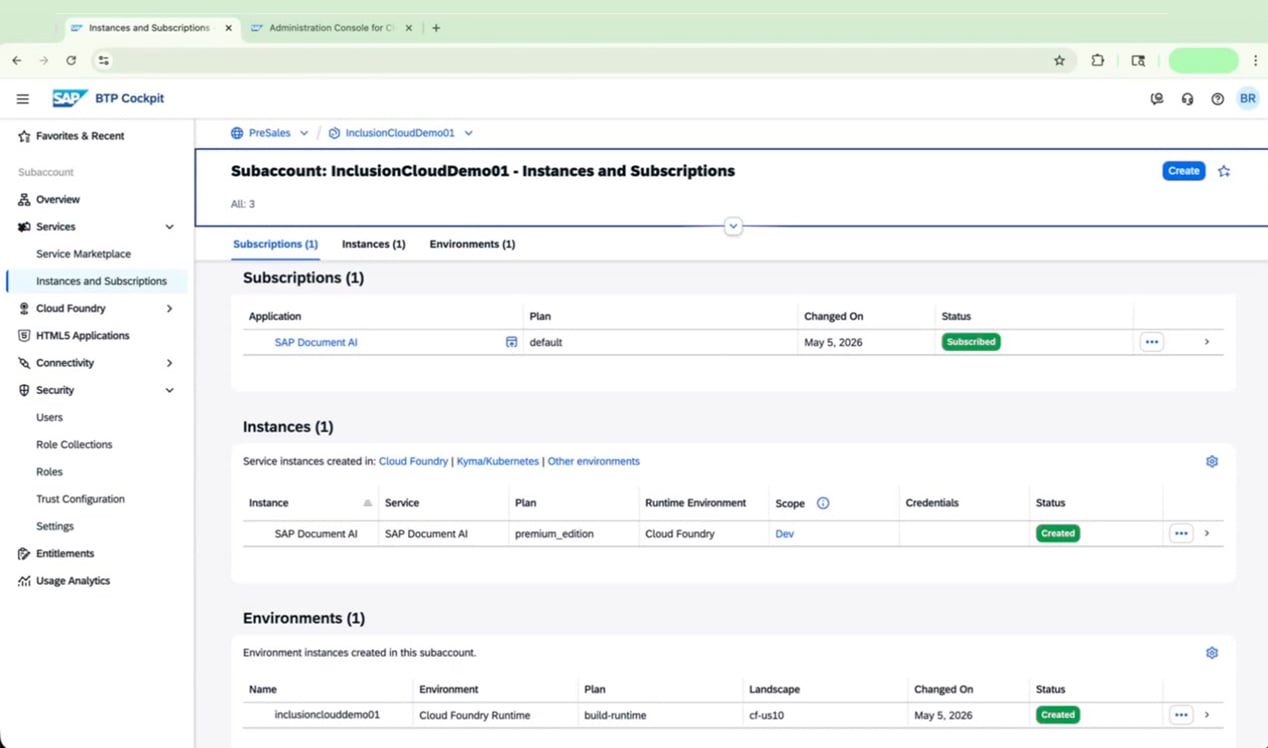
Once the instance status shows **Created**, confirm the subscription is also **Subscribed** on the **Instances and Subscriptions** page.
Do not attempt to open the SAP Document AI application until the service instance status shows **Created**. Accessing it too early will result in errors.
### Troubleshoot "Permission Denied" Errors
Even after assigning role collections, you may encounter a "Permission Denied" error when first opening the SAP Document AI workspace. Follow these steps to resolve it.
Once the instance status shows **Created**, confirm the subscription is also **Subscribed** on the **Instances and Subscriptions** page.
 Open the SAP Document AI workspace URL. If the screen loads blank or you see a **Permission Denied** dialog, don't worry — this is a common issue related to identity provider mismatches.
 Return to the SAP BTP Cockpit tab and re-authenticate if needed. When prompted, sign in using the correct identity provider credentials.
 If the Permission Denied error persists after signing in, navigate to **Security > Users** in SAP BTP Cockpit and check which identity provider is listed for your user.
 If the user is associated with the wrong identity provider, delete that user entry and confirm the deletion.
Select the correct user under the **business users** identity provider. Open their details pane, click **Add Role Collection**, and assign the required Document AI role collections.
Verify that the following role collections now appear under the business user's profile:
* `Document_Information_Extraction_UI_Document_Viewer`
* `Document_Information_Extraction_UI_End_User`
* `Document_Information_Extraction_UI_Templates_Admin`
If the user is associated with the wrong identity provider, delete that user entry and confirm the deletion.
Select the correct user under the **business users** identity provider. Open their details pane, click **Add Role Collection**, and assign the required Document AI role collections.
Verify that the following role collections now appear under the business user's profile:
* `Document_Information_Extraction_UI_Document_Viewer`
* `Document_Information_Extraction_UI_End_User`
* `Document_Information_Extraction_UI_Templates_Admin`
 Confirm that the user with the assigned role collections is using the **business users** identity provider, not the default identity provider.
 A "Permission Denied" error after login almost always means the role collections are assigned to a user under the wrong identity provider. Deleting the incorrect user entry and reassigning roles under the **business users** provider resolves this.
You're now ready to access and use the SAP Document AI application.
***
## Chapter 3: Finalize Your Document AI Configuration
With the core setup complete, this chapter walks you through the final configuration steps inside the SAP Document AI interface — including document retention, Instant Learning, and Data Feedback settings — and shows you how to review user access in the SAP BTP Cockpit.
### Log In and Navigate the Interface
From your BTP Cockpit subaccount applications and subscriptions, access the **SAP Document AI** application.
A "Permission Denied" error after login almost always means the role collections are assigned to a user under the wrong identity provider. Deleting the incorrect user entry and reassigning roles under the **business users** provider resolves this.
You're now ready to access and use the SAP Document AI application.
***
## Chapter 3: Finalize Your Document AI Configuration
With the core setup complete, this chapter walks you through the final configuration steps inside the SAP Document AI interface — including document retention, Instant Learning, and Data Feedback settings — and shows you how to review user access in the SAP BTP Cockpit.
### Log In and Navigate the Interface
From your BTP Cockpit subaccount applications and subscriptions, access the **SAP Document AI** application.
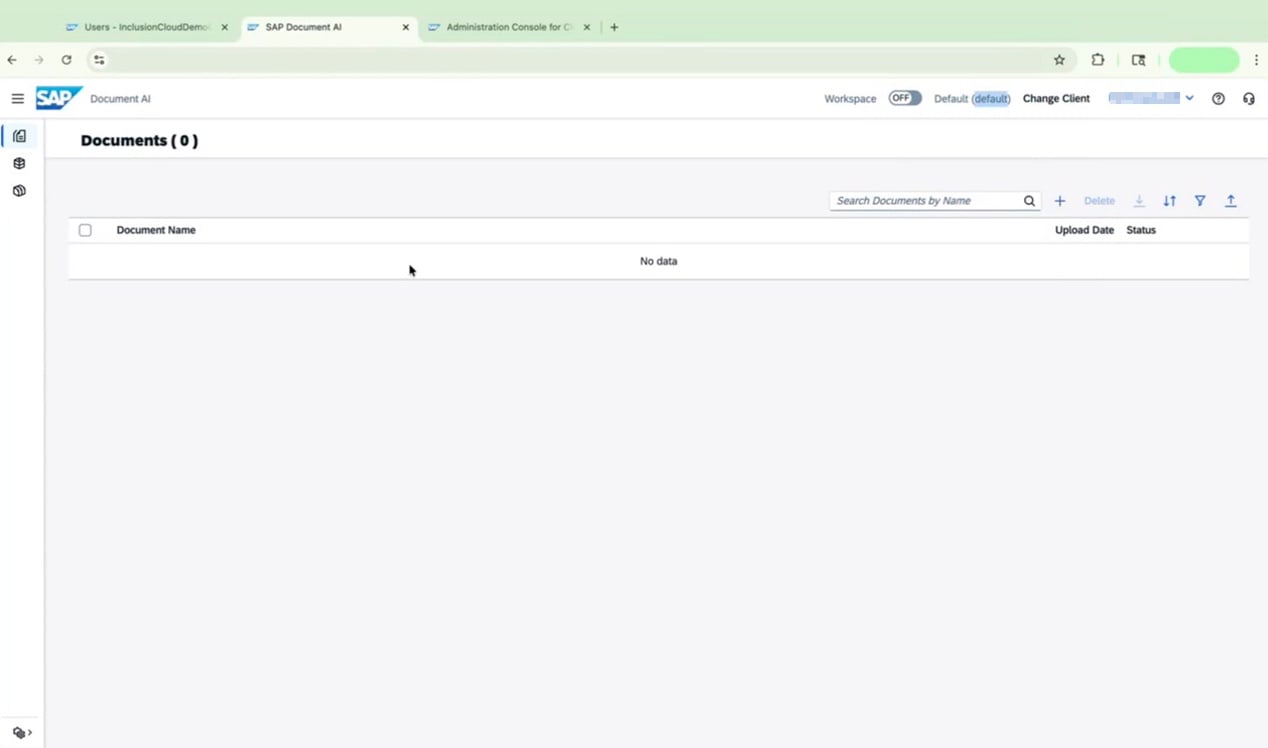
 Once logged in, navigate to the SAP Document AI interface. You may initially land on the old UI, which displays a simple document list with limited options. To access the full feature set, click **Workspace** to switch to the new UI.
 The new UI presents a more modern interface with a sidebar on the left and a blank workspace area. Sidebar options include **All Documents**, **Schemas**, **Channels**, **Workflows**, and **Transports**.
 ### Open the Configuration Screen
In the sidebar, click **All Documents** to explore document management features. You can use the search and filter options at the top to locate specific documents. If no documents are found, the system will prompt you to adjust your search or filter criteria.
### Open the Configuration Screen
In the sidebar, click **All Documents** to explore document management features. You can use the search and filter options at the top to locate specific documents. If no documents are found, the system will prompt you to adjust your search or filter criteria.
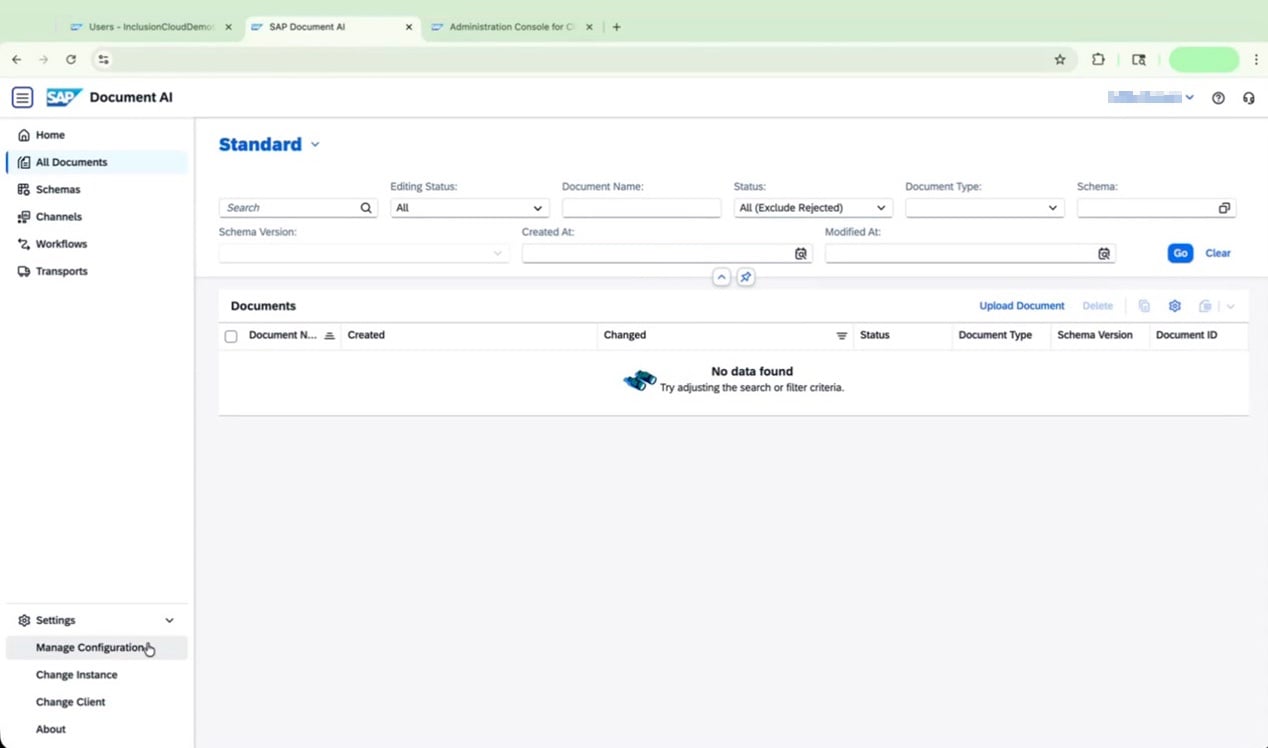 At the bottom left of the sidebar, click **Settings** and then select **Manage Configuration** to open the configuration screen.
### Configure Document Retention, Learning, and Feedback
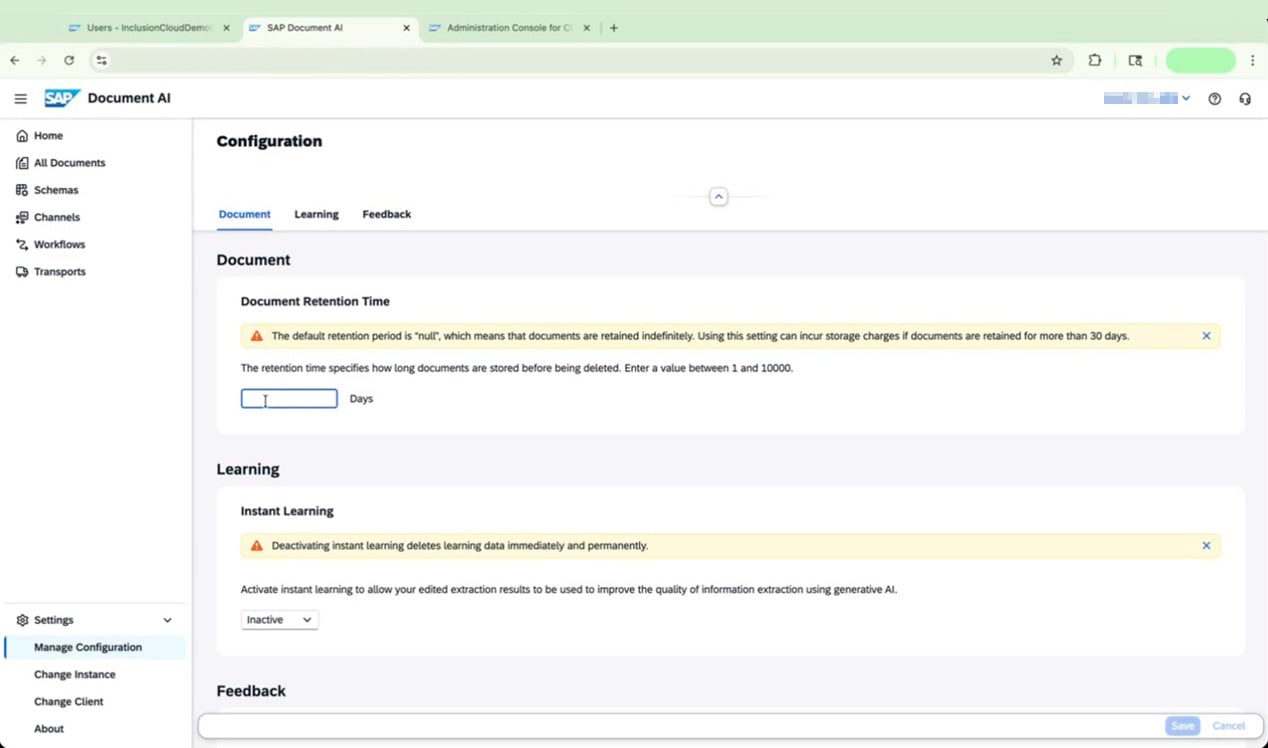
Under **Document Retention Time**, enter the number of days you want documents to be retained (between 1 and 10,000).
For a new environment, a retention period of **365 days** is recommended as a starting point.
Under **Learning**, find the **Instant Learning** dropdown and select **Active**.
At the bottom left of the sidebar, click **Settings** and then select **Manage Configuration** to open the configuration screen.
### Configure Document Retention, Learning, and Feedback
Under **Document Retention Time**, enter the number of days you want documents to be retained (between 1 and 10,000).
For a new environment, a retention period of **365 days** is recommended as a starting point.
Under **Learning**, find the **Instant Learning** dropdown and select **Active**.
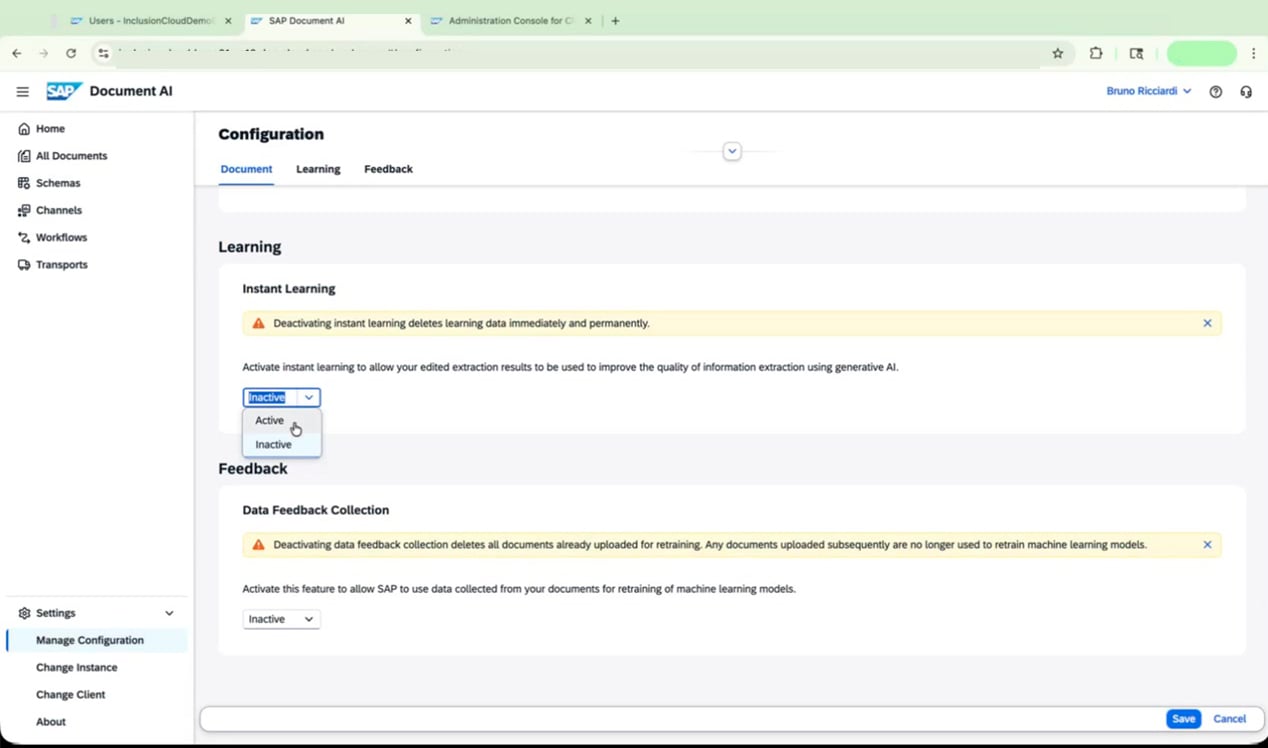 Activating Instant Learning allows edited extraction results to improve information extraction using generative AI. If you later deactivate this setting, **all learning data is deleted immediately and permanently** — this action cannot be undone.
Under **Feedback**, find the **Data Feedback Collection** dropdown and select **Active**.
Activating Instant Learning allows edited extraction results to improve information extraction using generative AI. If you later deactivate this setting, **all learning data is deleted immediately and permanently** — this action cannot be undone.
Under **Feedback**, find the **Data Feedback Collection** dropdown and select **Active**.
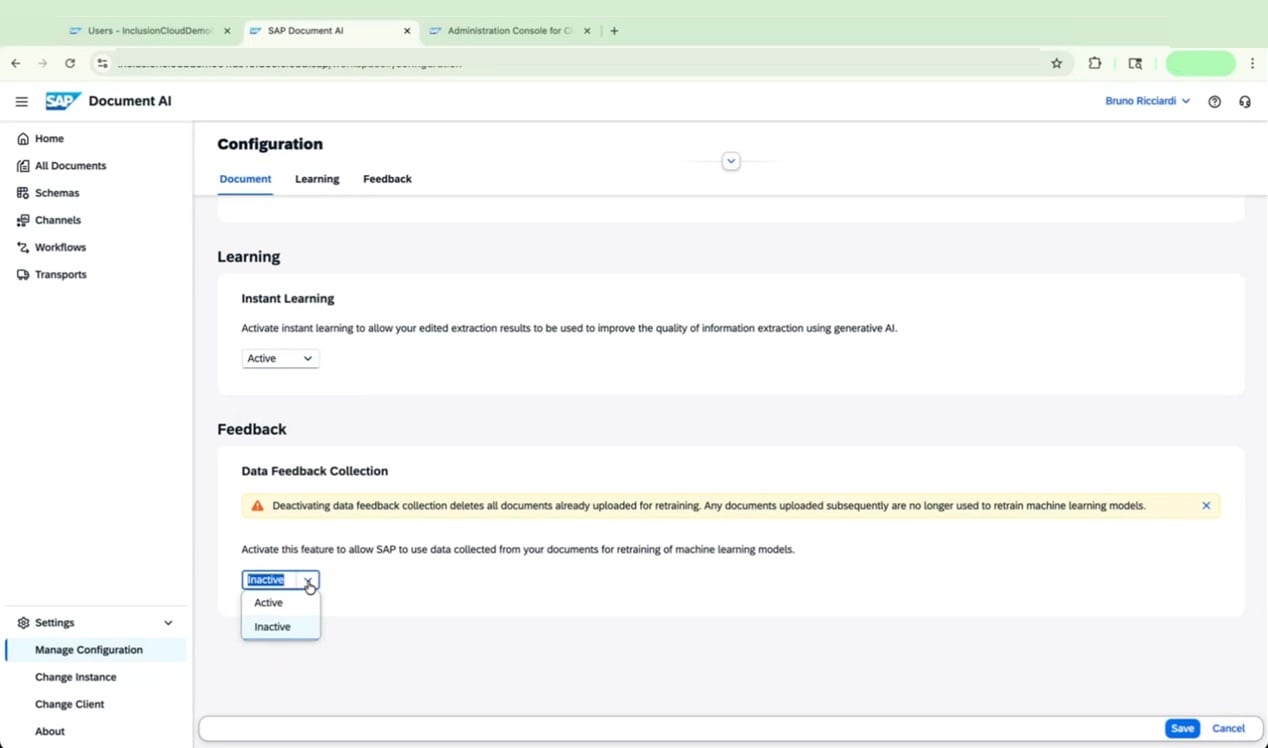 Activating Data Feedback Collection allows SAP to use your document data for retraining machine learning models. If you later deactivate this setting, **all documents already uploaded for retraining are permanently deleted** — this action cannot be undone.
 ### Save and Confirm Your Settings
Click the **Save** button at the bottom right of the configuration screen. Wait for the **Configurations Saved** confirmation message to appear before navigating away.
### Save and Confirm Your Settings
Click the **Save** button at the bottom right of the configuration screen. Wait for the **Configurations Saved** confirmation message to appear before navigating away.
 Review your saved settings to confirm everything is configured as intended. You can also browse the **Schemas** section in the sidebar to review the schemas provided by SAP.
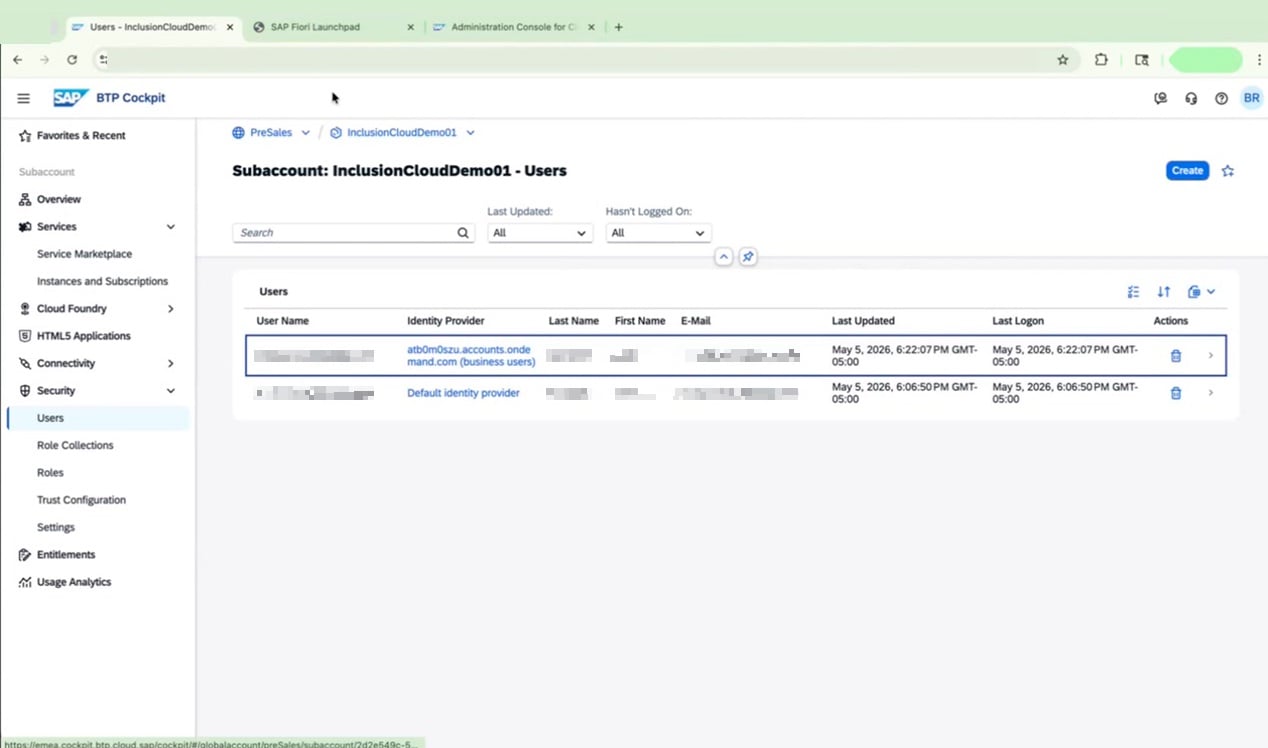
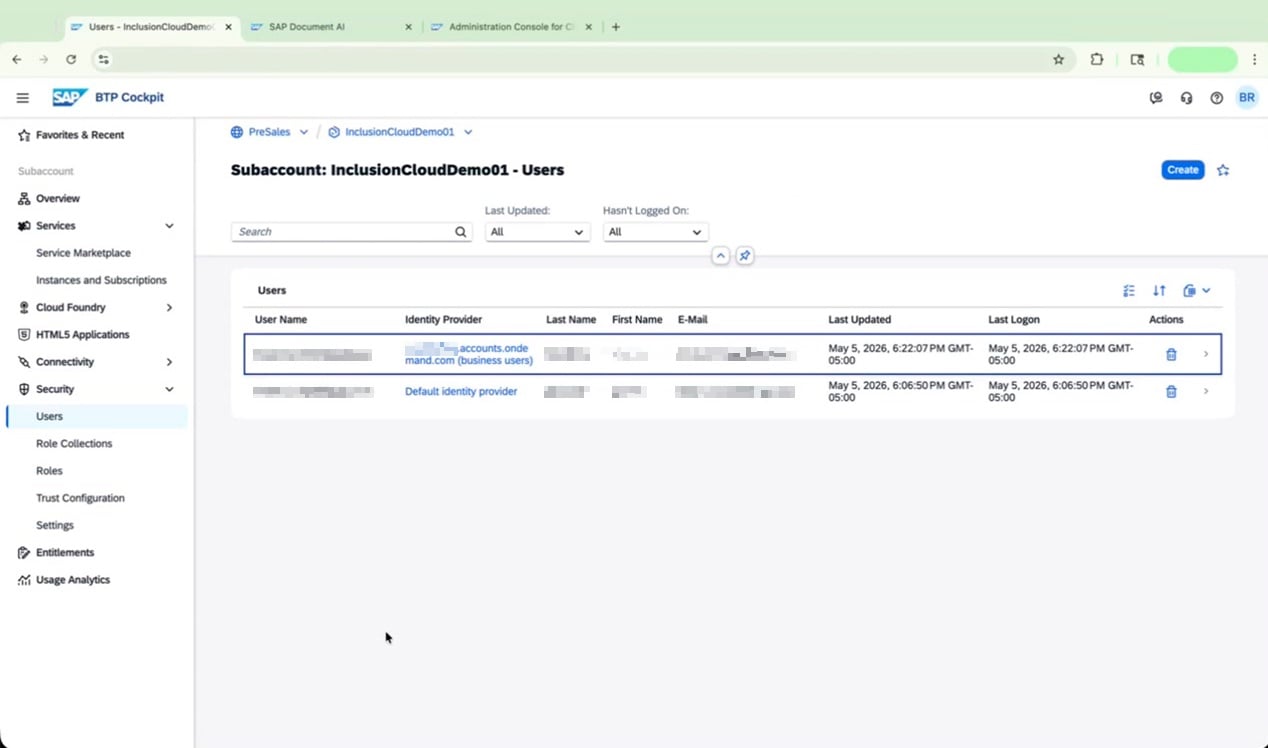
 ### Review User Access in SAP BTP Cockpit
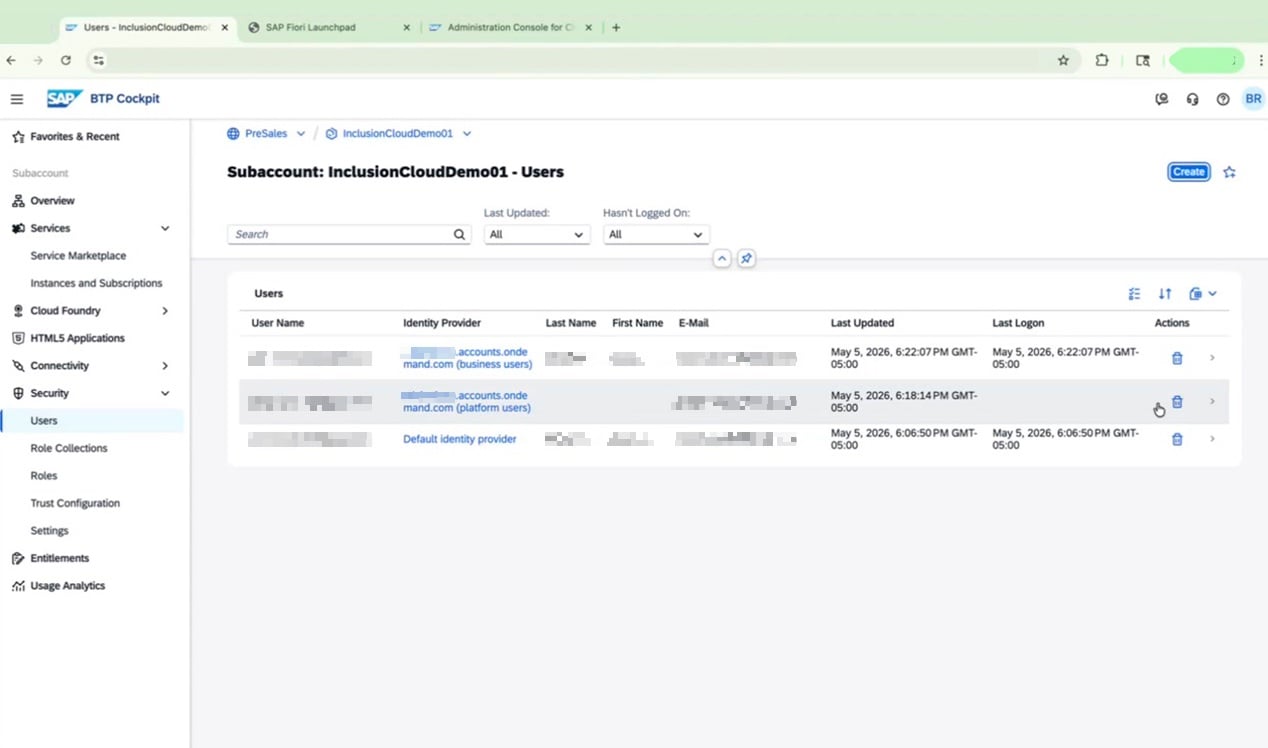
Navigate to the SAP BTP Cockpit and open your subaccount. Go to **Security > Users** to review who has access to your environment.
Verify the details shown for each user, including User Name, Identity Provider, Last Name, First Name, E-Mail, Last Updated, and Last Logon. Confirm that only authorized users appear in the list.
### Review User Access in SAP BTP Cockpit
Navigate to the SAP BTP Cockpit and open your subaccount. Go to **Security > Users** to review who has access to your environment.
Verify the details shown for each user, including User Name, Identity Provider, Last Name, First Name, E-Mail, Last Updated, and Last Logon. Confirm that only authorized users appear in the list.
 Your SAP Document AI environment is now fully configured and ready for use. 🎉
***
## Frequently Asked Questions
Three plans are available: `blocks_of_100`, `default`, and `premium_edition`.
* For the **service instance**, select **premium\_edition**.
* For the **application subscription**, select **default**.
Both are required for a complete setup.
The message "You have already assigned all the available quota for this service plan in your global account" means your global account has no remaining quota for that service plan. You must either purchase additional quota or release quota from another subaccount before you can proceed with adding the entitlement.
Yes. The correct entry depends on whether your customer has IAS configured:
* **IAS configured:** Select the entry whose name ends in `-ias` (for example, `document-information-extraction-application-ias`) and choose the **premium\_edition** plan.
* **IAS not configured:** Select the entry **without** the `-ias` suffix.
Provisioning can take **up to 30 minutes**. You must wait until both the service instance shows **Created** and the subscription shows **Subscribed** before attempting to access the SAP Document AI application. Accessing the application too early will result in errors.
This almost always means the role collections are assigned to a user under the wrong identity provider. Check the user's identity provider in **Security > Users** in the SAP BTP Cockpit. If the user is listed under the wrong provider, delete that user entry and reassign the required role collections to the user under the **business users** identity provider.
The following three role collections must be assigned to each user who needs access:
* `Document_Information_Extraction_UI_Document_Viewer`
* `Document_Information_Extraction_UI_End_User`
* `Document_Information_Extraction_UI_Templates_Admin`
Both actions are **irreversible**, so exercise caution:
* Deactivating **Instant Learning** deletes all learning data immediately and permanently.
* Deactivating **Data Feedback Collection** deletes all documents already uploaded for retraining.
Yes. The default value is "null," which retains documents indefinitely. Retaining documents for more than 30 days may incur storage charges. Set a specific retention period (between 1 and 10,000 days) based on your organization's requirements and cost considerations.
Your SAP Document AI environment is now fully configured and ready for use. 🎉
***
## Frequently Asked Questions
Three plans are available: `blocks_of_100`, `default`, and `premium_edition`.
* For the **service instance**, select **premium\_edition**.
* For the **application subscription**, select **default**.
Both are required for a complete setup.
The message "You have already assigned all the available quota for this service plan in your global account" means your global account has no remaining quota for that service plan. You must either purchase additional quota or release quota from another subaccount before you can proceed with adding the entitlement.
Yes. The correct entry depends on whether your customer has IAS configured:
* **IAS configured:** Select the entry whose name ends in `-ias` (for example, `document-information-extraction-application-ias`) and choose the **premium\_edition** plan.
* **IAS not configured:** Select the entry **without** the `-ias` suffix.
Provisioning can take **up to 30 minutes**. You must wait until both the service instance shows **Created** and the subscription shows **Subscribed** before attempting to access the SAP Document AI application. Accessing the application too early will result in errors.
This almost always means the role collections are assigned to a user under the wrong identity provider. Check the user's identity provider in **Security > Users** in the SAP BTP Cockpit. If the user is listed under the wrong provider, delete that user entry and reassign the required role collections to the user under the **business users** identity provider.
The following three role collections must be assigned to each user who needs access:
* `Document_Information_Extraction_UI_Document_Viewer`
* `Document_Information_Extraction_UI_End_User`
* `Document_Information_Extraction_UI_Templates_Admin`
Both actions are **irreversible**, so exercise caution:
* Deactivating **Instant Learning** deletes all learning data immediately and permanently.
* Deactivating **Data Feedback Collection** deletes all documents already uploaded for retraining.
Yes. The default value is "null," which retains documents indefinitely. Retaining documents for more than 30 days may incur storage charges. Set a specific retention period (between 1 and 10,000 days) based on your organization's requirements and cost considerations.